Lab 3: Build-a-Bot
- Checkpoint: Monday, February 10, 11:59pm EST
- Deadline: Monday, February 24, 11:59pm EST
Overview
Learning Goals
By the end of this lab you will be able to...
- Web Development: Build a dynamically-served website with a conversational agent using Flask, HTML, CSS, and JavaScript. You'll also learn about different types of HTTP requests and how to connect your front-end UI to your back-end server.
- Prompt Engineering: Systematically design and evaluate prompts for conversational agents.
- Social Computing: Understand how to evaluate the effectiveness of a conversational agent.
Before you begin...
"Any sufficiently advanced technology is indistinguishable from magic ✨." -Arthur C. Clarke.
This is a two-week lab that consists of two parts. The first part involves setting up your web server and front-end UI, and getting familiar with prompting. The second part involves customizing your conversational agent to help teach conflict resolution.
Background
Conversational agents (CAs) have come a long way from their first appearance in the 1960s to today’s generative models. Continuous technological advancements such as statistical computing and large language models allow for an increasingly natural and effortless interaction, as well as domain-agnostic deployment opportunities.
One of the earliest CAs, ELIZA, was developed in 1966 by Joseph Weizenbaum, who created a computer program that could communicate with humans via a text-based interface. These text-based communication programs were followed by voice-based interaction systems and embodied CA. ELIZA simulated conversation by using a pattern matching and substitution methodology that gave users an illusion of understanding on the part of the program, but had no representation that could be considered really understanding what was being said by either party.

Since then, CAs have come a long way. CAs are being used in a variety of applications, from customer service and mental health support to programming and education. OpenAI's most recent CA, Operator takes things up a few notches. Users can interact with Operator like any CA, but it is also an agent that can go to the web to perform tasks for you. Using its own browser, it can look at a webpage and interact with it by typing, clicking, and scrolling. A journlist recently reported being able to use Operator to: (1) order a new ice cream scoop on Amazon, (2) buy anew domain name and configured its settings, (3) book a Valentine’s Day date for him and my wife, and (4) schedule a haircut.
We won't be making such large advances in this lab. However, we will be replicating recent research on prompt engineering for conversational agents to build a CA that can help teach conflict resolution. Prompt engineering is the process of designing prompts that guide users to provide the information needed to complete a task.
Requirements
By the checkpoint, you should have:
-
Set up your flask server with two pages: (1) a homepage ("/") and (2) a page for your conversational agent ("/chat/"). Each page should extend a "base.html" HTML template that includes a header, footer, and navigation bar.
-
Homepage: Create and style a homepage for your conversational agent. This includes:
- 2.1 A navigation bar with: (1) a logo, (2) a relevant name for your CA, and (3) links to both pages. You can use Adobe Firefly to generate a logo royalty-free or you can design one yourself. You'll need to login with your Swat credentials.
- 2.2 Display two example conversations with your CA using only HTML, CSS, and JavaScript. Screenshots are not allowed; the conversations need to be styled using CSS.
- 2.3 A footer with your names, year, and copyright.
-
Chat:
- Customize the default chat page (e.g., button color, style, background color, etc.), and ensure that the UI:
- Displays the chatbot's messages on the left side of the screen and the user's messages on the right side.
- Correctly renders "\n"s generated by the chatbot as new lines by modifying JS code.
- Includes a toggle that turns on and off
funnymode. In funny mode, the CA should include a joke before it responds to the user, otherwise it should respond normally. The toggle needs to be integrated cleanly into the chat UI. - Includes a fastforward button that prompts the CA to predict what the user's next message will be. The CA should respond with a message that it thinks the user will send next, with the preface: "Wait, let me guess what you're going to say next:". The predicted text should be different color and the fastforward button needs to be integrated cleanly into the chat UI.
- Modify
utils.pyto keep track of message history in a dictionary so that the CA can refer back to previous messages and provide contextualized responses.
- Customize the default chat page (e.g., button color, style, background color, etc.), and ensure that the UI:
-
Your project should have the following file structure:
build-a-bot/
└── templates/
│       ├── base.html
│       ├── home.html
│       └── chat.html
│   └── static/
│       ├── css/
│       │   └── base.css
│       │   └── chat.css
│       ├── js/
│       │   └── chat.js
│       └── images/
│           └── logo.png
├── app.py
├── utils.py
├── requirements.txt
├── .gitignore
└── README.md- README.md file with instructions on how to install all of the requirements for your project and run your flask server. (Anyone who reads your README should be able to set up and run your project on their local machine assuming they have python, pip, and uv pre-installed.)
By the deadline, your project should:
- Show the user the pre-specified premise, as described in Section 2.2.1.
- Allow the user to interact with the CA, as described in Section 2.2.2.
- When the user reaches a predicted cooperative state (
Cooperativeness>=3) or when they have sent at least 7 messages, create an alert that informs users they have succeeded in resolving the conflict.
- The
fast forwardbutton should predict the CA's response to the user's current message. The predicted text should be displayed in a different color, and should not be included in the chat history. - Develop two IRP functions:
classify_input(): the classification function classifies a user's message into one of the 8 strategies given the message history and the current message to classify (see Sec. 2.3.1). This classification function should occur in a separate ChatGPT instance such that the current conversation's message history does not change.generate_response(): the response generation function generates a message from the CA given a strategy (chosen at random, see Sec. 2.3.2). This function should occur in the same ChatGPT instance such that the current conversation's message history is included. However, if this function is a result of thefastforwardbutton being pressed, the message history should not be updated.
- Use these functions to implement the IRP pipeline described in Sec. 2.4.
Stretch Goal:
- Let user enter their own premise.
Setup
a. Clone Your Lab Repository
Get your Lab SSH URL from the CS77-S25 GitHub organization. The repository to clone is named Lab3-<userID1>-<userID2>.
$ git clone [your lab2-userID1-userID2 url]
$ cd lab3-userID1-userID2
$ ls
- Here's a handy visual guide to help you better understand git.
- If you need help getting your git ssh keys setup or cloning the repository, please refer to the using git guide.
- If you are having trouble ssh-ing into a lab machine, make sure you've followed the instructions in the ssh setup guide.
b. [Optional, Recommended] Establish Your Partnership
You'll need to work with a partner for this lab. Teams are a common feature of the workplace, in virtually every industry; and HCI, UX, and Software Engineering are no exception. Many of you will have been, or currently are, involved in work teams, either formally or informally. In both face-to-face and remote contexts, team members have to practice good communication and collaboration. Job descriptions routinely ask for these skills, and I hope this class will help you to develop and reflect on these skills.
If you haven't already, read the syllabus for tips on effective teamwork. It's good to set expectations before you start a project so you have something to refer back to if (when) you encounter friction in your partnership.
Now, sit next to your partner and create a team compact. The team compact should include:
- Team Name: Come up with a team name that represents your partnership.
- Team Members: List the names of your team members.
- Meeting Times: List the times you plan to meet outside of class.
- Communication: How will you communicate with each other? (e.g., Slack, Discord, text, email)
- Conflict Resolution: How will you resolve conflicts that arise during the lab? Feel free to use me as a scapegoat: “Prof. V will not find this convincing. Why don’t we try…?”
- Division of Labor: How will you divide the work? Will you work on different parts of the lab or work together on everything? Remember, if one person does all the work, you won't be able to make much progress in a future lab. You also have to fill in a partnership survey at the end of each lab to indicate how much you and your partner contributed to the lab.
- Timeline: What is your timeline for completing the lab? When will you have certain requirements completed?
c. Get Your OpenAI API Key
You should have received an invite to join the College's OpenAI organization, with the subject "You were invited to the organization Swarthmore College on OpenAI" from noreply@tm.openai.com. If you haven't received an invite, please let me know.
Once you've accepted the invite and created an account, you will be able to generate API key. You can find the API key by going to the OpenAI API page, or click on the settings gear in the top right corner, then API key on the left menu bar.

Now, generate your API key by clicking on the + Create new secret key button. Choose an appropriate name, select CS77-S25-SocialComputing as the project, and grant all permissions. After you click create secret key, you will be able to view your API key. Copy it to a api_key.txt file in your lab3 directory; this is the only time you will be able to view your API key. Do not share your API key with anyone else. Also make sure that api_key.txt is added you your .gitignore file so that it is not pushed to your repository. This can be a security risk!
d. Set Up Your Virtual Environment
-
In your lab repository, create a virtual environment.:
python3 -m venv .venv -
To activate your virtual environment, type
source .venv/bin/activate. You should see your shell change to have a(.venv)prefix. -
To deactivate your virtual environment, type
deactivate. -
Check that your virtual environment is using the correct version of Python:
(.venv) $ which python
<path_to_directory>/.venv/bin/python -
Great, now install Flask, OpenAI and other required Python libraries:
pip install flask flask_cors openai
#OR
pip install -r requirements.txt
d. Run Your Flask App
If your main flask application is set up in a file called app.py, you can start your flask web server using the following command:
flask run --debug --reload
If your main flask application has another name, say chatbot.py, you can start your flask web server using the following command:
flask --app chatbot run --debug --reload
The --debug and --reload flags will automatically restart your sever if you make changes to files.
Part 1: Conversations and Context
When you make an API call to OpenAI's GPT model, it does not automatically remember previous interactions. Instead, you, the programmer, must keep track of the conversation history and provide it to the model as context.
While each text generation request is independent and stateless (unless you're using assistants), you can still implement multi-turn conversations by providing additional messages as parameters to your text generation request. Consider a "knock knock" joke:
client = OpenAI()
response = client.chat.completions.create(
  model: "gpt-4o-mini",
  messages: [
    {
      "role": "user",
      "content": [{ "type": "text", "text": "knock knock." }]
    },
    {
      "role": "assistant",
      "content": [{ "type": "text", "text": "Who's there?" }]
    },
    {
      "role": "user",
      "content": [{ "type": "text", "text": "Orange." }]
    }
  ],
  store: true
)
By using alternating user and assistant messages, you capture the previous state of a conversation in one request to the model.
1.1 Token Limits
As your inputs become more complex, or you include more turns in a conversation, you'll need to consider both output token and context window limits. Model inputs and outputs are metered in tokens, which are parsed from inputs to analyze their content and intent and assembled to render logical outputs. Models have limits on token usage during the lifecycle of a text generation request.
Output tokens are the tokens generated by a model in response to a prompt. Each model has different limits for output tokens. For example, gpt-4o-2024-08-06 can generate a maximum of 16,384 output tokens. A context window describes the total tokens that can be used for both input and output tokens (and for some models, reasoning tokens). Compare the context window limits of our models. For example, gpt-4o-2024-08-06 has a total context window of 128k tokens. If you create a very large prompt (usually by including a lot of conversation context or additional data/examples for the model), you run the risk of exceeding the allocated context window for a model, which might result in truncated outputs.
Use the tokenizer tool, built with the tiktoken library, to see how many tokens are in a particular string of text.
1.2 Prompt Caching
Although you need to provide context manually, OpenAI does take advantage of prompt caching. Model prompts often contain repetitive content, like system prompts and common instructions. OpenAI routes API requests to servers that recently processed the same prompt, making it cheaper and faster than processing a prompt from scratch. This can reduce latency by up to 80% and cost by 50% for long prompts. Prompt caching works automatically on all your API requests (no code changes required) and has no additional fees associated with it.
Make sure you use a model that has prompt caching enabled: gpt-4o, gpt-4o-mini, o1-preview or o1-mini. For this lab, gpt-4o-mini will suffice; gpt-4o is more resource and cost intensive.
You have to structure your prompts to take advantage of caching. Cache hits are only possible for exact prefix matches within a prompt. To realize caching benefits, place static content like instructions and examples at the beginning of your prompt, and put variable content, such as user-specific information, at the end. This also applies to images and tools, which must be identical between requests.

Caching is enabled automatically for prompts that are 1024 tokens or longer. When you make an API request, the following steps occur:
- Cache Lookup: The system checks if the initial portion (prefix) of your prompt is stored in the cache.
- Cache Hit: If a matching prefix is found, the system uses the cached result. This significantly decreases latency and reduces costs.
- Cache Miss: If no matching prefix is found, the system processes your full prompt. After processing, the prefix of your prompt is cached for future requests.
Cached prefixes generally remain active for 5 to 10 minutes of inactivity. However, during off-peak periods, caches may persist for up to one hour.
Best Practices
- Structure prompts with static or repeated content at the beginning and dynamic content at the end.
- Monitor metrics such as cache hit rates, latency, and the percentage of tokens cached to optimize your prompt and caching strategy.
- To increase cache hits, use longer prompts and make API requests during off-peak hours, as cache evictions are more frequent during peak times.
- Prompts that haven't been used recently are automatically removed from the cache. To minimize evictions, maintain a consistent stream of requests with the same prompt prefix.
Part 2: Implementing IRP Prompting
Congratulations! You now have a functional conversational agent. Now it's time to dial up the complexity: in Part 2, you will be implementing the Interest-Rights-Power (IRP) prompting method from Shaikh et al. (CHI 2024). If you weren't able to do the reading, please go back and read it now.
Here's a video summary of the paper to refresh your memory:
2.1 READ ME
Instead of framing conflict as constructive vs. destructive, Ury et al. frames conflict as a division across three categories: Interests, Rights, and Power. At a high level, the Interests strategy focuses on building common ground between both participants. While using Interests, both parties will actively problem solve, cooperatively discovering interests that lead to an eventual resolution. Importantly, Interests focuses on healthy future outcomes of a conflict, integrating concerns, needs, fears, and desires of both parties (e.g. “Let’s try to work things out here”). Cooperative conflict builds mostly on interests. However, conflict usually escalates to rights or power. When using Rights, an individual will appeal to fixed norms or standards to justify their position (e.g. “That’s not allowed according to our contract”). Finally, Power strategies draw on coercion and threats, and are often attacking or accusatory—this strategy imposes an explicit burden on another person (e.g. “I’m going to fire you.’)
Conflicts also have a tendency to spiral out of control, especially when contentious resolution strategies are repeatedly used. Brett et al. highlight how reciprocating with Power or Rights can escalate the conflict to a state where returning to cooperation becomes exceedingly difficult. Careful use of conflict strategies early in a conversation can significantly impact the likelihood of a healthy outcome.
A set of conflict resolution strategies and corresponding examples from Brett et al. are listed below. Strategies can be separated into three broad categories: cooperative, neutral, and competitive. To ground LLM generations, we strategically plan and generate messages that adhere to the above strategies.
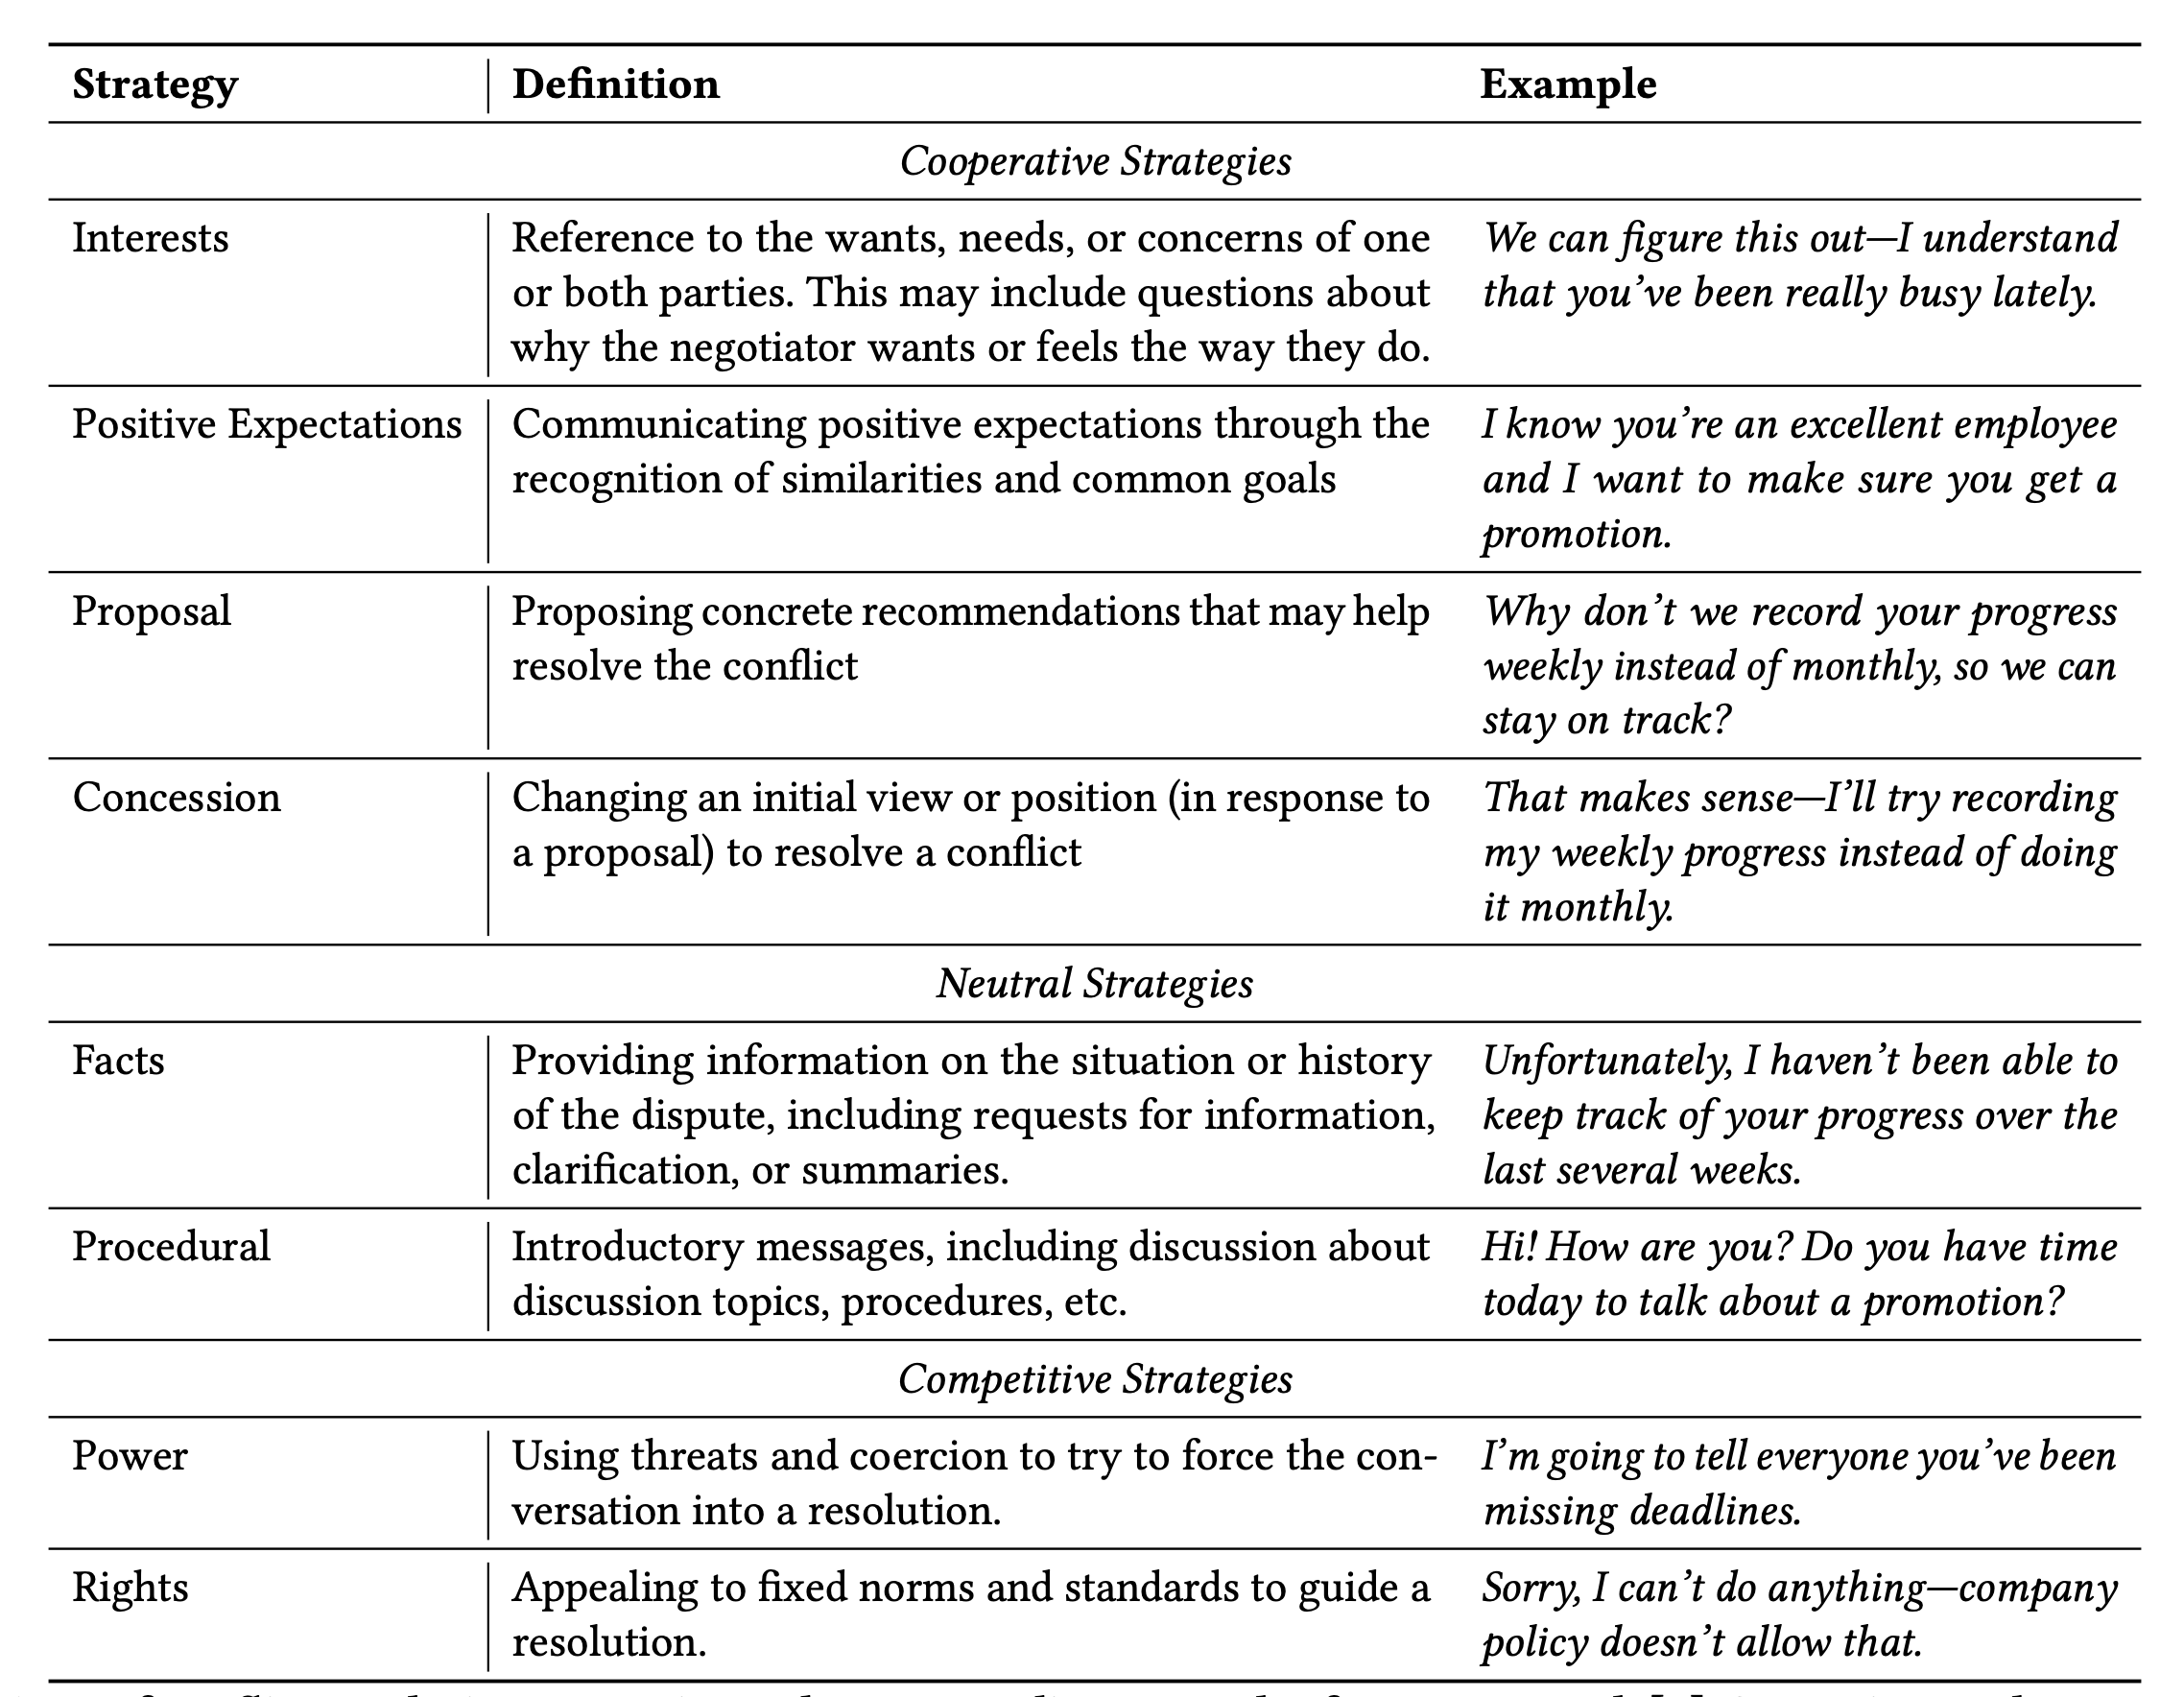
In IRP prompting, you will leverage the IRP framework to ground the CA's responses. Instead of directly generating conflict dialogue from a large space of potential outputs, you will instead classify the CA's next conflict strategy based on the current conversation, and then generate messages conditioned on that explicit conflict resolution strategy.
The original Rehearsal system enabled enable two broad sets of interactions/views (simulation and feedback). For this lab assignment, you will only need to allow the first interaction: interfacing with a conflict simulation.
2.2 Conflict Simulation: Interacting with a Faithful Conflict
2.2.1 Conflict Premises
Experts who teach roleplay use collections of pre-authored conflict settings, such as Harvard’s Program on Negotiation. For this lab, we're using a modified premise from the Rehearsal paper. Below is a description that you'll need to show to users:
The complaints clerk (Tahani) in a department store sees a customer (Eleanor) coming with a blender. The store cannot return these items to the manufacturer. Tahani has a small weekly budget to absorb the cost of such items, if returned, and the department head has instructed that it be used sparingly. The budget for this week is overspent. Eleanor, having used the blender for over a week, believes it is either defective or an inadequate appliance, and has therefore decided to return it.
You are free to modify it or create your own premise. Premises should only include two individuals and be self-contained (it doesn't require any additional context). The premise should also be designed to be resolved in a cooperative manner, as the goal is to teach users how to resolve conflicts.
You can download the full premise here. Save it as irp.txt in your Flask working directory.
2.2.2 Engaging with a Simulated Conflict
After the user reads about the conflict at hand (the premise), they can engage with the conversational agent (CA). The CA always begins in a dissatisfied state and sends the first message in the conversation. The user is then prompted to reply to the simulated message.
When the user sends a message, your system classifies their dialogue into the strategy being used, e.g., proposal, interests, rights, power, etc.
The simulated conflict continues until the internal conflict resolution score predicts that the conflict is least likely to escalate and the CA is in a satisfied state — analogous to cooperative conflict. In other words, an alert informs users when users reach a predicted cooperative state (Cooperativeness >=3) or when they have sent at least 7 messages. However, if the user feels that a conflict has gone completely of the rails, they can refresh the page to restart the conversation.
Furthermore, users can click the fastforward button to view a predicted reply to their own message. Clicking the fastforward button multiple times generates a different variation. In this way, users can experiment with how the CA reacts both to their message and the generated, potentially more cooperative, messages.
2.3 Your IRP Functions
For your system to work as intended, it must predict which conflict strategy was used by the user and generate counterfactual inputs grounded in IRP. To this end, the IRP planning component plans and constrains generation to the 8 discrete conflict resolution strategies in the outlined IRP framework. Planning and classifying utterances within the IRP framework provides a high-level grounding for each conversation.
Still, why should we expect a descriptive framework of conflict (e.g. IRP) to improve the planning capabilities of an out-of-the-box LLM? We borrow from the same intuition powering chain-of-thought prompting and prompt-chains: out-of-the-box LLMs must sample representative conflict, in one shot, from an exponentially large space of potentially undesirable generations.
Prompt-chaining with a descriptive framework reduces the likelihood of undesirable outputs. Similarly, expert roleplay is fairly strategic in nature—experts think carefully about which strategies are practical and representative of realistic behavior. By enforcing controlled generation through strategy planning, Rehearsal simulates expert roleplay, planning a conversation using finer-grained conflict resolution units.
To control generation, your planning prompt should support two interrelated functions: (1) classify a free-form message into one of the 8 Interests-Rights-Power strategies and (2) generate a message given a strategy.
The pipeline is predicated on the following set of instructions at the bottom of your premise:
Format ALL of your message as follows. Only complete the <fill in> fields. Copy all fields that do not have a <fill in> value.
From: <fill in>
Cooperativeness: <fill in>
Strategy: <fill in>
Message: <fill in>
2.3.1 Classifcation Function classify_input()
Your initial premise in irp.txt provides the LLM with few-shot examples of messages in IRP. You'll also need to update this premise with the conversational history as the user interacts with the CA. This will allow the LLM to classify the user's messages into one of the 8 IRP strategies.
More concretely, the classification function can classify a user's message into one of the 8 strategies. For example, if a user sends a message that says "I'm going to sue you," the classification module might classify this message as a Power strategy, e.g.:
- Input:
From: Tahani
Strategy: <fill in>
Message: I'm going to sue you.
- Output: Input:
From: Tahani
Strategy: Power
Message: I'm going to sue you.
2.3.2 Response Generation Function generate_response()
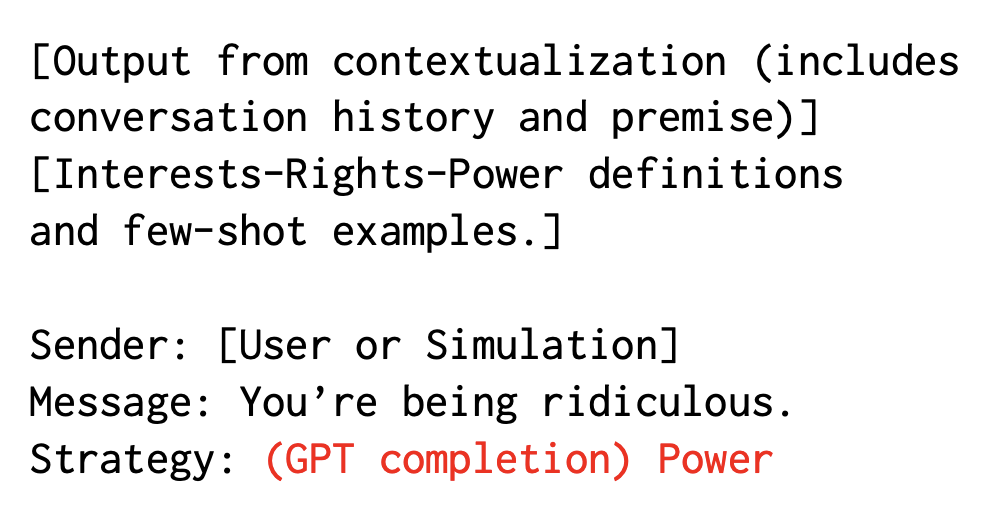
Finally, to generate simulated responses, you break message generation into a “chain-of-conflict” prompting process, where the response conflict strategy is determined before the response itself. By breaking down final response generation into a two-step process, you can force models to generate new messages that specifically adhere to a conflict resolution strategy. Additionally, Shaikh et al. qualitatively observed that zero-shot chain-of-thought generation (e.g. sampling CoTs without constraining them to a framework like IRP) may reduce the diversity of sampled output, mirroring findings from prior NLP work.
For example, if we wanted to generate a response, we would first determine the strategy by selecting one of these six strategies at random: Interests, Proposal, Positive Expectations, Rights, Power, Facts:
import random
# a list of possible strategies to use
strategies = [ "Interests", "Proposal", "Positive Expectations", "Rights", "Power", "Facts"]
# select from these at random
strategy = strategies[random.randint(0,5)]
Next, we would generate a response that adheres to the chosen strategy:
From: Eleanor
Cooperativeness: <fill in>
Strategy: Interests
Message: <fill in>
Or:
From: Eleanor
Cooperativeness: <fill in>
Strategy: Proposal
Message: <fill in>
If the generate_response() function is called as part of the fastforward button feature to generate a hypothetical response, the message history should not be updated. In all other cases, the message history should be update with the CA's actual response.
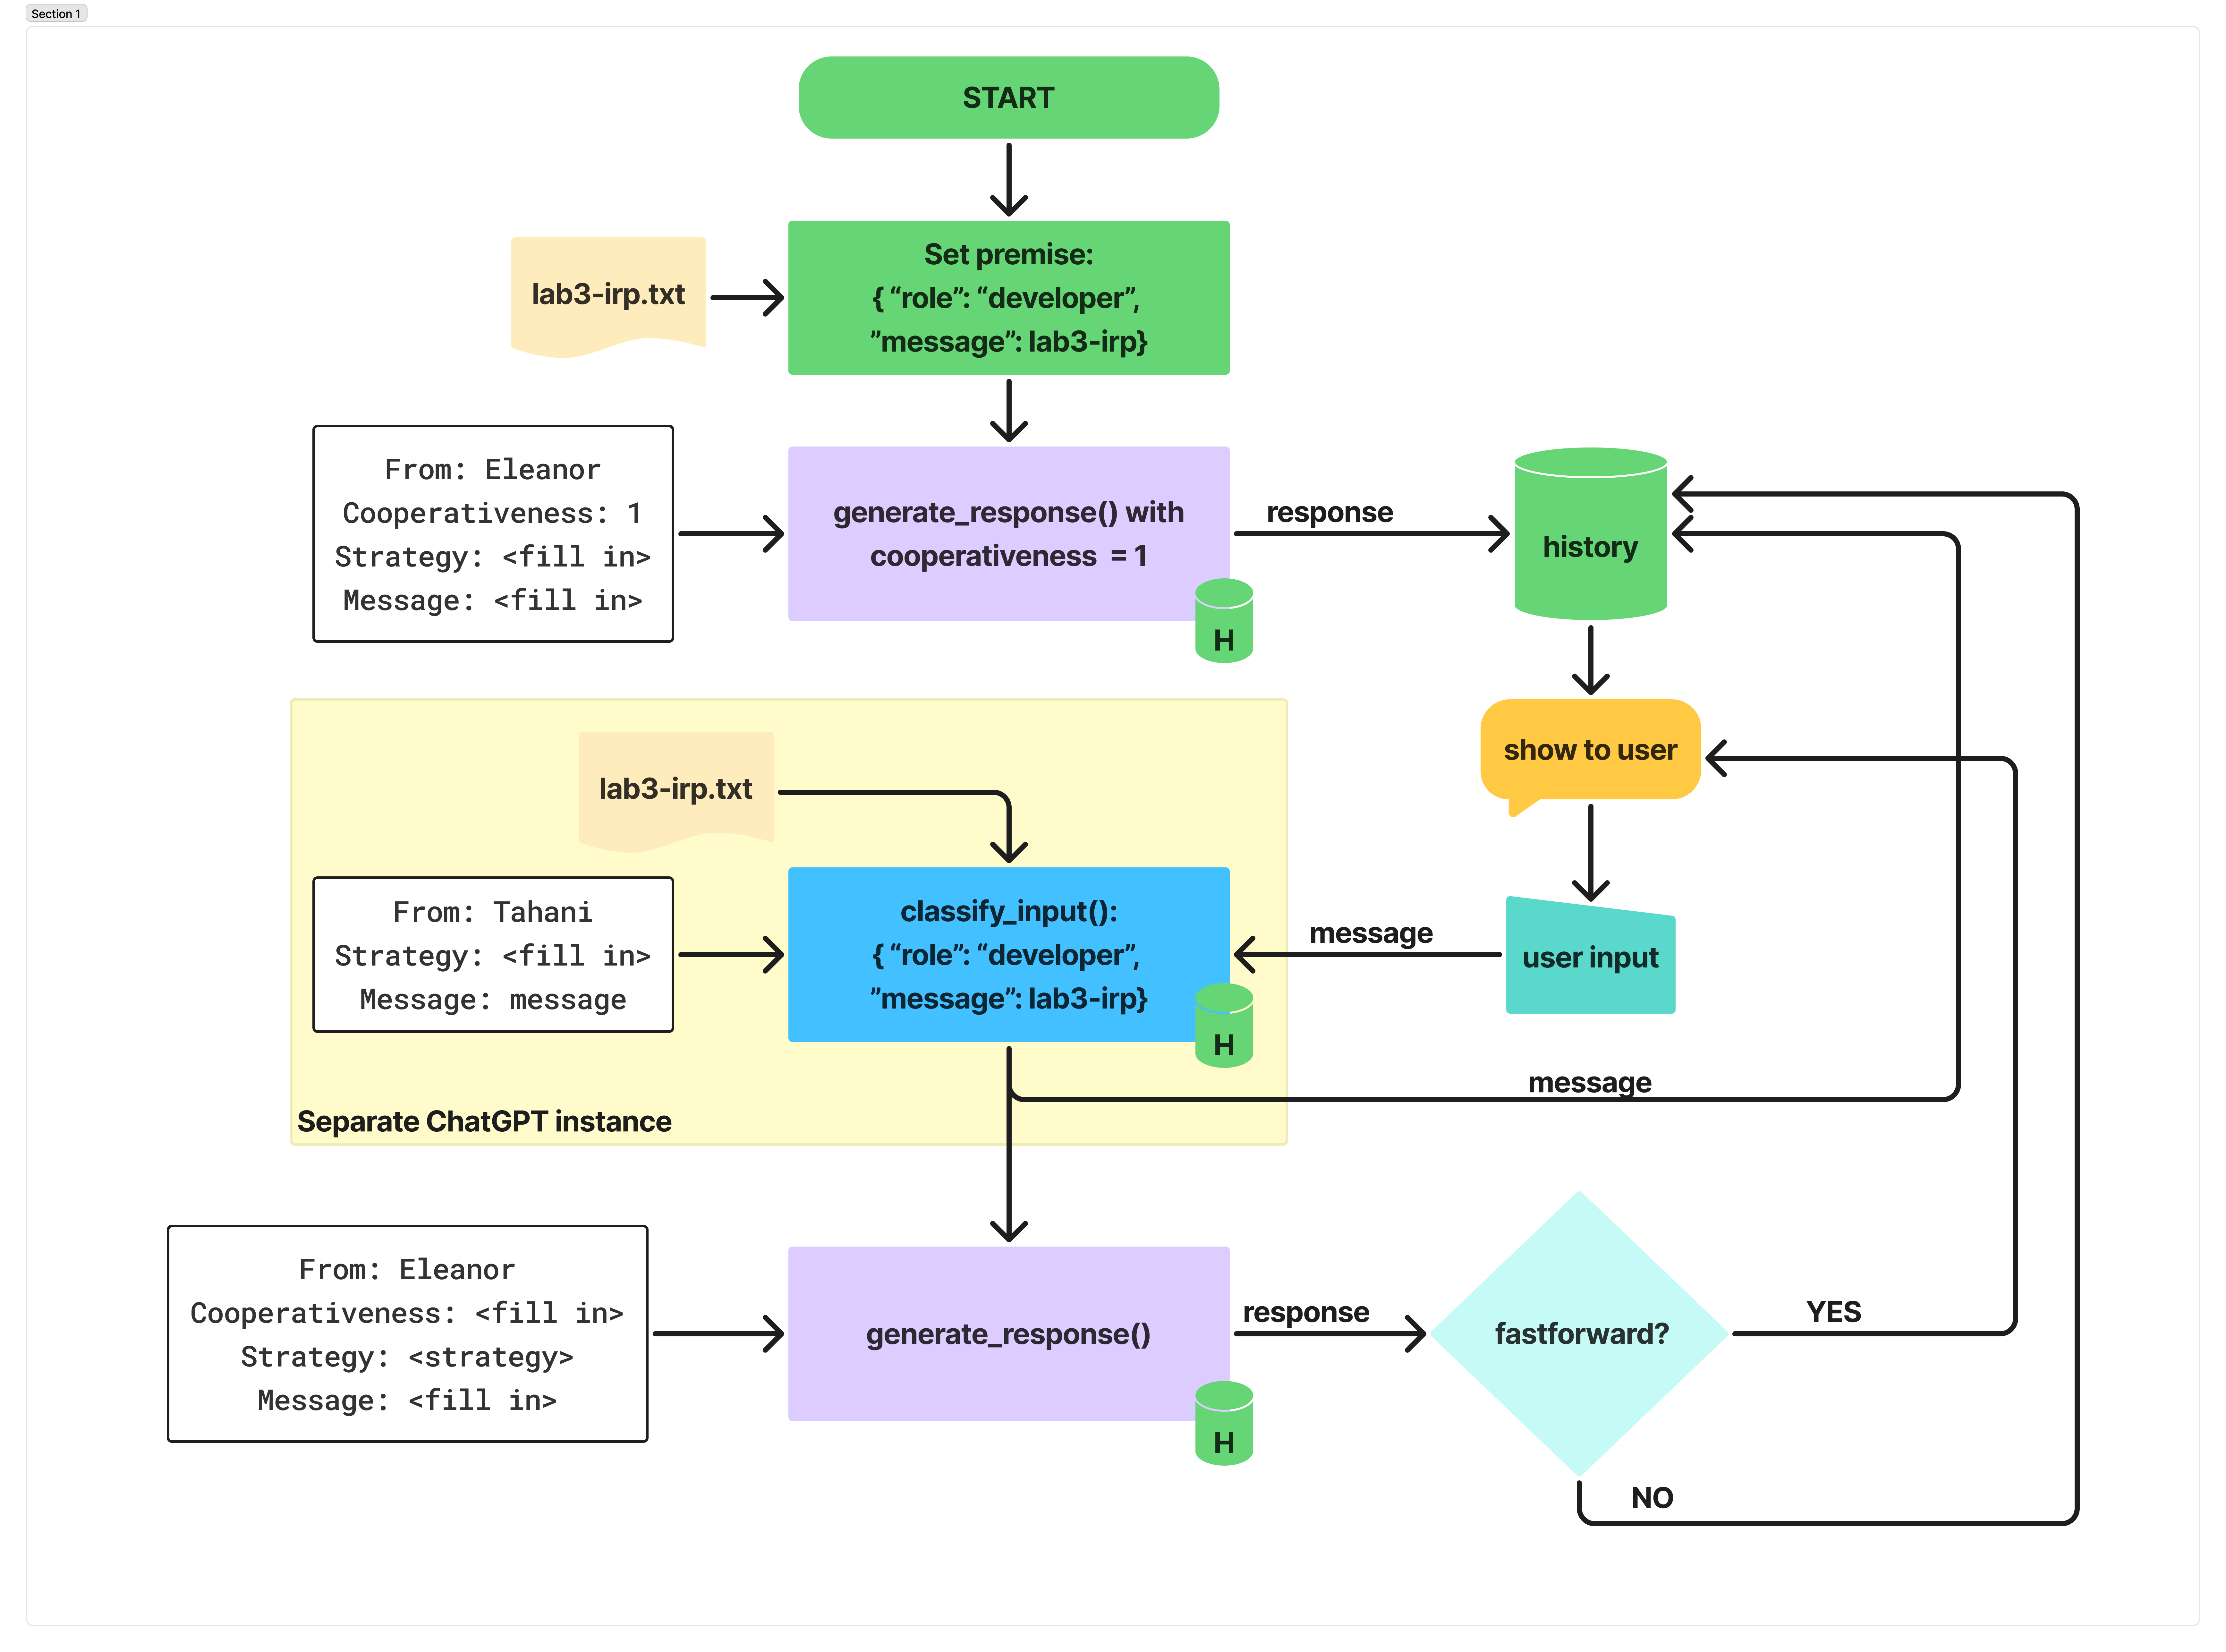
2.4 Your IRP Pipeline
Now, you'll need to put all of this together into your IRP pipeline, shown below: