Lab 2: Troll Hunting
Monday, February 3, 11:59pm EST
Overview
Learning Goals
- Javascript: Become more familiar with Javascript and how to use it to manipulate the DOM.
- Social Computing: Gain practice analyzing real data from a foreign influence campaign.
Before you begin...
Troll 👹: a troll is a person who posts deliberately offensive or provocative messages online. -Wikipedia
Your mission, should you choose to accept it, is to investigate Russia's meddling of our information sphere during the 2016 US elections. You will be analyzing a dataset of tweets from the Internet Research Agency (IRA), a Russian troll farm.
This is a one-week lab that consists of two parts. The first part involves analyzing Tweet data using Python and Jupyter Notebook. The second part involves creating a website to share your findings with the world.
Background
The following description is excerpted from a FiveThirtyEight article.
When historians try to appraise Russia’s interference in the 2016 election, which historical artifacts will they use? Then-candidate Donald Trump’s speech imploring Russia to find Hillary Clinton’s emails, perhaps. The soccer ball Vladimir Putin gave President Trump at their summit in Helsinki probably merits inclusion. And then there are the tweets — millions of them.
In 2018, as part of special counsel Robert Mueller’s investigation, the Justice Department charged 13 Russian nationals with interfering in American electoral and political processes. The defendants worked for a well-funded “troll factory” called the Internet Research Agency, which had 400 employees, according to one Russian news report. From a bland office building in St. Petersburg, the agency ran a sophisticated and coordinated campaign to sow disinformation and discord into American politics via social media. This often involved Trump’s favorite medium: Twitter.
Millions of the trolls’ tweets have since been removed from the service, and while other outlets, most prominently NBC News, have published samplings of them, it has been difficult to get a complete sense of the trolls’ strategy and the scale of their efforts. Until now.
FiveThirtyEight has obtained nearly 3 million tweets from accounts associated with the Internet Research Agency. To our knowledge, it’s the fullest empirical record to date of Russian trolls’ actions on social media, showing a relentless and systematic onslaught. In concert with the researchers who first pulled the tweets, FiveThirtyEight is uploading them to GitHub so that others can explore the data for themselves. The data set includes 2,973,371 tweets from 2,848 Twitter handles. It includes every tweet’s author, text and date; the author’s follower count and the number of accounts the author followed; and an indication of whether the tweet was a retweet. The entire corpus of tweets published dates from February 2012 to May 2018, with the vast majority from 2015 to 2017.

Even a simple timeline of these tweets can begin to tell a story of how the trolls operated. For instance, there was a flurry of trolling activity on Oct. 6, 2016. As the Washington Post first pointed out using the Clemson researchers’ findings, that may have been related to what happened on Oct. 7, 2016, when WikiLeaks released embarrassing emails from the Clinton campaign. There was another big spike in the summer of 2017, when the Internet Research Agency appeared to have shifted its focus to a specific type of troll — one the researchers call the “Right Troll” — that mimicked stereotypical Trump supporters.
That resulting data set is at the heart of a research paper by Linvill and Warren, currently under review at an academic journal, titled “Troll Factories: The Internet Research Agency and State-Sponsored Agenda Building.” In the paper, Linvill and Warren divide the IRA’s trolling into five distinct categories, or roles: Right Troll, Left Troll, News Feed, Hashtag Gamer and Fearmonger.

Right Troll and Left Troll are the meat of the agency’s trolling campaign. Right Trolls behave like “bread-and-butter MAGA Americans, only all they do is talk about politics all day long,” Linvill said. Left Trolls often adopt the personae of Black Lives Matter activists, typically expressing support for Bernie Sanders and derision for Hillary Clinton, along with “clearly trying to divide the Democratic Party and lower voter turnout.” News Feeds are a bit of a mystery: They present themselves as local news aggregators, with names such as @OnlineMemphis and @TodayPittsburgh, and the news they link to is typically legitimate. Hashtag Gamers specialize in playing hashtag games (e.g., #LessInterestingBooks might give rise to the tweet “Waldo’s Right Here”); many of their tweets are harmless wordplay in the spirit of the games, but some are socially divisive, in the style of Right Trolls or Left Trolls. And Fearmongers, relatively rare in the data set, spread news about a fake crisis, such as salmonella-contaminated turkeys around Thanksgiving, or the toxic chemical fumes described at the beginning of the New York Times Magazine article about the Internet Research Agency.
“Russia’s attempts to distract, divide, and demoralize has been called a form of political war,” the authors conclude in their paper. “This analysis has given insight into the methods the IRA used to engage in this war.” This war may or may not have had an effect on the 2016 election, but it certainly wreaked havoc. The man who would be named national security adviser followed and pushed the message of Russian troll accounts, according to the Daily Beast, and Trump’s eldest son, campaign manager and digital director each retweeted a Russian troll in the month before the election. Twitter itself informed 1.4 million people that they’d interacted with Russian trolls.
But the researchers emphasized that the Russian disinformation and discord campaign on Twitter extends well beyond even that. “There were more tweets in the year after the election than there were in the year before the election,” Warren said. “I want to shout this from the rooftops. This is not just an election thing. It’s a continuing intervention in the political conversation in America.”
“They are trying to divide our country,” Linvill added.
Requirements
By the deadline, you should have:
- Completed the six TODOs in the
from_russia_with_love.ipynbnotebook. - Created two different low-fidelity prototypes for your website. Briefly evaluated your low-fidelity prototypes with a friend or classmate outside of your team and made any necessary changes.
- Created a
troll_hunt_synopsiswebsite with three visualiztions representing three different data fields (e.g., number of followers) that you extracted in requirement #1.- The website must have: (1) a title, (2) a brief description of the dataset, and (3) a brief summary of your findings.
- The visualizations should be on the same page and each visualization should have a title, x-axis label, y-axis label, and legend. You can create the visualizations using matplotlib or seaborn in Python, D3.js or chart.js in JavaScript, Excel, or any other software.
- Underneath each visualization, describe in approx. 100 words your analysis (i.e., what patterns you see).
troll_hunt_synopsisJavaScript/CSS decoration:- Add a
hovereffect to change the background color of the div that the visualization is in. - For two visualizations, add a
buttonunderneath the image that toggles displaying two different versions — one where data is sorted in descending order and the other in ascending order — by setting thestyle.displayproperty to "none" (or) by changing the.srcproperty. - Add a secret, third effect: If the user clicks on all three visualizations in the span of 10 seconds, a hidden message should appear on the page.
- Add a
- Your repository should contain seven files:
README.md: a brief description of: (1) the files in your repository, (2) your team compact, and (3) how you iterated on your prototype.lowfi_prototype_1: an image of your first low-fidelity prototype.lowfi_prototype_2: an image of your second low-fidelity prototype.from_russia_with_love.ipynb: the completed jupyter notebook.troll_hunt_synopsis.html: the completed website.index.jsstyle.css
Note: Do not push the dataset (IRAhandle_tweets_1.csv) to your repository. You can add it to your .gitignore file.
Setup
a. Clone Your Lab Repository
Get your Lab SSH URL from the CS77-S25 GitHub organization. The repository to clone is named Lab2-<userID1>-<userID2>.
$ git clone [your lab2-userID1-userID2 url]
$ cd lab2-userID1-userID2
$ ls
README.md  from_russia_with_love.ipynb  troll_hunt_synopsis.html  index.js  style.css
- Here's a handy visual guide to help you better understand git.
- If you need help getting your git ssh keys setup or cloning the repository, please refer to the using git guide.
- If you are having trouble ssh-ing into a lab machine, make sure you've followed the instructions in the ssh setup guide.
Copy over the dataset and the requirements.txt to your lab repository:
$ cp ~sukrit/public/cs77/IRAhandle_tweets_1.csv .
$ cp ~sukrit/public/cs77/requirements.txt .
b. Establish Your Partnership
To establish a limited-liability company... just kidding! You'll need to work with a partner for this lab. Teams are a common feature of the workplace, in virtually every industry; and HCI, UX, and Software Engineering are no exception. Many of you will have been, or currently are, involved in work teams, either formally or informally. In both face-to-face and remote contexts, team members have to practice good communication and collaboration. Job descriptions routinely ask for these skills, and I hope this class will help you to develop and reflect on these skills.
If you haven't already, read the syllabus for tips on effective teamwork. It's good to set expectations before you start a project so you have something to refer back to if (when) you encounter friction in your partnership.
Now, sit next to your partner and create a team compact in your README.md file. The team compact should include:
- Team Name: Come up with a team name that represents your partnership.
- Team Members: List the names of your team members.
- Meeting Times: List the times you plan to meet outside of class.
- Communication: How will you communicate with each other? (e.g., Slack, Discord, text, email)
- Conflict Resolution: How will you resolve conflicts that arise during the lab? Feel free to use me as a scapegoat: “Prof. V will not find this convincing. Why don’t we try…?”
- Division of Labor: How will you divide the work? Will you work on different parts of the lab or work together on everything? Remember, if one person does all the work, you won't be able to make much progress in a future lab. You also have to fill in a partnership survey at the end of each lab to indicate how much you and your partner contributed to the lab.
- Timeline: What is your timeline for completing the lab? When will you have certain requirements completed?
c. Upgrade VSCode
IntelliSense is a code-completion aid that includes features to help you learn more about the code you're using, keep track of the parameters that you type, and add calls to properties and methods with only a few keystrokes. Whenever you're working on a large project, it's good practice to install that language's IntelliSense extension in your editor to make programming easier and less error-prone.
- HTML/CSS Intellisense: In VSCode, navigate to Code -> Settings -> Extensions. Search for "HTML CSS Support" (v2.0.13). Install this extension to get better support for HTML and CSS in your editor.
Code snippets are templates that make it easier to enter repeating code patterns, such as loops or conditional-statements. For JavaScript on VSCode, there is no Intellisense extension, but there is a code snippets extension.
- JavaScript (ES6) code snippets: In VSCode, navigate to Code -> Settings -> Extensions. Search for "JavaScript (ES6) code snippets" (v1.8.0). Install this extension.
VSCode also comes preconfigured with Emmet for HTML and CSS. Emmet is a plugin for many popular text editors which greatly improves HTML & CSS workflow. It's a set of abbreviations that expand into full HTML tags, CSS properties, or anything else. Verify that it works by creating a new index.html file and typing ! followed by pressing the Tab key.
If it works, the ! should be replaced by something like:
<!DOCTYPE html>
<html lang="en">
<head>
	<meta charset="UTF-8">
	<meta name="viewport" content="width=device-width, initial-scale=1.0">
	<title>Document</title>
</head>
<body>

</body>
</html>
d. Set Up Your Virtual Environment
In your lab repository, create a virtual environment. We need this to install a local version of Python and the necessary libraries to run Jupyter Notebook. Jupyter Notebook is a web-based interactive computational environment for creating notebook documents. It lets you run Python code in an interactive environment, combining code, text, and visualizations so that you can see the effects of your data transformations step-by-step.
$ python3 -m venv .venv
To activate your virtual environment, type:
$ source .venv/bin/activate
Check that your virtual environment is using the correct version of Python:
(.venv) $ which python
<path_to_directory>/.venv/bin/python
Great, now install Jupyter Notebook within your virtual environment and install additional python libraries:
(.venv) $ pip install jupyter notebook
(.venv) $ pip install -r requirements.txt
Now you can finally open up the Jupyter Notebook:
(.venv) $ jupyter notebook
[...]
To access the server, open this file in a browser:
  [...]
Or copy and paste one of these URLs:
  [...]
To deactivate your virtual environment, type:
$ deactivate
Part 1: Investigate the Trolls
In your Jupyter Notebook, open the from_russia_with_love.ipynb file. This notebook contains a subset of FiveThirtyEight's dataset with 3 million tweets. The dataset you will be analyzing contains 243,853 tweets posted by 298 Twitter accounts (the Internet Research Agency (IRA) trolls).
A CSV (comma-separated value) file is a good way to efficiently store and retrieve large, flat datasets useful in spreadsheets such as tabular data. It is more efficient than a JSON file. JSON is suited for complex, hierarchical data structures in web applications.
Now, follow the instructions in the Jupyter Notebook and complete the six TODOs. We'll be using the Pandas library to manipulate the dataset and Matplotlib to create visualizations. You can take a deeper dive into Pandas with this 10-minute tutorial, as well as one for Matplotlib.
CSV header definitions
The IRAhandle_tweets_1 CSV file has the following columns:
| Header | Definition |
|---|---|
external_author_id | An author account ID from Twitter |
author | The handle sending the tweet |
content | The text of the tweet |
region | A region classification, as determined by Social Studio |
language | The language of the tweet |
publish_date | The date and time the tweet was sent |
following | The number of accounts the handle was following at the time of the tweet |
followers | The number of followers the handle had at the time of the tweet |
updates | The number of “update actions” on the account that authored the tweet, including tweets, retweets and likes |
post_type | Indicates if the tweet was a retweet or a quote-tweet |
account_type | Specific account theme, as coded by Linvill and Warren |
retweet | A binary indicator of whether or not the tweet is a retweet |
account_category | General account theme, as coded by Linvill and Warren |
new_june_2018 | A binary indicator of whether the handle was newly listed in June 2018 |
alt_external_id | Reconstruction of author account ID from Twitter, derived from article_url variable and the first list provided to Congress |
tweet_id | Unique id assigned by twitter to each status update, derived from article_url |
article_url | Link to original tweet. Now redirects to "Account Suspended" page |
tco1_step1 | First redirect for the first http(s)://t.co/ link in a tweet, if it exists |
Part 2: Share Your Findings
Congratulations, you've completed your first investigation into the IRA's influence campaign during the 2016 U.S. elections. Now, it's time to share your findings with the world. But first, you'll need to create a prototype of your website before you move onto building your final website.
2.1 Prototype Your Website
“A prototype is one manifestation of a design that allows stakeholders to interact with it and to explore its suitability. It is limited in that a prototype will usually emphasize one set of product characteristics and de-emphasize others.” — Helen Sharp, Yvonne Rogers, and Jennifer Preece, Interaction Design: Beyond Human-Computer Interaction.
Prototyping is an essential part of the web design process. Prototypes allow designers to test design ideas and user flows before committing to the final product.
Prototypes help validate what works but also expose missing elements and features. Without the prototyping phase, companies would waste precious resources iterating over the final product. Prototypes use wireframes and mockups with clickable elements to simulate interactions and user flows. There are broadly two type of prototypes based on fidelity (level of detail): (1) low-fidelity and (2) high-fidelity. Low-fidelity prototypes allow teams to test information architecture and user flows, while high-fidelity prototypes introduce UI elements and how the user might interact with the final design.
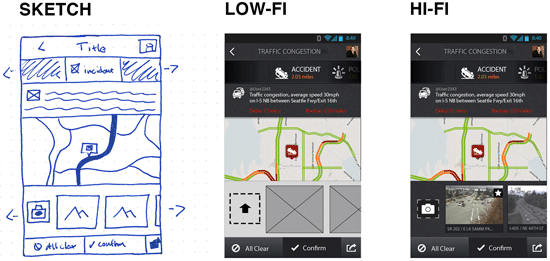
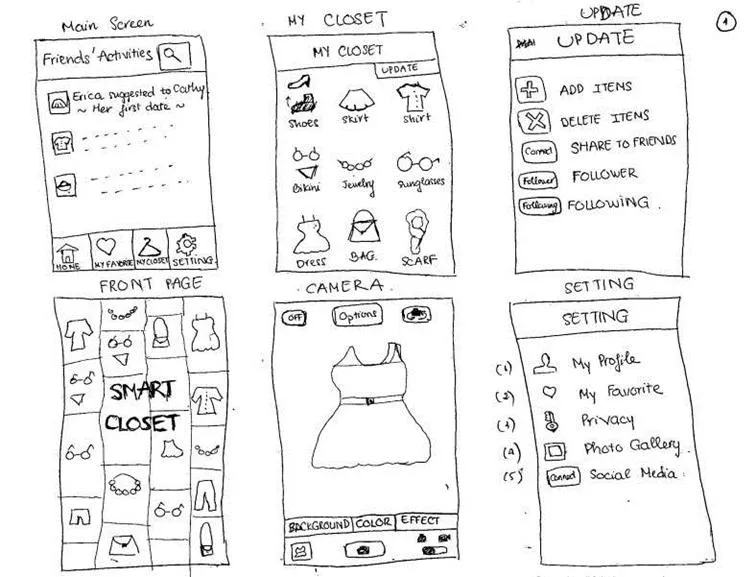
Low-Fidelity Prototypes
Low-fidelity prototypes are either hand-drawn or basic digital wireframes without color or content. These low-tech designs allow UX teams to visualize each screen’s layout, test navigation, and experience user flows.
The most common way to create low-fidelity prototypes is with paper! Paper prototypes are the fastest way for teams to create user flows and imagine interactions. It is particularly beneficial during design sprints when teams have limited time to develop flows and iterations. With paper “screens” laid out on the desk or whiteboard, teams can visualize flows together, allowing effective collaboration and idea-sharing. None of the elements are clickable, but paper prototypes enable teams to design screen layouts and flows, reducing the time needed to create initial digital wireframes.
Pros:
- Designers can make low-fidelity prototypes fast! This speed allows designers to make quick changes during testing or meetings to visualize fresh ideas.
- Low-fidelity prototypes are time efficient – inexpensive, which means teams can test multiple variations and iterations at a low cost.
- Anyone can create low-fidelity prototypes because they only use simple lines and shapes—even non-design team members can provide valuable input.
Cons:
- Due to the basic layout and functionality, low-fidelity prototypes don’t provide accurate results during testing. Stakeholders might also battle to visualize the final product resulting in poor feedback or confusion.
- Without color, interactions, transitions, or animations, low-fidelity prototypes can feel dull and underwhelming.
Based on your preliminary investigation into the IRA trolls, create a 2-3 low-fidelity prototypes of a website that could help make the public aware of their tactics. Feel free to use pen and paper, draw on a whiteboard or iPad, or use a digital tool like Balsamiq.
Great, now that you have a low-fidelity prototyp the next section (2.2) will guide you through creating a high-fidelity prototype. Err... not so fast. Have you evaulated your low-fidelity prototype? If not, now is the time to do so. Share your low-fidelity prototype with a friend or classmate outside of your team and ask for feedback. What do they think works well? What could be improved? Make any necessary changes before moving on to the next section.
High-Fidelity Prototypes
High-fidelity prototyping is where a product begins to take shape. Using mockups with color and content, designers can create hi-fi prototypes that look and function as close to the final product as possible.
Now designers can add interactions, transitions, and animations to create an immersive user experience—making high-fidelity prototypes perfect for usability studies and presenting to stakeholders.
A high-fidelity prototype using mockups gives users an accurate sense of how a product will look and function. The designs will include color and content, while every link and button should work as it would in the final product. A high-fidelity prototype using code takes prototyping one step further.
Pros:
- High-fidelity prototypes provide meaningful feedback during usability studies because participants can interact with the prototype like they would the final product.
- Designers can test interactions, animations, and transitions.
- Hi-fi prototypes provide stakeholders with an accurate representation of the final product. These prototypes could help startups get early-stage funding or pitch product concepts to clients.
Cons:
- Designers must spend more time making changes with greater detail, so high-fidelity prototypes cost more to produce.
- Without clear objectives, designers can get distracted trying to find the “perfect” interactions, animations, or transitions while creating high-fidelity prototypes. This fixation could lead to unnecessary delays.
Based on your low-fidelity prototype, create a high-fidelity prototype of your website using HTML, CSS, and JavaScript.
If you are unable to run JS in your HTML file, this is likely because of security restrictions with recent versions of browsers. You can run a local Python web server to bypass this issue:
- Type:
python -m http.serverin the same directory as your website code - Go to: http://[::]:8000/ (or whichever url:port is specified in the terminal)
- Navigate to the .html file you want to access
Submission Instructions
Submit your assignment by committing and pushing your changes to your GitHub repository:
$ git add <changed file1> <changed file2> ...
$ git commit -m "Lab 2 completed. We're computational social scientists now!" # or spies... or data scientists
$ git push
Make sure you have the appropriate files and images in the correct folders as described in the requirements above.
Grading
Grading Rubric
Extra Credit: Show Us the Data
Pick ten approprite-for-class tweets from the dataset and display them on the website, one at a time using Javascript. You can read the tweets from a local csv file or a hard-coded JS object. The tweets should be displayed in a div that changes every 10 seconds.
- Each tweet should contain the tweet content, author, publish_date, and tweet_id.
- The div should also contain have two buttons:
play/plauseandnext - The
play/pausebutton should change its text toplaywhen the tweets are paused andpausewhen the tweets are playing - The
nextbutton should immediately display the next tweet in the list
Acknowledgements
Parts of this assignment are adapted from Lauren Aronson's Kaggle notebook and MIT's Visualization and Society course.