Firewall Exploration
This lab is built on the SEED Labs for Security Education project by Prof. Wenliang Du, at Syracuse University.
The learning objective of this lab is two-fold:
-
learning how firewalls work, and
-
setting up a simple firewall for a network.
We will first implement a simple stateless packet-filtering firewall, which inspects pack- ets, and decides whether to drop or forward a packet based on firewall rules.
We will also explore the Linux built-in firewall, based on netfilter. This firewall is called iptables. Using a simple network topology, we will use iptables to set up firewall rules to protect the network. This lab covers the following topics:
-
Understanding Firewalls
-
Using Netfilter
-
Loading kernel modules
-
Using
iptablesto set up firewall rules -
Applications of
iptables
Lab Setup
-
The lab uses the CS88 VM.
-
Before you follow the instructions to setup the VM you want to first copy the VM over to the
/localon the machine you currently are on. Alternatively, you can also copy the VM onto your personal laptop and run it. You will first have to install VirtualBox on your machine.# let's assume you are logged into poppy in the CS lab: poppy[~]$ cd /local # copy the VM from zucchini over to poppy poppy[local]$ scp zucchini:/local/CS88-Ubuntu20.04.ova . # set the permissions for the `.ova` file: poppy[local]$ chmod 644 CS88-Ubuntu20.04.ova -
You can follow along with the instructions on the lab page to setup the VM.
What is a Firewall?
A firewall is typically used within an organization’s network to protect or isolate the internal network traffic from the wider Internet. A firewall is built using a combination of software and hardware, and is typically set by the network administrator. A firewall has three goals:
-
Protecting ingress and egress traffic: I.e., a firewall protects traffic that is internal to the organization, blocking the traffic from access by the wider Internet. It can also block egress traffic, i.e., traffic leaving the organization, based on the security access policy of the organization.
-
Defining a security access policy: An organization might use a firewall, or a set of firewalls, to restrict, filter or block access based on the security access policy of the organization. The list of traffic "allowed" to pass through can be based on application layer, transport layer, network layer or link layer access rules.
-
The firewall is secure from attacks: The device running the firewall, along with the software and rules that are set, should not be compromised. A faulty firewall, can be a result of loop holes in the access policy, or compromised if it allows unauthorized access to the access control list. This can have severe consequences to an organization.
Firewalls can be traditional packet filters (i.e., stateless firewalls that have per-packet filtering rules), stateful filters (that apply an action based on a match on the state of an on-going connection), or as application gateways (an application speecify server, that allows more fine-grained security policies based on user priveleges).
In this lab, we will implement two types of firewalls — traditional packet filters, and stateful filters.
Task 1: Implementing a Traditional Packet Filter
In this task, we will implement a simple packet filter, which inspects each incoming and outgoing packets, and enforces the firewall policies set by the administrator. In this task, we will modify the Linux kernel, to do so.
In the past modifying the Linux kernel often meant rebuilding the kernel all over! Thankfully, the modern Linux operating systems provide several new mechanisms to facilitate the manipulation of packets without rebuilding the kernel image :). The two mechanisms we will use are the Loadable Kernel Module (LKM) and Netfilter.
Since all the containers share the same kernel, kernel modules are global. Therefore, if we set a kernel model from a container, it affects all the containers and the VM. In this lab, we will just set the kernel module from the VM.
Task 1.A Implement a Simple Kernel Module
The Linux Kernal Module or (LKM) allows us to add a new module to the kernel at the runtime. This enables us to extend the functionalities of the kernel, without rebuilding the kernel or even rebooting the computer. We will implement packet filtering rules as a part of our firewall policy as an LKM.
Take a look at /kernel_module/hello.c in your starter code. It prints our "Hello World!" when this LKM module is loaded onto the Linux kernel. When the module is removed from the kernel,it prints out "Bye-bye World!" But where do these messages print? Take a look at this reference to figure out when and were these print messages are printed out.
|
We can now run make, and you should see a generated kernel module named hello.ko. You can use the following commands to load the module, list all modules, and remove the module. Also, you can use modinfo hello.ko to show information about a Linux Kernel module.
$ sudo insmod hello.ko  # (inserting a module)
$ lsmod | grep hello    # (list modules)
$ sudo rmmod hello      # (remove the module)
$ dmesg                 # (check the messages)
$ sudo dmesg| Run the above kernel module in your VM not on the docker containers. |
Task 1.B Implement a Simple Firewall Using Netfilter
Netfilter provides packet filtering, network address translation, load balancing, traffic engineering, packet logging, and other packet inspection and transformation.
"The netfilter hooks are a framework inside the Linux kernel that allows kernel modules to register callback functions at different locations of the Linux network stack. The registered callback function is then called back for every packet that traverses the respective hook within the Linux network stack." — Netfilter Project.
Netfilter hooks can be inserted into the packet’s incoming and outging paths. If we want to manipulate the incoming packets, we simply need to connect our own programs (within LKM) to the corresponding hooks. Once an incoming packet arrives, our program will be invoked. Our program can decide whether this packet should be blocked or not; moreover, we can also modify the packets in the program.
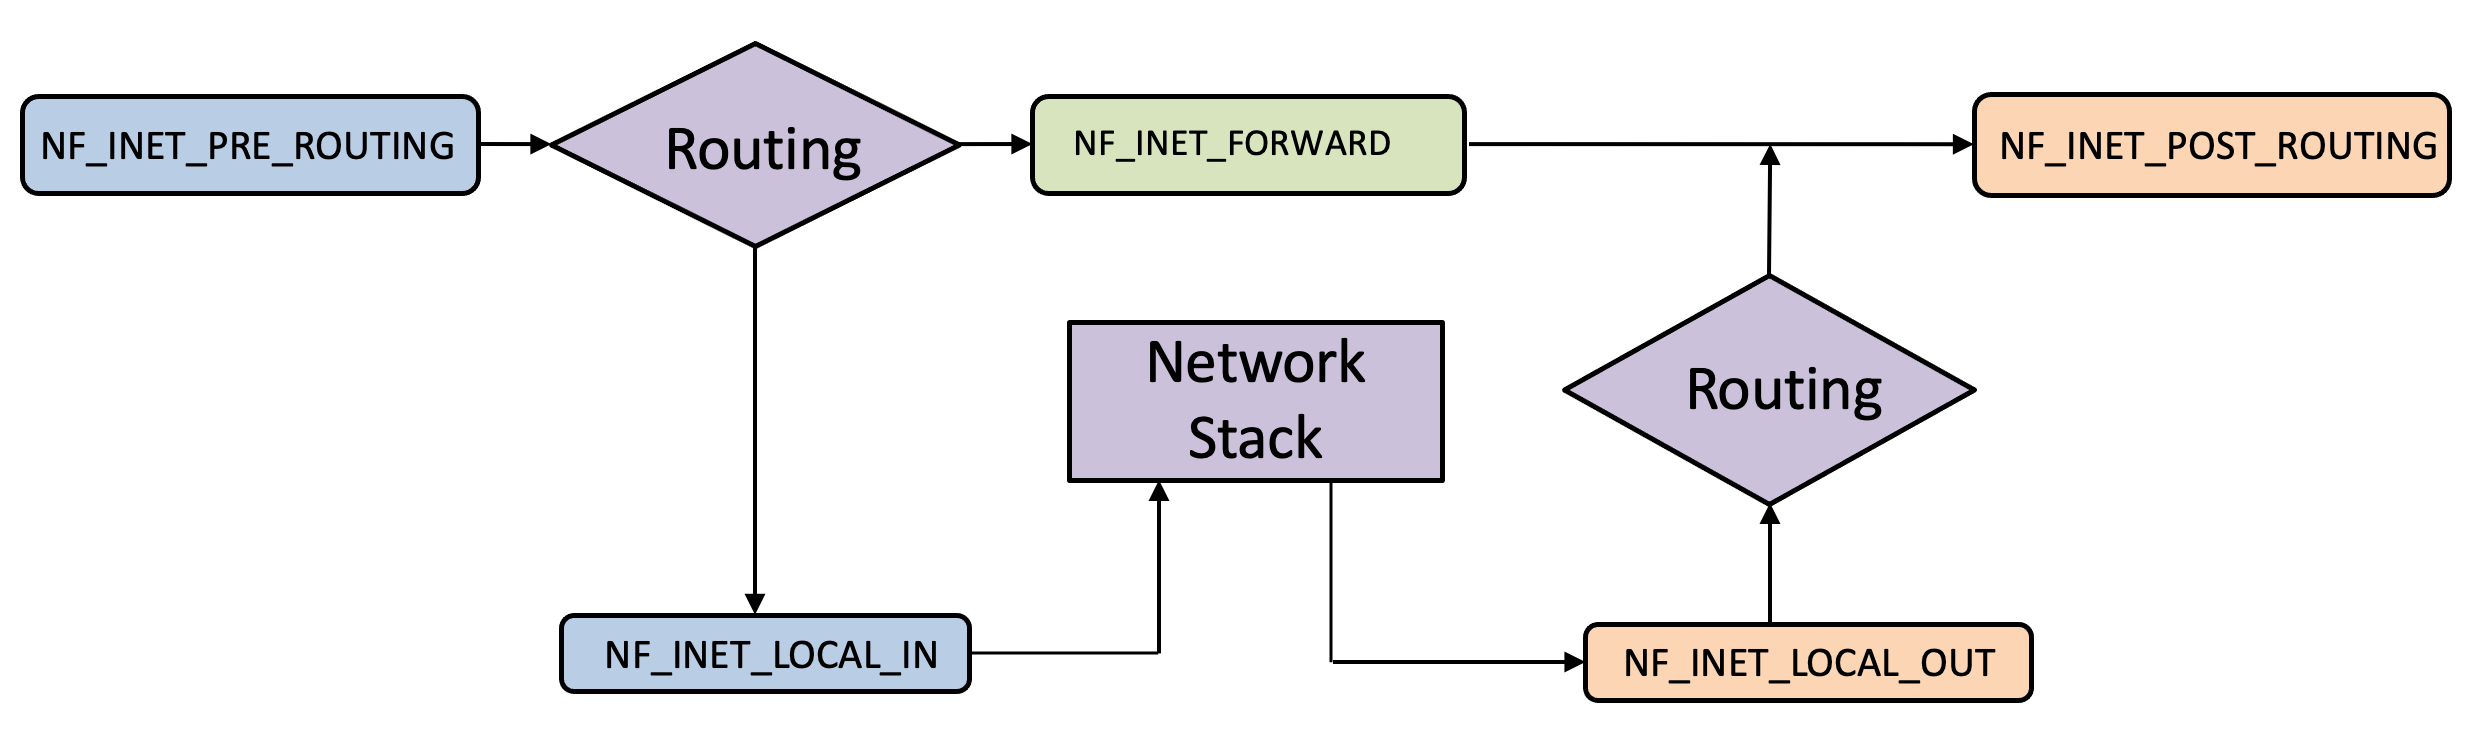
The Netfilter modules shown in the flowchart above provides a series of hooks (shown in blue, green and orange) in the Linux network stack that allows us to "hook" our code into the linux OS as the packet traverses the network protocol stack. Our code can be injected into the ingress path (shown in blue) or at the egress path (shown in orange) or at an intermediate forwarding stage if we are programming a router (as shown in orange).
The flowchart shows how a network packet traverses the linux OS network stack.
First let’s look at the ingress path:
-
A packet is received on the network interface card (NIC), and enters the
NF_INET_PRE_ROUTINGhook. -
If the packet is destined to this machine, the packet is routed to the
NF_INET_LOCAL_INhook. If not, and this machine is an end host, the packet is dropped. -
Otherwise, if this device is a router, the packet is forwarded to the
NF_INET_FORWARDhook. -
Once the packet is received on the
NF_INET_LOCAL_INhook, the packet is sent up the network protocol stack (shown in the purple rectangle).
Now that the packet has either been processed at the device, or forwarded along, let’s look at the egress path:
-
If this device is a router, the packet passes through the
NF_INET_FORWARDhook and then through theNF_INET_POST_ROUTINGhook. -
Otherwise, the packet traverses down the network protocol stack, through the
NF_INET_LOCAL_OUThook before being routed to the egressNF_INET_POST_ROUTINGhook.
Depending on where we want to apply filtering rules to the packet, we might choose to add our code at different stages along the packet’s path. As an example, let’s say the device is a router, and we want to apply filtering rules to all packets arriving at this router. We would apply our filtering code at the NF_INET_PRE_ROUTING hook.
In this task, we will write our packet filtering program as an LKM, using Netfulter, and then insert it into the packet processing path inside the kernel. The LKM will fetch the firewall policies from a struct and use the policies to decide whether packets should be blocked or not.
Writing a Netfilter Hook
To follow along look at your code in packet_filter/filter.c.
|
-
The structure of the code follows the structure of the kernel module we implemented earlier. When the kernel module is added to the kernel, the
registerFilter()function in the code will be invoked. Inside this function, we register two hooks tonetfilter. -
To register a hook, you need to initialize a hook
struct`, and set the fields of the struct. Let’s take a look at theregisterFilterfunction, where we register the first hook to the functionprintInfo().-
This hook creates the following rule: when a packet gets to the
LOCAL_INhook, the functionprintInfo()will be invoked. Next, we attach the hook to Netfilter using the functionnf_register_net_hook. -
printInfo()is an example hook function, that prints out the packet information. When netfilter invokes a hook function, it passes three arguments to the function, including a pointer to the actual packet (skb).
-
-
To typecast other protocol headers see the commented lines of code in
/packetfilter/filter.c
Blocking Packets
The starter code, /packetfilter/filter.c, also has an example hook function that blocks a UDP packet if it satisfies a particular condition. In this example, UDP packets are blocked if their destination IP is 8.8.8.8 , and the destination port is 53 (i.e., the packet is destined to Google’s DNS server).
Your Tasks
Please do each of these tasks seperately
-
Compile the sample code using the provided Makefile. Load it into the kernel, and demonstrate that the firewall is working as expected. You can use the following command to generate UDP packets to 8.8.8.8, which is Google’s DNS server. If your firewall works, your request will be blocked; otherwise, you will get a response. To test your firewall demonstrate your output with and without the firewall with the following command:
dig @8.8.8.8 www.example.com -
Hook the printInfo function to all of the netfilter hooks. Here are the macros of the hook numbers. Using your experiment results to help explain at what condition will each of the hook function be invoked.
NF_INET_PRE_ROUTING NF_INET_LOCAL_IN NF_INET_FORWARD NF_INET_LOCAL_OUT NF_INET_POST_ROUTING -
Implement two more hooks to achieve the following: (1) preventing other computers to ping the VM, and (2) preventing other computers to telnet into the VM. Please implement two different hook functions, but register them to the same netfilter hook. You should decide what hook to use. Telnet’s default port is TCP port 23. To test it, you can start the containers, go to 10.9.0.5, run the following commands (10.9.0.1 is the IP address assigned to the VM; for the sake of simplicity, you can hardcode this IP address in your firewall rules):
ping 10.9.0.1
telnet 10.9.0.1
|
Since we make changes to the kernel, there is a high chance that you would crash the kernel. Make sure you back up your files frequently, so you don’t lose them. One of the common reasons for system crash is that you forget to unregister hooks. When a module is removed, these hooks will still be triggered, but the module is no longer present in the kernel. That will cause system crash. To avoid this, make sure for each hook you add to your module, add a line in removeFilter to unregister it, so when the module is removed, those hooks are also removed. |
To implement the tasks above you will need to ssh into the docker containers setup on the vm. The following layout is setup in the docker containers.
Docker containers
Next, we will use docker containers to setup the two machines that we will use in our test environment, to setup firewall ingress and egress.
In the last lab we saw how we can setup a virtual machine and we talked about what a VM does - i.e., creates virtual instances of the entire system hardware up!
You can think of a Docker container as a light-weight VM. Docker virtualizes the application environment in which all of your software applications, code and data live. If you think of the hardware as "bare metal" and the OS as managing computer resources, then the Docker container sits on top of the OS, giving us a sandboxed environment to work in, without the overhead of the entire virtual machine. You can read more about Docker containers here.
In this lab, we are going to run a docker VM inside our virtual machine.
Can you run a docker inside a VM? Yes! How about a docker inside a docker inside a VM? also yes!… it’s turtles all the way down…
-
First, you will need to
git cloneyour lab in the VM. -
Next we will build our docker image just like we built our vm.
The next two steps will need to be performed every time you login to your VM and want to work on your lab. seed@VM:~$ cd firewall-exploration seed@VM:~/.../firewall-exploration$ dcbuild # this step will take a couple of minutes -
Next, we want to run
dcupwhich starts the docker container. This is equivalent to starting our VM.seed@VM:~/.../firewall-exploration$ dcupYou should now have a docker container up and running! The
dcupcommand will swallow the cursor. To interact with the docker, we will need to open up a new terminal. -
All the containers will be running in the background. To run commands on a container, we often need to get a shell on that docker container. We first need to use the
dockpscommand to find out the ID of the container,and then usedockshto start a shell on that container. The following command showsn you can get a shell inside hostC.seed@VM:~/.../firewall-exploration$ dockps $ dockps b1004832e275 hostA-10.9.0.5 0af4ea7a3e2e hostB-10.9.0.6 9652715c8e0a hostC-10.9.0.7 $ docksh 96 root@9652715c8e0a:/# // Note: If a docker command requires a container ID, you do not need t type the entire ID string.Typing the first few characters will be sufficient, as long as they are unique among all the containers.You may not see the same IDfor the docker containers on your end. They are randomly generated when the docker container starts up. -
Once you are done with your work you can run
dcdownto shutdown the docker container.seed@VM:~/.../firewall-exploration$ dcdown
Task 2: Experimenting with Stateless Firewall Rules
In the previous task, we had a chance to build a simple firewall using netfilter. Turns out Linux already has a built-in firewall, also based on netfilter! This firewall is called iptables. Technically, the kernel part implementation of the firewall is called Xtable, while iptables is a user-space program to configure the firewall. However, iptables is often used to refer to both the kernel-part implementation and the user-space program.
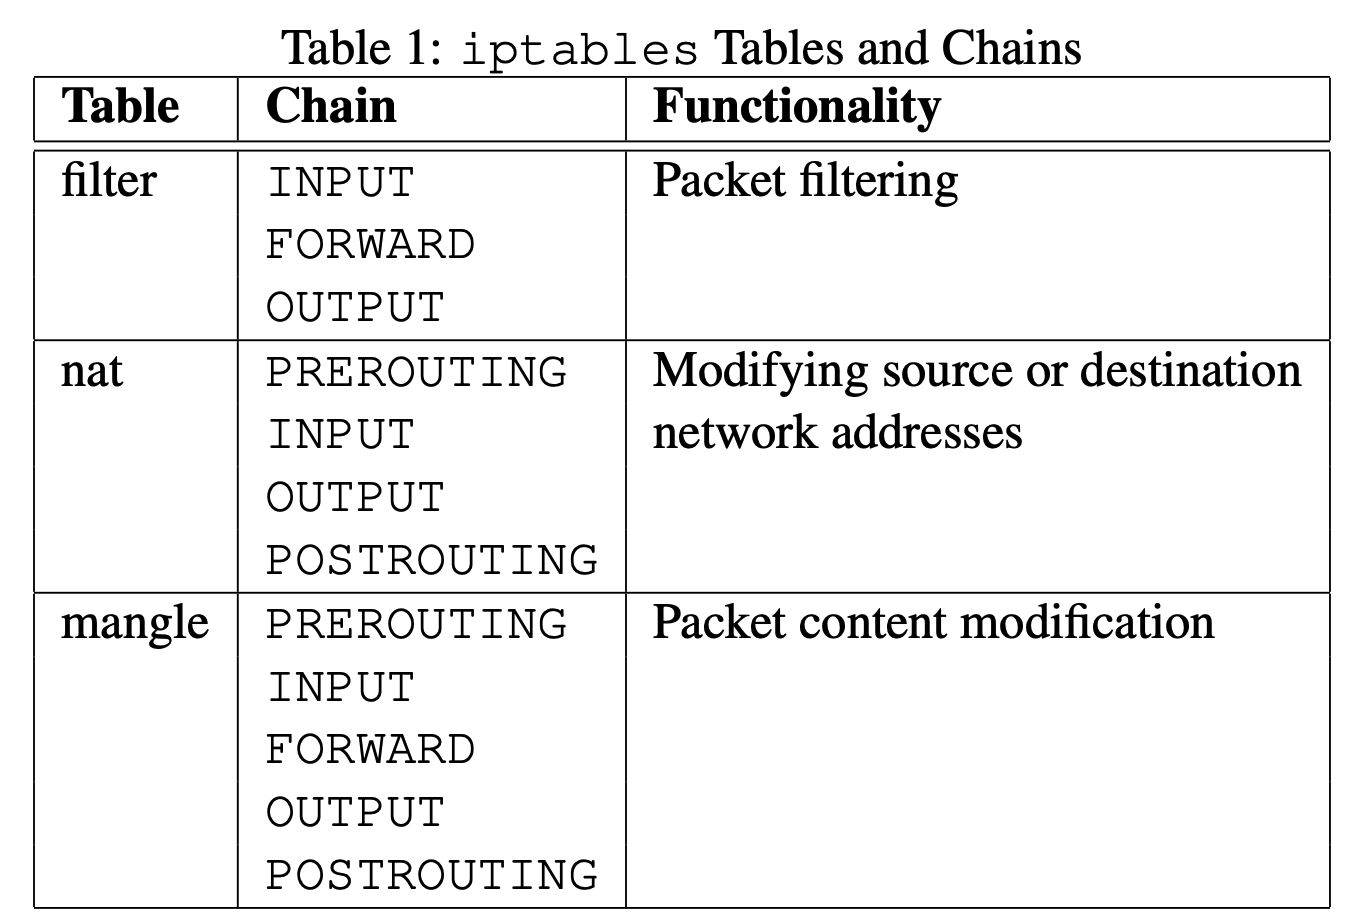
In this task, we will use iptables to set up a firewall. The iptables firewall is designed not only to filter packets, but also to make changes to packets. To help manage these firewall rules for different purposes, iptables organizes all rules using a hierarchical structure: table, chain, and rules. There are several tables, each specifying the main purpose of the rules as shown in Table 1. For example, rules for packet filtering should be placed in the filter table, while rules for making changes to packets should be placed in the nat or mangle tables.
Each table contains several chains, each of which corresponds to a netfilter hook. Each chain indicates where its rules are enforced. For example, rules on the FORWARD chain are enforced at the NF-INET-FORWARD hook, and rules on the INPUT chain are enforced at the NF-INET-LOCAL-IN hook.
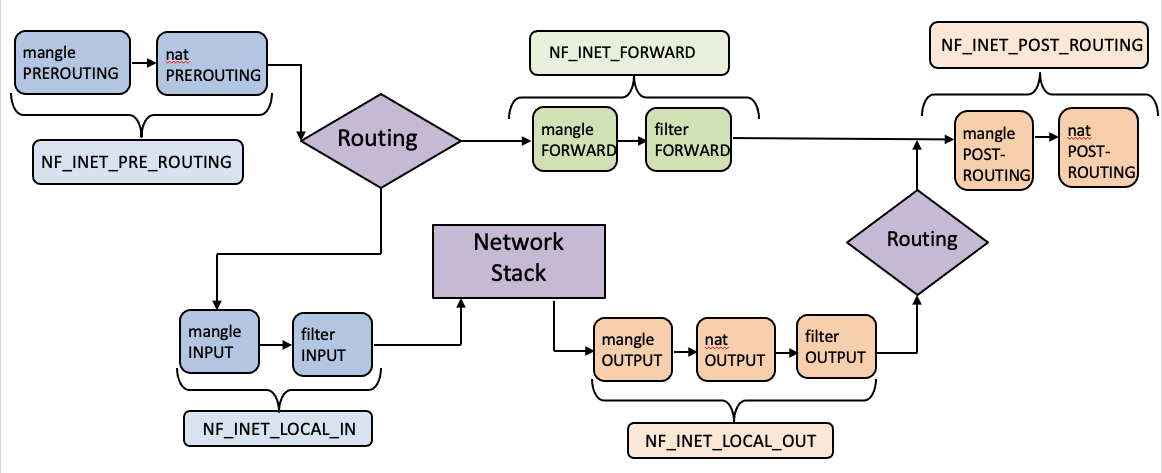
The figure above shows how the netfilter hooks translate to actiosn in iptables. Each chain contains a set of firewall rules that will be enforced. When we set up firewalls, we add rules to these chains. For example, if we would like to block all incoming telnet traffic, we would add a rule to the INPUT chain of the filter table. If we would like to redirect all incoming telnet traffic to a different port on a different host, basically doing port forwarding, we can add a rule to the INPUT chain of the mangle table, as we need to make changes to packets.
Using iptables
To add rules to the chains in each table, we use iptables on the command line. You can also type in man iptables to learn more. iptables can be used to specify complex forwarding, filtering and mangling rules. Here is the structure of these command-lien arguments so you can easily set your rules:
iptables -t <table> -<operation> <chain>  <rule>   -j <target>
         ---------- --------------------  -------  -----------
            Table          Chain           Rule      Action
In a typical iptables command, we add a rule to or remove a rule from one of the chains in one of the tables, so we need to specify a table name (the default is filter), a chain name, and an operation on the chain. After that, we specify the rule, which is basically a pattern that will be matched with each of the packets passing through. If there is a match, an action will be performed on this packet.
Rules themselves can also be quite complex. Here are some commonly used iptables rules:
# List all the rules in a table (without line number)
iptables -t nat -L -n

# List all the rules in a table (with line number)
iptables -t filter -L -n --line-numbers

# Delete rule No. 2 in the INPUT chain of the filter table
iptables -t filter -D INPUT 2

#Drop all the incoming packets that satisfy the <rule>
iptables -t filter -A INPUT <rule> -j DROP|
The Docker containers we have setup rely on |
Task 2.A Protecting the Router
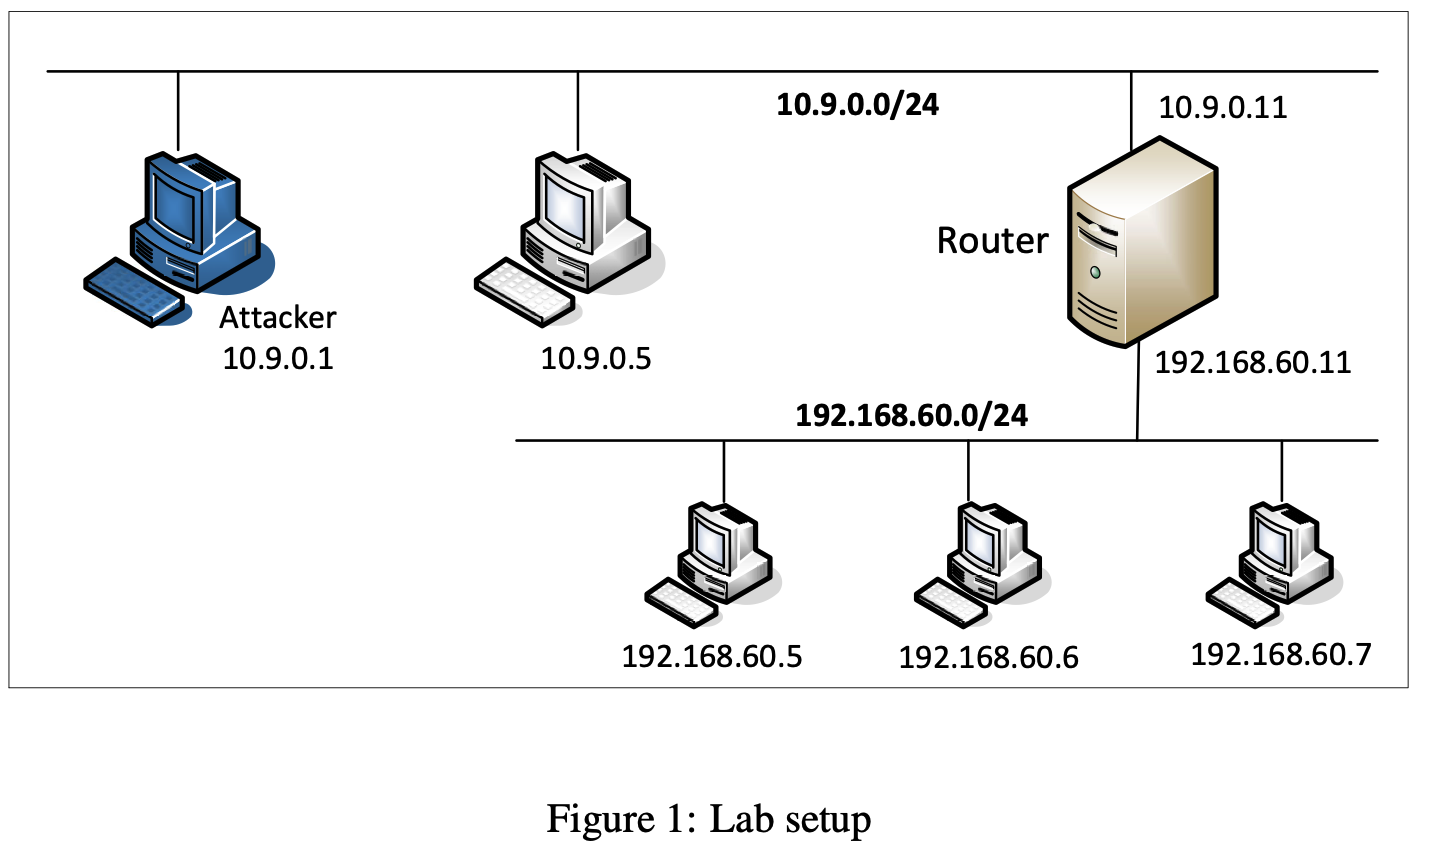
In this task, we will set up rules to prevent outside machines from accessing the router in the docker containers, except ping`.
update your code in packet_filter/router.sh
|
Come up with a list of iptables commands that need to run on the router container, and then try to access it from 10.9.0.5.
-
Can you ping the router?
-
Can you telnet into the router (a telnet server is running on all the containers; an account called seed was created on them with a password dees).
Please report your observation and explain the purpose for each rule.
clean up after you are done by running router-cleanup.sh
|
Task 2.B Protecting the Internal Network
In this task, we will set up firewall rules on the router to protect the internal network 192.168.60.0/24`. We need to use the FORWARD chain for this.
While the packet ingress and egress directions in the INPUT and OUTPUT chains are clear: packets are either coming into (for INPUT) or going out (for OUTPUT), this is not true for the FORWARD chain. The FORWARD chain is bi-directional: packets going can either pass into the internal network or leave to an external network all go through the same chain. To specify the direction,we can add the interface options using -i xyz (i.e., ingress on the xyz interface) and/or -o xyz (egress from the xyz interface). The interfaces for the internal and external networks are different.You can find the interface names using the ip addr command.
In this task, we want to implement a firewall to protect the internal network. More specifically, we need to enforce the following security access rules on ICMP traffic. You can write your code in packet_filter/icmp-firewall-policy.sh
-
Hosts outside the internal network cannot ping internal hosts.
-
Hosts outside the network cannot ping the router.
-
Internal hosts can ping hosts outside the network.
-
All other packets between the internal and external networks should be blocked.
You will need to use the -p icmp options to specify the match optiosn related to the ICMP protocol. You can also run iptables -p icmp -h to find all the ICMP match options. As an example the following command drops an ICMP echo request
iptables -A FORWARD -p icmp --icmp-type echo-request -j DROP
When you are done with this task, please remember to clean the iptable using router-cleanup.sh
Task 2.C Protecting Internal Servers
In this task, you are responsible for protecting the TCP servers inside the internal network (192.168.60.0/24). More specifically, we would like to achieve the following security objectives. You can write your code in packet_filter/tcp-firewall-policy.sh
-
All the internal hosts run a telnet server (listening to port 23). Outside hosts can only access the telnet server on
192.168.60.5, not the other internal hosts. -
Hosts external to the network cannot access other internal servers.
-
Internal hosts can access all the internal servers.
-
Internal hosts cannot access external servers.
You will need to use the -p tcp options to specify the match options related to the TCP protocol. You can run iptables -p tcp -h to find out all the TCP match options. The following example allows the TCP packets coming from the interface eth0 if their source port is 5000.
iptables -A FORWARD -i eth0 -p tcp --sport 5000 -j ACCEPT`
When you are done with this task, please remember to clean the iptable using router-cleanup.sh
Task 3: Connection Tracking and Stateful Firewall
In the previous task, we have only set up stateless firewalls, which inspect each packet independently. How- ever, packets are usually not independent; they may be part of a TCP connection, or they may be ICMP packets triggered by other packets. Treating them independently does not take into consideration the con- text of the packets, and can thus lead to inaccurate, unsafe, or complicated firewall rules. For example, if we would like to allow TCP packets to get into our network only if a connection was made first, we can- not achieve that easily using stateless packet filters, because when the firewall examines each individual TCP packet, it has no idea whether the packet belongs to an existing connection or not, unless the firewall maintains some state information for each connection.
Task 3.A: Experiment with the Connection Tracking
To support stateful firewalls, we need to be able to track connections. This is achieved by the conntrack mechanism inside the kernel. In this task, we will conduct experiments related to this module, and get familiar with the connection tracking mechanism. In our experiment, we will check the connection tracking information on the router container. This can be done using the following command:
# first, docksh into the router container
~# conntrack -L-
ICMP Experiment: Run the following command and check the connection tracking information on the router. How long is the ICMP connection state be kept?
// On 10.9.0.5, send out ICMP packets # ping 192.168.60.5 -
UDP experiment: Run the following command and check the connection tracking information on the router. How long is the UDP connection state be kept?
// On 192.168.60.5, start a netcat UDP server # nc -lu 9090 // On 10.9.0.5, send out UDP packets # nc -u 192.168.60.5 9090 <type something, then hit return> -
TCP experiment: Run the following command and check the connection tracking information on the router. Describe your observation. How long is the TCP connection state be kept?
// On 192.168.60.5, start a netcat TCP server
# nc -l 9090
// On 10.9.0.5, send out TCP packets
# nc 192.168.60.5 9090
<type something, then hit return>
Task 3.B: Setting Up a Stateful Firewall
Now we are ready to set up firewall rules based on connections. In the following example, the -m conntrack option indicates that we are using the conntrack module. This module tracks connections, and iptables replies on the tracking information to build stateful firewalls. The --ctsate ESTABLISHED, RELATED indicates that whether a packet belongs to an ESTABLISHED or a RELATED connection.
As an example, the following rule allows TPC pacekts belonging to an existing connection to pass through:
iptables -A FORWARD -p tcp -m conntrack          \
         --ctstate ESTABLISHED,RELATED -j ACCEPT
Do you notice something missing? It’s keeping track of connection setup with TCP! The rule above does not cover SYN packets, which do not belong to any established connection. Without it, we will not be able to start a connection in the first place! Therefore, we need to add a rule to accept incoming SYN packet:
iptables -A FORWARD -p tcp -i eth0 --dport 8080 --syn  \
         -m conntrack --ctstate NEW -j ACCEPT
Finally, we will set the default policy on FORWARD to drop everything. This ensures that if a packet is not accepted by the two rules above, they will be dropped.
iptables -P FORWARD DROPYour Task: Using conntrack, rewrite the firewall rules in Task 2.C, but this time,add a rule allowing internal hosts to visit any external server in packet_filter/tcp-conntrack-policy.sh
Task 4: Limiting Network Traffic
In addition to blocking packets, we can also limit the number of packets that can pass through the firewall. To do so, we will use the limit module of iptables. In this task, we will use this module to limit the number of packets from 10.9.0.5 ` to the internal network.You can use `iptables -m limit -h to look at all the actions.
Limit packets from 10.9.0.5 to 10 minutes, with a burst of 5 packets. Complete the code in packet_filter/limit-up.sh.
|
Task 5: Load Balancing
In this task, we will use iptables to load balance three UDP servers running in the internal network. Let’s first start the server on each of the hosts: 192.168.60.5, 192.168.60.6, and 192.168.60.7 (the -k option below indicates that the server can receive UDP datagrams from multiple hosts):
# run the following command on all three hosts
nc -luk 8080
We will now use the statistic module to achieve load balancing. Type in iptables -m statistic -h to understand how it works. In particular we will use the following two modes random and nth.
Task 5.A: Using the nth mode (round-robin):
On the router container, we set the following rule, which applies to all the UDP packets going to port 8080. Using the nth mode of the statistic module, we will implement the following round-robin load balancing policy: for every three packets, pick the packet 0 (i.e., the first one), change its destination IP address and port number to 192.168.60.5 and 8080, respectively. The modified packets will continue on its journey. Packets that do not match the rule will continue on their journeys; they will not be modified or blocked.
Complete the code in packet_filter/udp-loadbalancing.sh
Testing: With this rule in place, if you send a UDP packet to the router’s 8080 port, you will see that one out of three packets gets to 192.168.60.5. You can run the following commands to see this:
// On 10.9.0.5
echo hello | nc -u 10.9.0.11 8080
<hit Ctrl-C>
Task 5.B: Using the random mode:
We can also use the random mode to achieve load balancing. The following rule (also in packet_filter/udp-random-loadbalancing.sh) will select a matching packet with the probability P. You need to replace P with a probability number.
iptables -t nat -A PREROUTING -p udp --dport 8080   \
         -m statistic --mode random --probability P \
-j DNAT --to-destination 192.168.60.5:8080| Use this mode to implement your load balancing rules, so each internal server get roughly the same amount of traffic (it may not be exactly the same, but should be close when the total number of packets is large). |