Checkpoint Due: Thursday, November 12, 11:59 PM ET
Lab Due: Thursday, November 19, 11:59 PM ET
-
The protocol you implement will be simpler than TCP, but you may find TCP’s header information to be useful for inspiration.
-
select() manual. (You will need to set timers for your timeout, select makes this easy.)
Lab 5 Goals
-
Understand principles of reliability at the transport layer
-
Design and implement a protocol that pipelines transmissions - i.e., has multiple packets in flight using Go-Back-N (GBN).
-
Develop C library code for your protocol over a UDP socket and implement congestion control using Additive Increase, Multiplicative Decrease (AIMD).
-
Learn to use mininet, a network emulator to design and test your protocol.
Overview
For this lab, you will be continuing your development of a reliable data transfer protocol over an unreliable (simulated) link and transfer all packets from source to destination over a simple dumbbell network. Your submission will still be in the form of a library that mimics the type of functionality that you would expect to get from an OS’s transport-layer implementation.
Your transport protocol should be a Go-Back-N style protocol. In addition to using timeouts and ACKs, you will also use pipelining, and implement congestion control for reliable transfer without packet loss. We will continue to emulate a simple dumbbell network to transfer the packets from source to destination.
This time, since you are pipelining packets, your transfer rate should improve significantly!
Lab Requirements
Go-Back-N Protocol Specifications:
-
Your protocol should provide fast (pipelined) reliable transfer of data in the presence of lossy links.
-
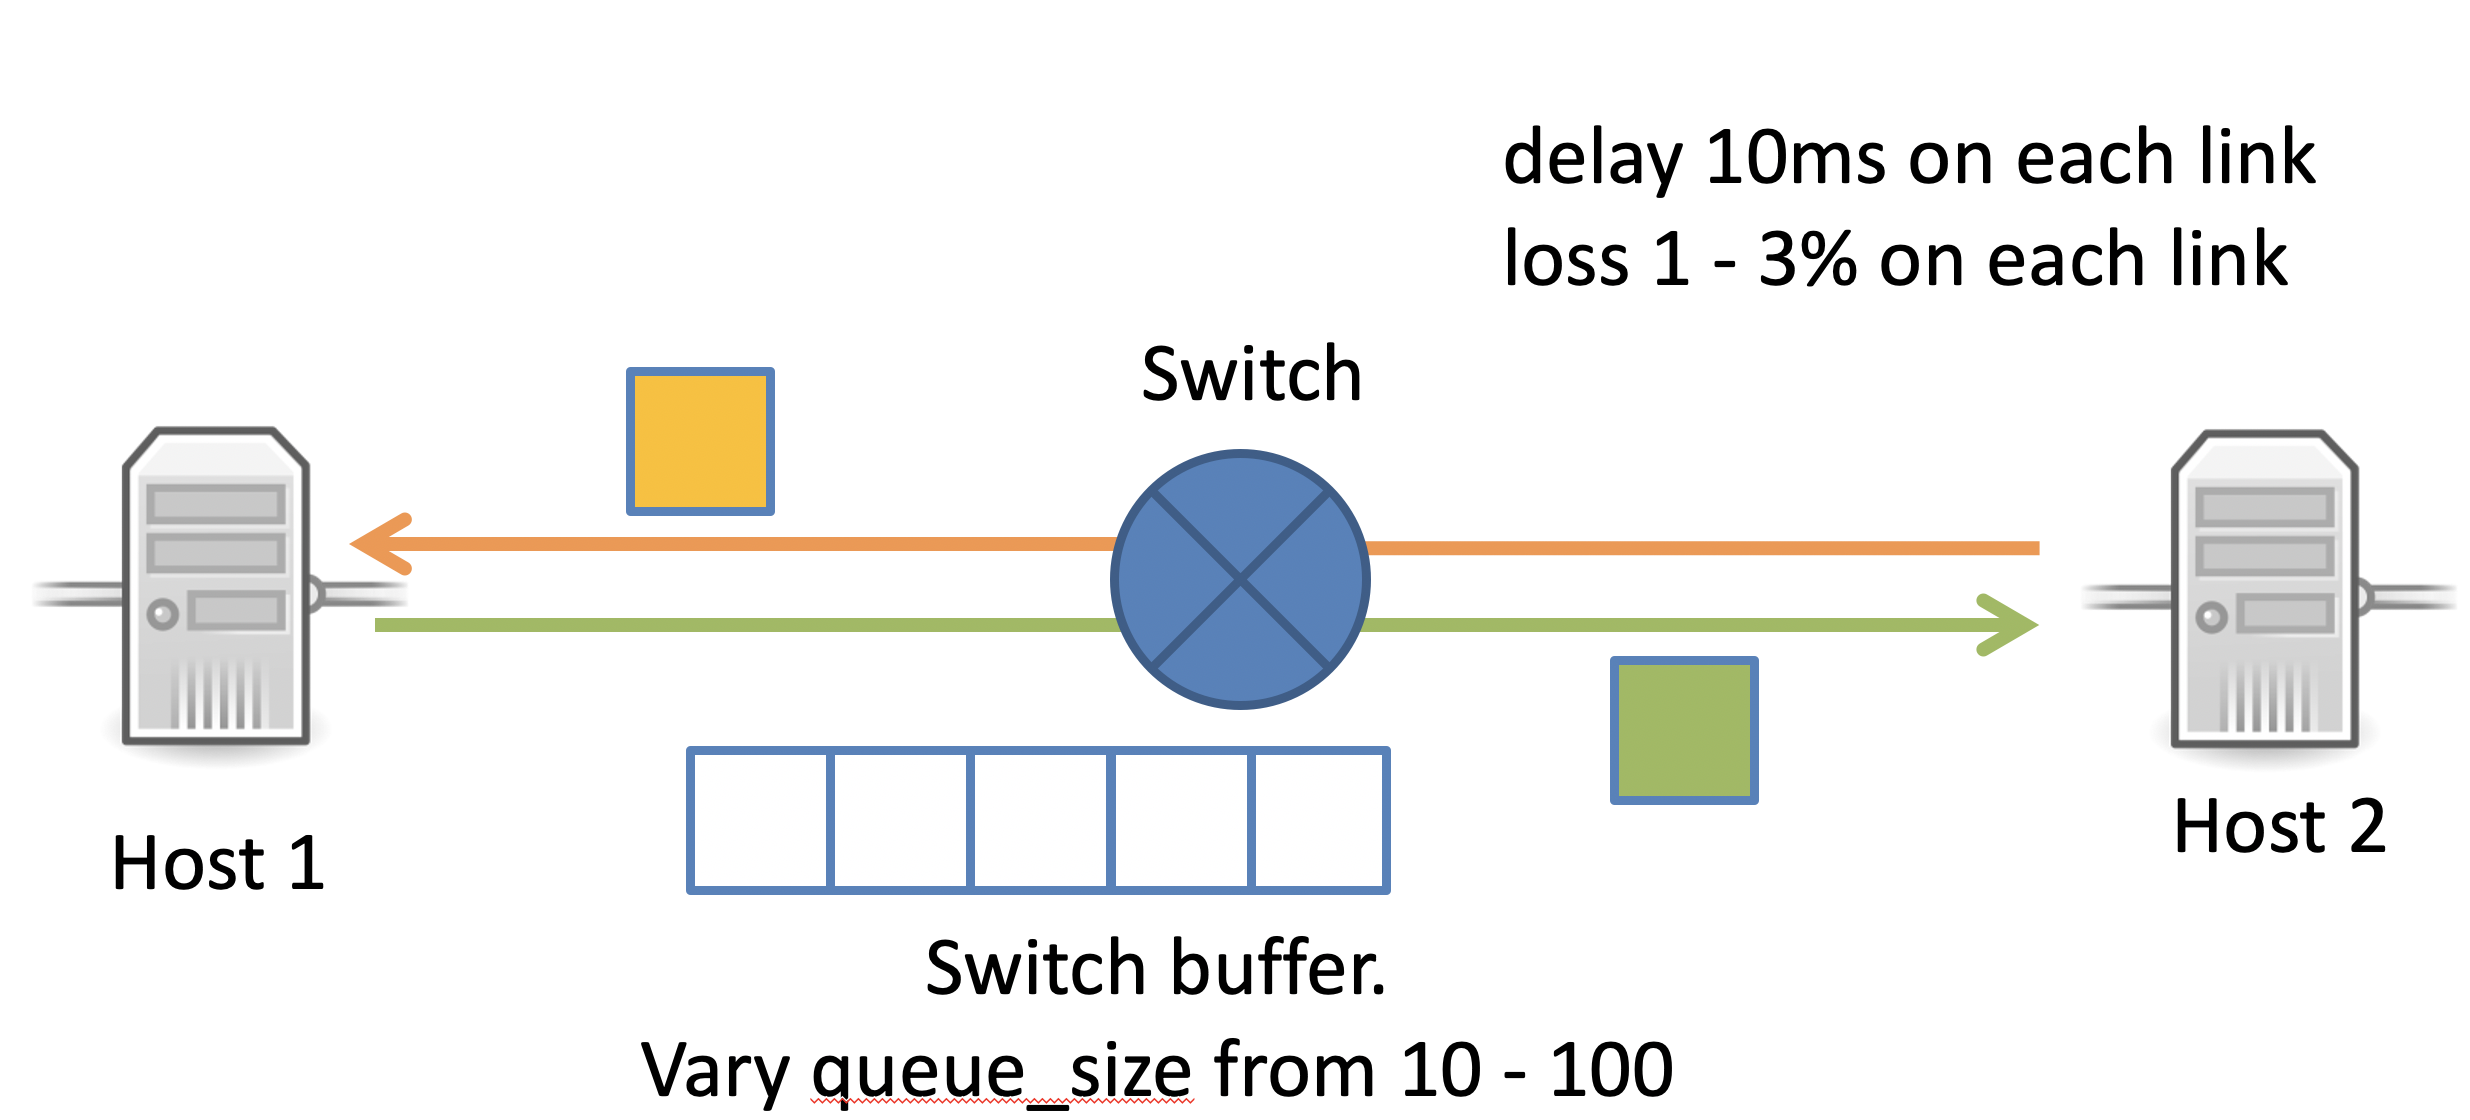
Link packet buffers will vary from 10 - 100 at the switch.
-
Your protocol should provide in-order delivery. That is, the receiver should receive packets in the same order that the sender sends them, even if something occurs (e.g., losses) that causes a later-sent packet to arrive before an earlier-sent one.
-
You should mimic TCP’s AIMD congestion control behavior. Your protocol should provide as much performance as network conditions will reasonably allow. If there is free space in the router or switch queue, your protocol should attempt to take advantage of that. If it overflows the queues, it should back off.
-
Cleanly shut down connections on both ends, and deliver outstanding packets.
-
You do not have to deal with checksums or error detection and corruption.
-
Your library (
lab5.handlab5.c) should allow any application that’s built on top of it to achieve reliable communication. When transferring files with your library, you should get byte-for-byte identical copies usingdiff,md5sum.
Working example
-
Similar to lab 4, we will run this lab inside a Virtual Machine (VM) that runs
mininet- a virtual network emulator. -
The following commands show how you can test your application-layer code with a completely implemented version of your lab.
# SSH into the virtual VM and cd into Lab4
$ ssh localhost -p 22222 -l mininet
$ cd lab5-username1-username2/

# Setup mininet with appropriate delay and loss parameters
$ sudo mn --link tc,delay='10ms',loss=5,max_queue_size=10

# run lab4 receiver first in the mininet terminal
$ mininet> h2 ./lab5_receiver 9000 > output.txt 2> output.err & echo $!

# SSH into the virtual VM in a different terminal
$ tail -f output.txt output.err

# run lab4 sender in mininet (mininet terminal)
$ mininet> h1 ./lab5_sender 10.0.0.2 9000 < 1000lines

# view differences in output and input (second terminal)
$ md5sum 1000lines output.txt
187323fe69aa075411d75dd0849f8263  1000lines
187323fe69aa075411d75dd0849f8263  output.txt
Getting your Lab 5 Starting Point Code
Log into CS43 Github for our class and get the ssh-URL to your lab git repository. Follow along with the prompts below to SSH, create a lab directory and clone your lab repos.
# ssh into our lab machines
ssh yourusername@lab.cs.swarthmore.edu

# cd into your cs43/labs sub-directory and clone your lab2 repo
cd ~/cs43/labs
git clone [your-ssh-URL]

# change directory to list its contents
cd lab5-user1-user2

# ls should list the following contents
ls
 Makefile README.md week1-worksheet.md week2-worksheet.md 1000lines generate_test_files.py lab5_sender.c lab5_receiver.c
You will notice that you are missing the files lab5.c and lab5.h. That’s because you can base it off of your reliable lab4.c and lab4.h. You can start by copying them over, and changing their names, and the struct lab4_hdr fields appropriately. You should also continue to run your VM on the CS_Machines allocated to your group from Lab 4.
|
High-level overview of your program
-
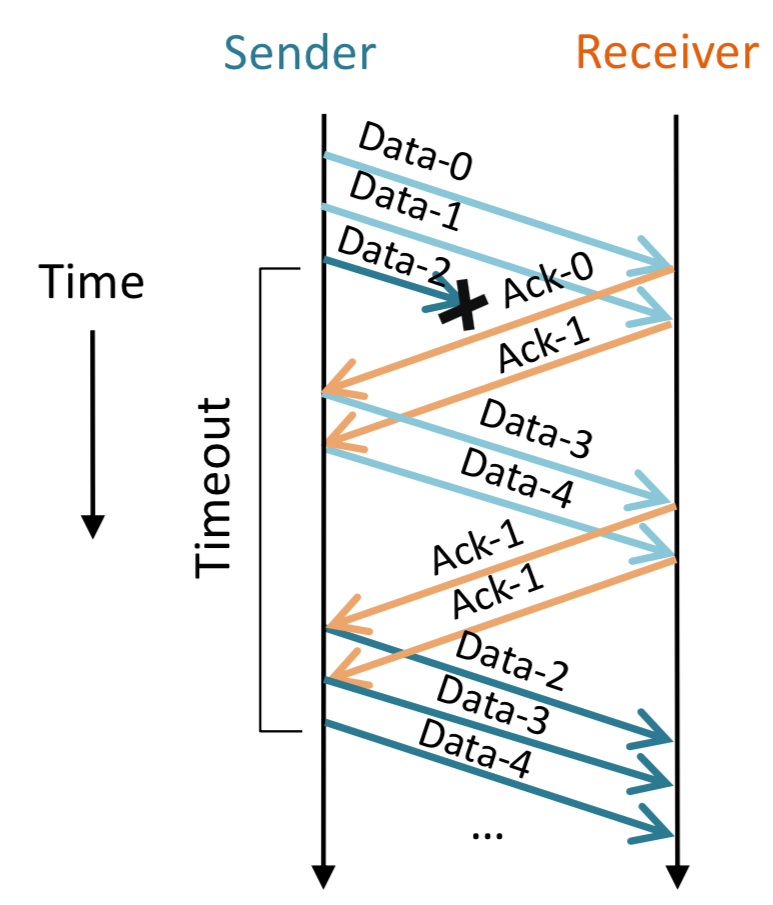
In Go-Back-N: Packets are retransmitted from point of loss.
-
Segments between loss event and retransmission are ignored.
-
Packet transmissions, "Go-back-N” if a timeout event occurs.
-
-
Protocol API: You are responsible for writing/editing only the following functions:
-
in
lab5.c:my_socket,my_send,my_rtt,my_recvandmy_close. -
in
lab5.h: add state tostruct lab5_hdr -
to send and receive data across the wire, we will be using UDP’s unreliable
sendandrecvfrominmy_sendandmy_recv. Your code in the functions above are responsible for implementing reliability on top of UDP.
-
-
Application layer:
lab5_sender.candlab5_receiver.cimplement the application layer that calls your library functions.lab5_sender.candlab5_receiver.ceach get their own copy of your library functions.-
You may only edit
lab6_sender.candlab6_receiver.cfor your own testings purposes. When grading, I will use the default version, so do not rely on changes to the application layer for correct operation.
-
Workflow
The workflow remains similar to Lab 4. The main elements that change are sending pipelined data, and keeping track of packets in flight.
-
Setup initial state in
my_socketcall, that GBN would need to get started. -
Setup metadata that the transport layer packet header (per packet) will need to carry in
lab5.h. You can keep this header value minimal. -
Setup helper functions that will be called by
my_sendandmy_recv. -
Implement
my_rttsimilar to Lab 4. -
Implement reliable sending in
my_send. To reliably send data, you will need to implement the following:-
Maintain a data structure that keeps track of all the packets in your window.
-
For each packet, create a header, and maintain timeout values associated with that packet and send the packet.
-
Keep track of packets sent and acknowledgements received.
-
Depending on whether you have received ACKs or encountered a timeout change, implement congestion control and change your window size according to AIMD.
-
You can choose to implement fast-retransmit but you don’t have to.
-
-
Implement reliable receive in
my_recv. To reliably receive data, you will need to implement the following:-
Receive packets over the network the size of your window. For each packet, you do not need to check for errors in the checksum.
-
Make sure packets are received in order, and send appropriate cumulative acknowledgements to the sender.
-
If packets are received in order, remove the transport layer header and copy the application layer payload to the application buffer
-
Return the number of bytes received to the application.
-
-
Implement reliable closing in
my_close. Your implementation should cleanly shut down connections on both ends, even if packets get lost.-
You do NOT need to implement the TCP behavior that allows each side to shutdown independently.
-
Your
my_closefunction logic can remain the same as Lab4. -
Before closing, make sure to send and ACK all outstanding packets in a window before sending a FIN packet.
-
Weekly Deliverables
Week 1
-
Setup
lab5.candlab5.hbased on Lab 4. -
Complete
week1-worksheet.md. This is a deliverable by the end of week 1 of lab5. -
Implement 1-4 of the workflow and get started on 5.
Week 2
-
Implement 5 - 7. Reliably closing takes some time to think about - don’t leave this as an afterthought!
-
Complete
week2-worksheet.md. -
Test your code to make sure you can reliably send and receive.
Setting up your VM and Mininet
The instructions for setting up your Virtual Machine and Mininet are the same as lab 4.
Go-Back-N Protocol
This section adds more detail on setting up your GBN protocol.
Pipelined transmission
-
Your
my_sendfunction is now responsible for sending more than one packet at a time. -
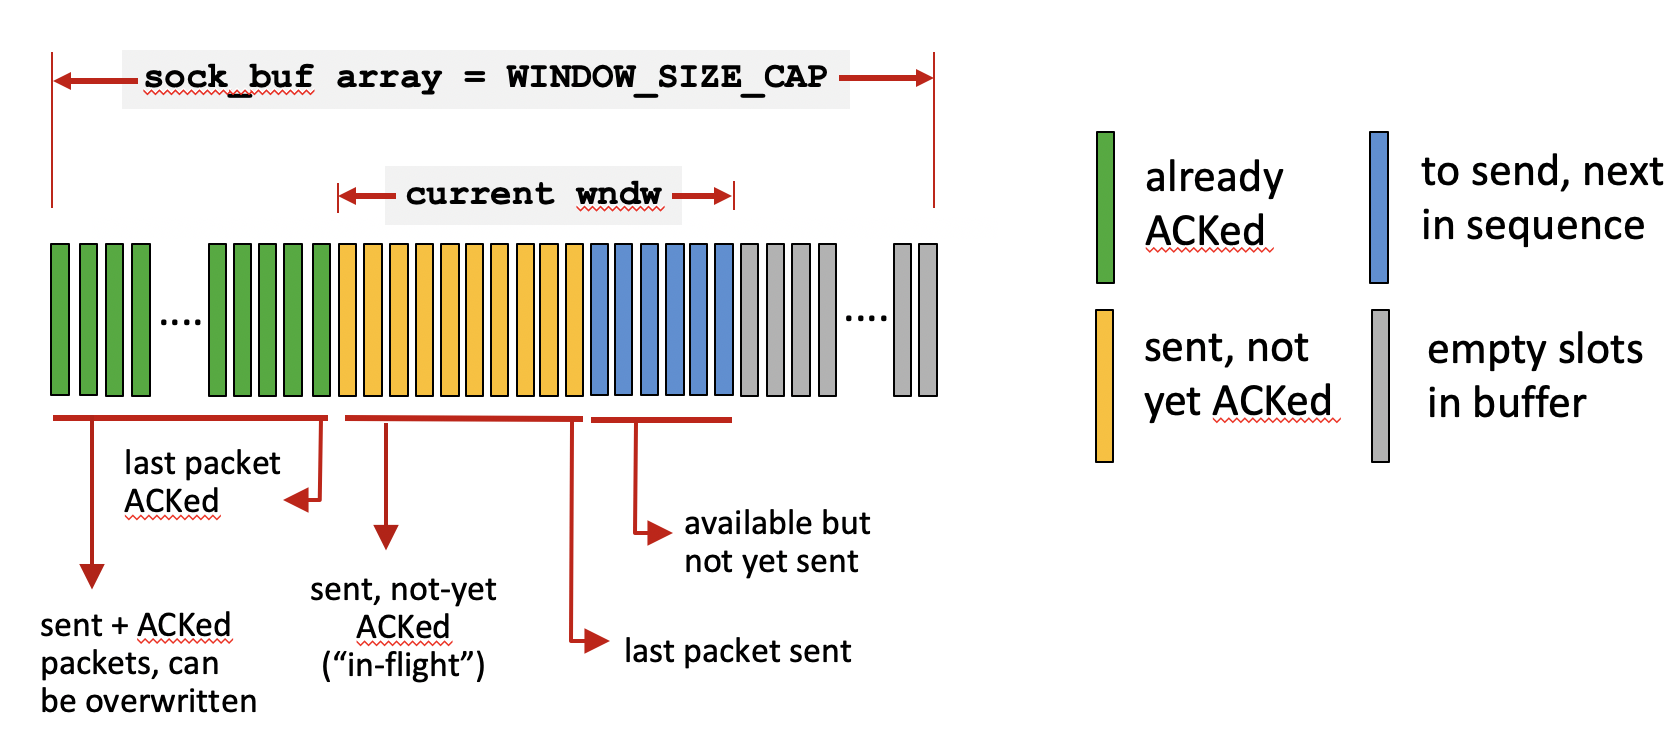
To implement this functionality, we will maintain a socket buffer data structure that will hold packets passed down from the application layer. In the figure above, this corresponds to the
sock_bufarray. For thesock_bufarray you can allocate a static array of sizeWINDOW_SIZE_CAP. Just asMAX_PACKETis predefined inlab4.h, you can define a macro withWINDOW_SIZE_CAP = 2000.// In lab5.h # define WINDOW_SIZE_CAP 2000
-
We will also maintain variables to point to the start and end of the current window or
cwnd; your congestion window.cwndgrows and shrinks based on network conditions. You can assume thatcwndwill never reach the size ofsock_bufarray. -
As you send data and get ACKs back for packets, you can keep advancing your congestion window
cwnd. If you reach the end of thesock_bufarray, you want to circle back to the beginning; i.e., implement the array as a circular queue. -
For each packet in your
sock_bufarray you should keep track of the status of that packet. This might include if the packet is in flight, has received an ACK, the timeout values, etc. -
To keep track of the information per packet, each element of your socket buffer array can be a
structwith everything you need to know about a packet. Essentially yoursock_bufarray, is an array of struct packets. You might want to declare thestruct packetinlab5.has follows:struct packet{ char array[MAX_PACKET]; //hold the header + packet. float timeout; //future timeout per packet uint32_t sequence_number; int packet_status; //retransmitted //any other fields you find necessary };This struct is not to be confused with struct lab5_hdrwhich you’ll keep the same asstruct lab4_hdr.struct lab5_hdris the header information associated with each packet being sent from the sender to the receiver. Whereas,struct packetis book-keeping information the sender will maintain for each packet in flight within its socket buffer.
Implementing Congestion Control: Additive Increase Multiplicative Decrease (AIMD)
To implement AIMD, you might want to create helper functions to my_send that are responsible for: (a) Receiving acknowledgements and (b) Scheduling timeouts.
Your AIMD should:
-
Start in Slow Start, with
cwnddoubling each time an entire window’s worth of packets is acknowledged. -
Transition to Congestion Avoidance, if you loose a packet, i.e., half
cwnd, and start increasingcwndlinearly. -
Once you enter Congestion Avoidance you can remain in this phase, and don’t have to go back to Slow Start.
AIMD Control Flow:
To implement reliable delivery, this time you do not want to wait to receive an ACK before returning to the sender! Instead you want to keep adding packets up to the size of cwnd, and return to the sender once you have reliably sent at least one free spot available in cwnd.
At a high-level this would look like the following:
1: while you have open slots in cwnd:
2:  copy the packet that the application layer has given  to the sock_buf array
3:  setup state required for the packet, including timeouts etc.
4:  send the packet
5: return to the application layer
6: if all your open slots are full:
7:  enter a while loop and call a separate function to receive ACKs
Scheduling Timeouts
Since we are pipelining packets, we now need to check the timeout values for every packet. To do so, we will use the struct packet to maintain book-keeping information about the future timeout values for every packet.
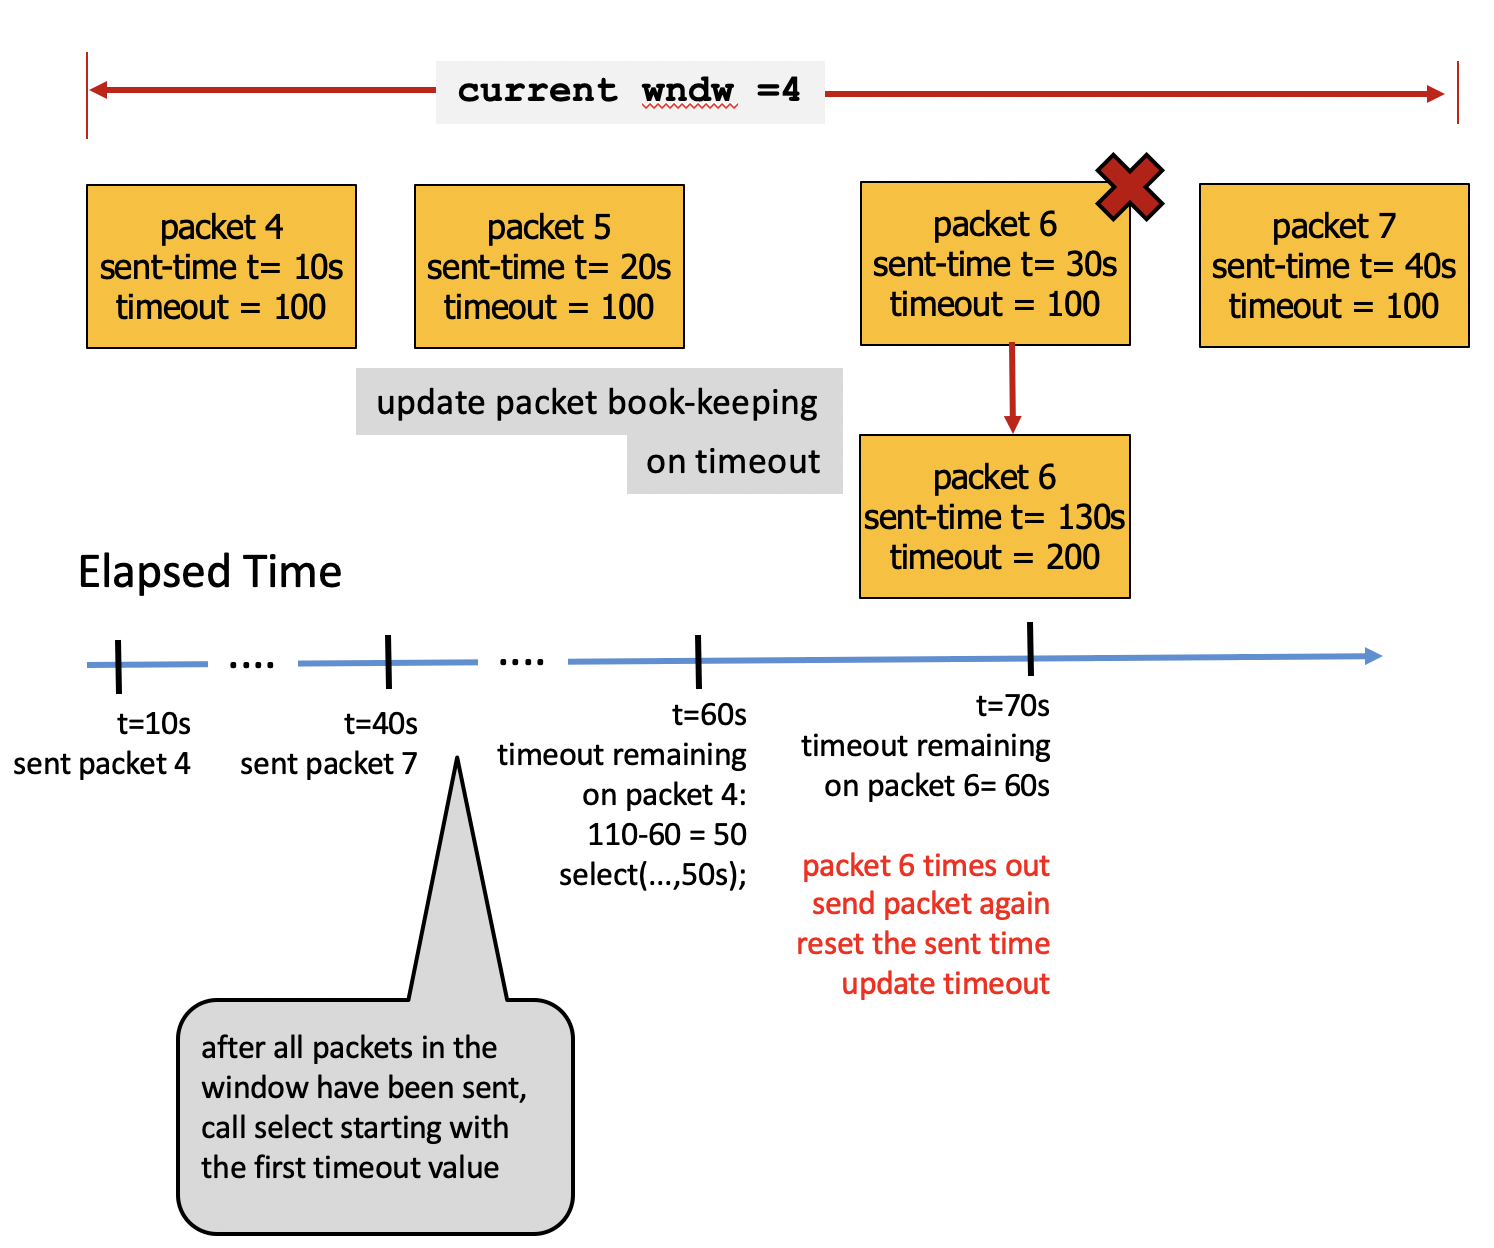
cwnd have been sent, and we are now ready to check if there are any received ACKs.-
Rather than calling select as soon as we send a packet, this time we will send all the packets in our window, and call select on the first packet to timeout.
-
To keep track of timeouts per packet, for every packet we send, we will keep track of the time sent using
current_msec(), and calculate the timeout for that packet and maintain this information instruct packet. This is shown in figure 4. -
In figure 4, we have
cwnd = 4and we have sent all four packets, and kept track of thesent_timeandtimeoutfor each packet.
| The timescales it takes for multiple packets to be processed and sent at the sender are much much smaller than the time it takes for the network to send back an ACK. |
-
Once we have sent the packets, we are ready to call select. We pass to select the smallest timeout value within our sent window. As shown in the figure, note that at this point some time would have elapsed since we sent that packet, and we would have to account for this in the timeout value you pass to select.
-
The figure shows how you would set the timeout for the first packet in our window, packet 4. We calculate the projected timeout (
sent_time + timeout) and subtract thecurrent_time, to get the time we still need to wait, for packet 4. -
In general, your code would have a control flow similar to the following to receive ACKs.
1: Receiving ACKs:
2:  find the packet with the earliest packet_timeout
3:  to set the timeout calculate: packet_timeout + sent_time - curr_time
2:  call select and with this timeout value
3:  if select times out
4:    send all the packets that have timed out
5:    for every packet retransmitted, reset the timeout and other book-keeping information
6: if select does not timeout
7:    calculate the RTT using EWMA
8: if an ACK has successfully been received:
9:    and if there are one or more empty slots in cwnd
10:     advance cwnd and possibly double or increment cwnd
11:     return from my_send back to the application layer.
Recall the timeout_struct has to be reinitialized every time you call select! select internally decrements the value of the timeout_struct until you receive an ACK.
|
Implementing Receiving, RTT estimates and calling select
This should mostly be the same as Stop-and-Wait. Refer to Lab 4 pages for the workflow for receiving, estimating RTT, struct casting tricks, and calling select.
Implementing Closing
Most of your functionality can stay the same as my_close in Lab 4. The key difference here is that if my_close calls `my_send, with a FIN you should first make sure to send all outstanding packets in your window, before sending the close packet.
You do not want to immediately close the connection, and drop application layer data!
Grading Rubric
This assignment is worth 8 points.
-
(-1) - Penalty for writing or implementing code before the completion of the week 1 worksheet.
-
2 - Complete week 1 worksheet, and design run-through.
-
1 - Complete week 2 worksheet.
-
2 - Your protocol delivers packets reliably and in-order, regardless of link buffer size, with a window size that is larger than one.
-
1 - Your protocol’s performance increases significantly when network conditions are more favorable.
-
1 - Your protocol cleanly terminates connections such that both ends agree that the connection is closed.
-
1 - Your protocol has no memory leaks or invalid memory accesses (i.e.,
valgrindshould not complain about anything). Your pseudo-kernel library will need to keep track of the window and outstanding packets, and it would be very bad for the kernel to have memory problems.
Testing
-
If you want to add a print statement to your library, use
fprintfto print to thestderrstream rather than the usualstdout. There are examples of this in the library already. The benefit of using this method is that it won’t interfere with the results that are outputted by the receiver, since that captures only stdout. -
You should experiment with a range of packet queue sizes in
mininet. For loss rates, you can go from 1% to 3% (effective overall loss rate of 88%) at most. If you set higher loss rates, your pipelining windows will be very small and you won’t see an improvement over Stop-and-Wait. -
Your estimated RTT should converge to the network RTT for large file transfers and small loss rates (1%).
-
md5sumsfor the input and output files should match for all file sizes. -
my_close, should reliably close even withICMPpackets disabled.
Tips
-
START EARLY! The earlier you start, the sooner you can ask questions if you get stuck.
-
Test your code in small increments. It’s much easier to localize a bug when you’ve only changed a few lines.
-
git pushfrequently. You could loose your code if it lives only on the VM.
Submitting
Please remove any debugging output prior to submitting.
Please do not submit output file(s) that you used in testing.
To submit your code, simply commit your changes locally using git add and git commit. Then run git push while in your lab directory.