Uncle Shuck’s Farm
By UncleShuck’s farm, Dawsonville, GA
Due Wednesday, March 20 at 11:59pm.

Uncle Shuck’s Farm
By UncleShuck’s farm, Dawsonville, GA
This lab comes in three parts:
Implementing stack and queue data structures
Writing an application to solve a maze using (at the user’s option) either breadth-first or depth-first search
Answering written questions involving induction
The main goals of this lab are to use data structures to implement algorithms and to gain practice using induction. Concepts you will be familiar with after this lab include:
Stacks and queues
Depth-first search
Breadth-first search
Induction
Note: This is a two-week lab assignment. However, the lab is due in three weeks due to the mid-semester break. This lab is not designed to make you work over break, nor are you expected to. There are, however, two weeks' worth of work in this lab, and we do expect you to work on it this week. Plan accordingly.
You can choose your partner for this lab using Teammaker. The URL for your repository will be
git@github.swarthmore.edu:CS35-S24/lab06-<your-teamname>This lab involves writing code for a program called maze. This program will solve provided mazes using the depth-first and breadth-first search algorithms discussed in class. To implement these algorithms, you will first need to create implementations of the Stack and Queue ADTs.
When you clone your repository, you will see the following files. Files you may need to change appear in bold.
adts/: A directory containing the C++ definitions of the ADTs you will use for this lab (e.g., List). You are not permitted to change these files, but you’ll probably want to refer to them.
linkedQueue.h/linkedQueue-inl.h: The LinkedQueue class, which you will implement.
linkedStack.h/linkedStack-inl.h: The LinkedStack class, which you will implement.
manualTests.cpp: A sandbox test program for you to use while you develop your program.
testStackQueue.cpp and testMaze.cpp: Unit tests for your data structure. These tests have already been written. You will not have to write your own tests for this assignment, but you should definitely run the ones you’ve been given!
position.h/position.cpp: The Position class which is used to track the search process through a maze.
maze.h/maze.cpp: The Maze class which is used to represent a maze and provide solutions to it.
mazeUtils.h/mazeUtils.cpp: Provided utility functions for the Maze class, such as reading files and rendering solutions.
main.cpp: The program which reads a maze, solves it, and prints the result.
test_data/: A directory containing several files for testing your main application. The format is described below.
We can group these files into the major components of the maze lab, which we recommend implementing in the given order:
ADTs and data structures. You are provided with ADTs (List,Stack, Queues, OrderedCollection) in the adts folder and some implementations (STLList). You will implement LinkedQueue and LinkedStack in the corresponding files. You will thoroughly test your implementations using manualTests.cpp and testStackQueue.cpp.
Helper methods for the maze application. These are the provided Position class, the Maze class (you will implement the search related methods of this class), and the provided maze utilities (for loading and drawing your mazes). You will thoroughly test your implementations using manualTests.cpp and testMaze.cpp.
The main application. You will write the main function for the maze program in main.cpp to bring all of the components together.
For this and future labs, you will occasionally be provided with implementations of the ADTs we discussed in class. These implementations make use of the C++ standard template library (STL) and are written as classes named e.g. STLList. To use these classes, simply #include the header the same way you normally would, using the directory names as necessary (e.g. #include "adts/stlList.h). You are welcome to inspect these files, but recall that a feature of implementing ADTs is that you only need to know the interface. The STLList, for example, has the exact same interface as your LinkedList implementation from last week:
/* ADTs */
#include "adts/list.h"

/* Implementations */
#include "adts/stlList.h"

int main(){
  List<int>* list = new STLList<int>();
  list->insertFirst(10);
}LinkedQueue and LinkedStack
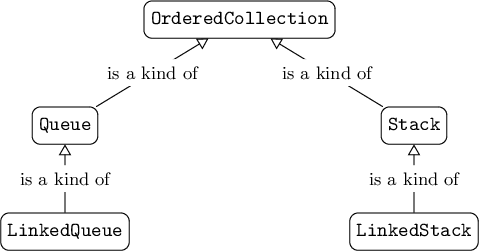
Type Hierarchy for Stacks and Queues
The LinkedQueue and LinkedStack classes appear in the like-named files in your starter code. As we discussed in lecture, these classes are easily implemented using a linked list; you can find a linked list implementation in the form of the STLList class in the file adts/stlList.h. You should proceed by implementing each of the methods in the files linkedQueue-inl.h and linkedStack-inl.h. These methods are not meant to be complex; they require very little code to complete. You do not need to throw your own exceptions from these objects' methods since the underlying list will do so for you. For example, while pop() should raise an exception if it is called on an empty list, the STLList will throw this for you when you try to remove an element from an empty list.
This lab includes an OrderedCollection abstract class which describes the commonalities between queues and stacks (also as discussed in lecture). Note that e.g. LinkedQueue is a subclass of both Queue and OrderedCollection, so it will need not only enqueue and dequeue methods but also insert and remove methods. The insert and remove methods can be implemented simply by calling enqueue and dequeue; we will rely on this commonality later to reduce the amount of code you need to write!
Once you’ve completed your LinkedQueue and LinkedStack implementations, run the unit tests (make testStackQueue followed by ./testStackQueue) to see if they are working correctly. After these tests pass, proceed to the Maze part of the lab.

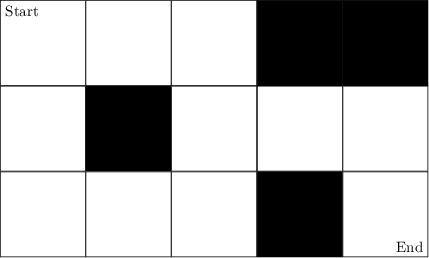
An example maze. Black squares are walls.
Once you have completed your LinkedQueue and LinkedStack implementations, you are prepared to implement the search algorithms we discussed in lecture. We begin by considering how we will represent the mazes we intend to solve.
Each maze is a rectangular grid. Each space in the grid is connected to the orthogonally adjacent spaces. That is, from any location in the grid, you can move one space right (east), down (south), left (west), or up (north); you cannot move diagonally. The starting point of every maze is the upper left corner; the exit is in the bottom right.
The layout of a particular maze will be stored in a text data file with the extension .map; you can find several examples in your test_data directory. We have already written the code which loads files in this format for you; this explanation is just for reference. A map file contains the following:
The width of the maze in squares (that is, the number of columns in the map).
The height of the maze in squares (that is, the number of rows in the map).
For each row of the map, a string describing all of the spaces in that row.
Each # character is a wall.
Each . character is an open space.
For instance, the following is a valid map corresponding to the grid in the figure:
5 3
...##
.#...
...#.
Position ClassThis class is written for you, but you’ll need to make frequent use of this class, so it’s helpful to understand what it does.
Each Position object contains information for one place in the maze: the (X,Y) coordinates (where (0,0) is in the upper-left), and some fields which will be used during the search to construct an appropriate path through the maze. The constructor of the Position class takes the X and Y coordinate values and initializes the other fields to suitable default values.
Maze ClassA Maze object represents our knowledge of a particular maze; we can use this information to find a path through the maze using various search strategies. The Maze class stores the maze characters as a one-dimensional array. It also stores a one-dimensional array of Position * representing the locations within the maze. Both arrays are length width*height, which is the total size of the maze. Remember that we’ve seen that you can represent two-dimensional data in one dimensional arrays in the picfilter lab. The constructor, destructor, and many of the basic getters and setters of this class have been written for you.
The Maze class has several private methods to help you implement the search strategy: isExit, inBounds, and getNeighbors. Be sure to implement these first.
The Maze class has two public methods: solveBreadthFirst and solveDepthFirst. These will perform the appropriate search algorithm and return an answer. The answer is in the form of a List<Position*>*: a pointer to a new list of positions which constitute a correct path through the maze from start to finish. These two algorithms are very similar: they only differ in which data structure they use to perform the search! Regardless of whether we are using a stack (depth first) or a queue (breadth first), the search algorithm goes as follows:
Insert the pair (start position, nullptr) into your data structure
While the data structure is not empty:
remove a pair from the data structure and store it as (current, previous)
If current is not visited:
set current as visited
set current's previous to previous
If current is the exit, then our search is complete; we can break the loop!
For each neighbor of the current position:
insert (neighbor, current) into the data structure
If current is the goal:
return the path as a list
At the end of the loop, you can determine whether you found a path
by seeing if the current position is at the exit. If so, you just need to follow the previous position pointers backward adding each Position to the List you need to return until you reach the start to describe the path to take. If the current position is not, then there is no possible path through the maze.
To avoid writing the same code twice, we can implement the above algorithm in the private method solve. This method takes an argument of type OrderedCollection<Position*> and uses that data structure during the search. Then, solveBreadthFirst and solveDepthFirst both call solve, each providing an appropriate data structure. Your solve method will return the list of positions that describe the correct path through the maze (or a nullptr in the event that no such path exists).
Maze ClassMake sure to run the provided unit tests on your code as you develop using make testMaze and ./testMaze; definitely test your code once you’ve finished the Maze class! It’ll be easier to find most bugs in your Maze implementation by direct testing than it will be by trying to find them by hand by running the maze program.
mainThe implementation for main relies mostly on the classes you have already completed and is thus relatively short for such a large lab assignment. The loadMap and renderAnswer functions have been written for you. loadMap will read a map file; it will return a Maze* if load is successful and will throw a runtime_error otherwise. renderAnswer will produce a string containing a solution, which looks like the map from the map file but contains @ characters on the path that you found. For instance, here is a one example execution of the program:
$ ./maze test_data/example4.map breadth
calling BFS

@@@@@@@@
.......@
.......@
.......@
.......@
.......@
.......@
.......@

The solution contains 15 steps
Let’s try the same map using depth-first search:
$ ./maze test_data/example4.map depth
calling DFS

Calling DFS!

@@@@@@@.
@@@@@@@.
@@@@@@@.
@@@@@@@.
@@@@@@@.
@@@@@@@.
@@@@@@@.
@@@@@@@@

The solution contains 57 steps.
NOTE: BFS should always find paths that are less than or equal in length to paths found by DFS on the same maps.
NOTE: Search should visit neighbors in this order: east, south, west, north.
Your program will take two command-line arguments:
The name of the map file containing the maze to solve
Either "depth" or "breadth" to indicate the type of search to perform
If there is a solution to the provided map, your program should print the rendering of that solution. If there is no solution, your program should print a message to that effect.
Your maze program should gracefully handle the following cases of invalid input:
The user provides an invalid number of command-line arguments.
The user provides a search type other than "depth" or "breadth".
The user provides an invalid maze file (to be handled by catching the exception from loadMap).
Note that you are not permitted to allow your program to crash in these cases; you must catch exceptions and print messages accordingly, using syntax similar to the following:
try {
    ... // do stuff
} catch (runtime_error e) {
    ... // handle error
}Your program is required to run without any memory errors. Use valgrind to determine if you have any memory errors; we will do so, and any errors reported by valgrind will result in lost points. You should also use valgrind as a debugging tool as you develop your program.
You are also required not to have any memory leaks, although memory leaks will be scored far more generously. You are encouraged to worry about memory leaks only after your program is working correctly. Once your program works, commit and push it and then consider making changes to solve leaks. It’s much better to have a correct, leaky program than it is to have a leak-free program that crashes.
As usual, you will also be required to observe good coding practices:
Your C++ code must have proper and consistent indentations.
You must have proper and consistent usage of spacing & braces for if, else, for, and while conditions as well as class definitions and code blocks.
In this part of the assignment, you will answer questions related to induction. You will submit your answers just as before: in a typeset PDF format. You are encouraged to use LaTeX to typeset your work; we have provided WrittenLab.tex as a starting point. Your solution should appear in WrittenLab.pdf.
For this part of the lab, answer the following questions.
Prove each of the following claims by induction.
The sum of the first \(n\) even numbers is \(n^2 + n\). That is, \(\sum\limits_{i=1}^{n} 2i = n^2 + n\).
\(\sum\limits_{i=1}^{n} \frac{1}{2^i} = 1-\frac{1}{2^n}\)
\(\sum\limits_{i=0}^{n} 2^i = 2^{n+1}-1\)
The function minEven, given below in pseudocode, takes as input an array A of size n of numbers. It returns the smallest even number in the array. If no even numbers appear in the array, it returns positive infinity (+∞). Using induction, prove that the minEven function works correctly. Clearly state your recursive invariant at the beginning of your proof.
Function minEven(A,n)
  If n is 0 Then
    Return +infinity
  Else
    Set best To minEven(A,n-1)
    If A[n-1] < best And A[n-1] is even Then
      Set best To A[n-1]
    EndIf
    Return best
  EndIf
EndFunctionWhen you are finished, you should have
A working Maze class
A main which provides a command-line interface to solve mazes
The ability to handle bad command-line arguments or user input
No memory errors!
Code which conforms to the style requirements above
Written answers to the algorithmic analysis questions in PDF form