CS21 Lab 6: Graphics, Using Objects
Due Saturday, October 26, before midnight
Goals
The goals for this lab assignment are:
-
Practice using object-oriented programming
-
Become more comfortable using dot notation to call methods of objects
-
Learn how to draw graphics in python
As you write programs, use good programming practices:
-
Use a comment at the top of the file to describe the purpose of the program (see example).
-
All programs should have a
main()function (see example). -
Use variable names that describe the contents of the variables.
-
Write your programs incrementally and test them as you go. This is really crucial to success: don’t write lots of code and then test it all at once! Write a little code, make sure it works, then add some more and test it again.
-
Don’t assume that if your program passes the sample tests we provide that it is completely correct. Come up with your own test cases and verify that the program is producing the right output on them.
-
Avoid writing any lines of code that exceed 80 columns.
-
Always work in a terminal window that is 80 characters wide (resize it to be this wide)
-
In
vscode, at the bottom right in the window, there is an indication of both the line and the column of the cursor.
-
Function Comments
All functions should have a top-level comment! Please see our function example page if you are confused about writing function comments.
You must work in the lab
The graphics library will only work on the lab machines. Therefore, you can not use your own laptop to work on this week’s lab.
If you have any questions or concerns, please let us know.
The eyes have it
In this lab, we will work up to building a program that fills the screen with a grid of eyeballs that follow the mouse around the screen. We’ll build this program incrementally, starting with a simple grid of circles, moving on to drawing eyeballs, and finally making the eyeballs follow the mouse.
In the eyes.py file, we have provided a partial implementation of the main
function, and function stubs for the rest of the functions you will need to
write to complete the lab. You will need to write implementations of the
functions we have provided as stubs and complete main so that it calls the
functions you have written in a way that solves the problem presented below.
Here are all the functions (or function stubs) that are in the eyes.py
file, along with a brief description. In the starter code we provided,
you will find more extensive function comments and a partial implementation
of the main function.
def main():
    """ the main function for this lab """

def get_positive_integer(prompt):
    """ gets a positive integer from the user """

def create_circles(window, gridsize, diameter):
    """ creates a size-by-size grid of circles with the given diameter """

def color_circle(circle):
    """ give a circle a random color """

def move_eyes(eyes, point):
    """ move the eyes to follow the point """
The steps below will guide you through an incremental development of the solution.
get_positive_integer
You will start by asking the user to enter the number of circles that will be in each row and column of the grid and the size of each circle:
$ python3 eyes.py
Enter the grid size: 6
Enter the diameter: 100
You want to make sure that user only enters positive integers for each of values, repeating the question if they don’t answer correctly:
$ python3 eyes.py
Enter the grid size: hello
Please enter a positive integer.
Enter the grid size: -3
Please enter a positive integer.
Enter the grid size: 0
Please enter a positive integer.
Enter the grid size: 5
Enter the diameter: 2.5
Please enter a positive integer.
Enter the diameter: 100
To do this, you will implement the function get_positive_integer, which
you will use to read each of the values above (the grid size and the diameter).
You can use isdigit() method to check if a string is comprised entirely of
numbers.
def get_positive_integer(prompt):
    """
    This function prompts the user to enter a positive integer.
    If the user enters anything that isn't a positive integer
    (something that isn't all digits or the number 0 which is not positive),
    ask the user to enter the value again. Repeatedly ask the user until
    they enter a positive integer.

    Args:
        prompt (str): The prompt to show the user

    Returns:
        int: The integer typed by the user
    """
    # TODO: Implement this function

    # TODO: Change this line so it returns the int entered by the user
    return 1
Testing the get_positive_integer function
In main, be sure that you can use the get_positive_integer function to read
in the grid size and diameter before proceeding.
creating the graphics window
Now that you know the diameter of each circle and number of circles in each row and column, you can create the GraphWin graphics window with the appropriate size. For example, if the user enters 6 for the grid size and 100 for the diameter, you would create a window that is 600 pixels wide and 600 pixels tall.
Try different values for the grid size and diameter to make sure that the size of the window changes as the user enters different values.
(Note: if the user chooses a small grid size or a small diameter, the "Click to exit" message may not fit entirely in the graphics window, but that’s OK.)
create_circles
Now that the graphics window is set up, you will implement the create_circles function, which creates all of the circles in the grid, accumulates them into a list, and
draws them all in the graphics window. The function stub looks like this:
def create_circles(window, grid_size, diameter):
    """
    Given a graphics window, the grid size, and the diameter of each
    circle, create and draw circles to fill the window, returning
    the a list of the circles created.

    Args:
        window (GraphWin): the window where the circles will go
        grid_size (int): the number of circles across and down
        diameter (int): the size of each circle

    Returns:
        list: a list of the circles created
    """
This is a complicated function to write! Let’s try to break it down into smaller steps.
Creating a single circle
Let’s start by creating a single circle with the appropriate diameter in the top left corner of the window. Here’s what the window should look like with a grid size of 6 and a diameter of 100:
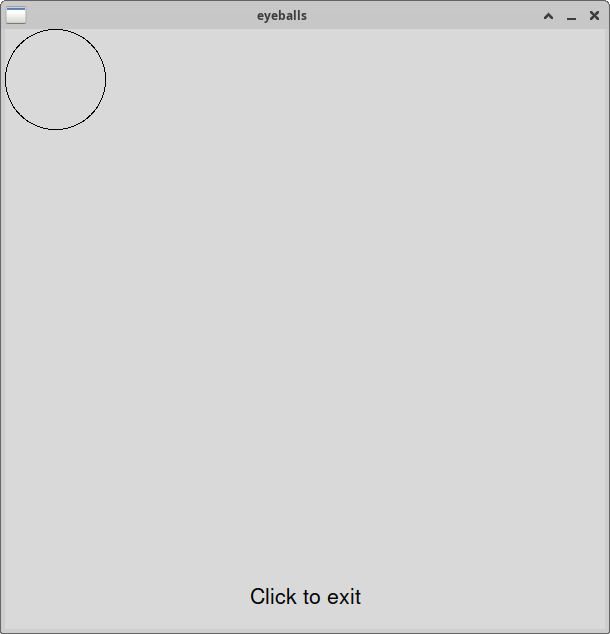
To create a circle, you need to know its center and its radius.
Since you know the diameter of the circle, you can compute the radius by dividing
the diameter by 2. But where is the center of the circle? Since the circle is against
the left side of the window, the center must be exactly one radius away from the left.
And since the circle is also against the top of the window, the center must be exactly
one radius away from the top. Since the top left corner of the window is at (0, 0), the
center of this circle must be at (radius, radius). Create and draw this circle in the graphics window.
Test your code! You should get a picture similar to the one shown above if you use a grid size of 6 and a diameter of 100. Try other grid sizes and diameters, too!
Creating a row of circles
Now that you can create a single circle, you can create a row of circles
across the top of the window using a for loop.
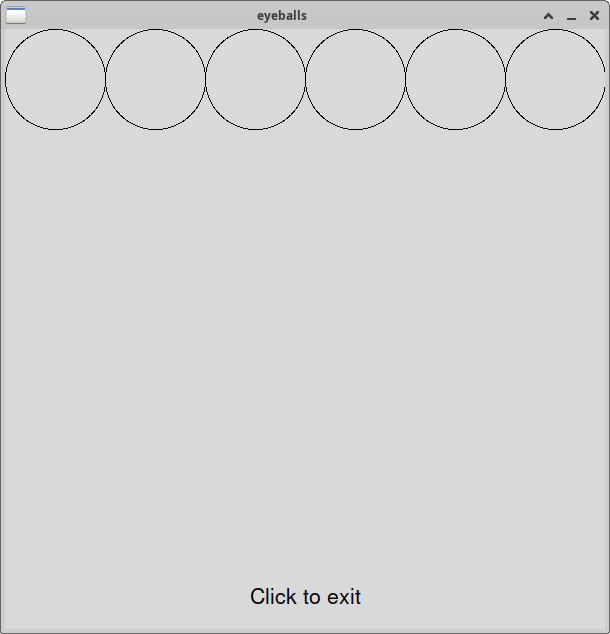
Notice that the center of each circle is diameter pixels to the right of the
center of the previous circle. That means the x coordinate of the center of the
next circle gets diameter pixels bigger each time you draw another circle whereas the y coordinate stays the same.
Write this for loop and test your code! You should get a picture similar
to the one shown above if you use a grid size of 6 and a diameter of 100.
Try other grid sizes and diameters, too!
Creating a grid of circles
Now that you can create a row of circles, you can create a grid of circles.
To do this, you will need a nested loop. The outer loop will change the
x coordinate (as you did above when you created the row of circles).
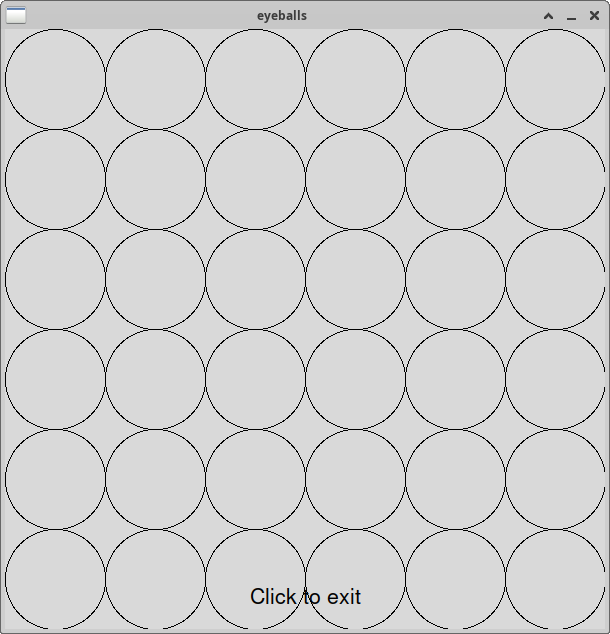
The inner loop will change the y coordinate. Since you are creating a grid
with the same number of rows and columns, the y coordinate will move down
by diameter pixels each time you move to the next row.
Write this nest for loop and test your code! You should get a picture similar
to the one shown above if you use a grid size of 6 and a diameter of 100.
Try other grid sizes and diameters, too!
Returning the circles
Now that you have created all the circles, you should return a list of the circles you created. In order to return a list of the circles you created, you will need to accumulate them into a list as you create them.
After your nested loop has created and drawn all the circles, your list should contain all the circles you created. Return this list from the function.
color_circle
Now that we can create a grid of dots, let’s color them with random colors
using the color_circle function:
def color_circle(circle):
    """
    Sets the fill and outline of a single circle to a random color.
    This function does not return anything.
    Args:
        circ (Circle): the circle to color
    """
    # TODO: Implement this function

    # This function has no return value
This function takes a single circle as a parameter and sets the fill and outline of this circle to a random color. This function mutates the circle, so there is no return value.
You can implement this function however you’d like, but you must end up choosing each circle’s color randomly.
-
One option is to create a list of colors that you can choose from and then randomly select the color from that list.
-
Another option is to use the function
color_rgb(r, g, b), which takes 3 integers as parameters: the red, green, and blue components of the color. Each component color value is between 0 and 255 (inclusive). Using the random library, you can choose random values for each component. You can use the return value ofcolor_rgbjust like any other color:
>>> color = color_rgb(138, 206, 0)  # brat green
>>> circle.setFill(color)
After you’ve completed this function, add a call to this function inside
your create_circles function just before you draw the circle.
Testing color_circle
Below are a few example runs. Since the colors are random, you should get something similar but of course the colors will not match.
$ python3 eyes.py
Enter the grid size: 6
Enter the diameter: 100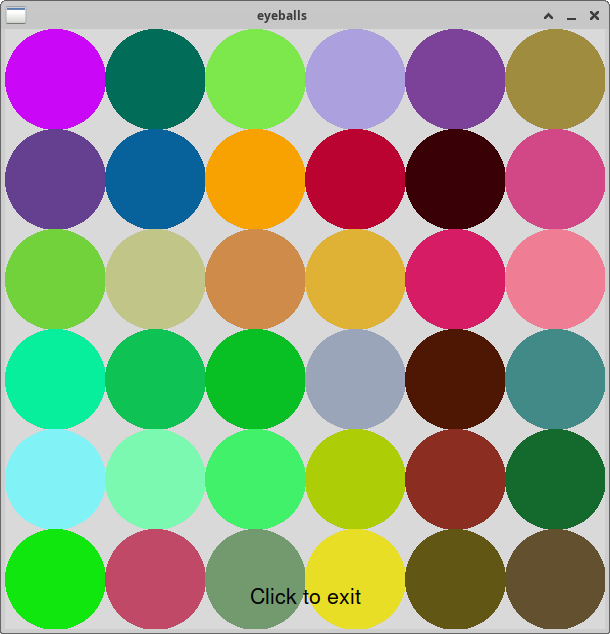
$ python3 eyes.py
Enter the grid size: 10
Enter the diameter: 25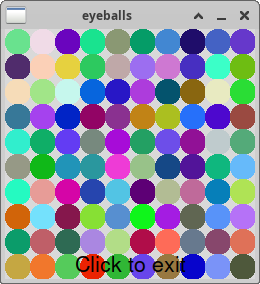
Eyeball replaces Circle
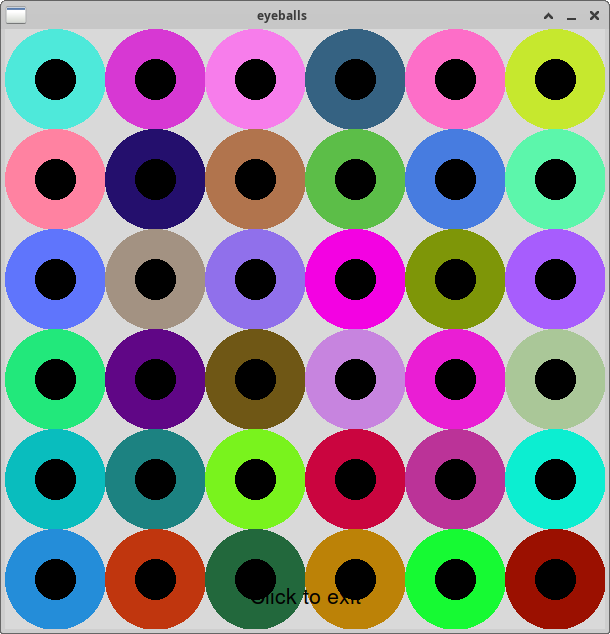
To make this lab more fun, we will turn the circles into eyeballs. An eyeball is just like a circle, but with a pupil in the center. The pupil is a small black circle that you can move around inside the eyeball.
Let’s first modify your code so that it creates eyeballs instead of circles.
To do this, find the line in create_circles where you call the Circle
constructor. Change the word Circle to Eyeball and re-run your code.
One of the really nice things about objects is that two objects that have
the same interface can be used interchangeably. This means that you can
write a function that takes a Circle object as a parameter and then
pass an Eyeball object to that function and it will work just fine!
All of the methods that work on a Circle object will work on an Eyeball
object, too. However, there are special methods that only work on Eyeball
objects. For example, there is a method called move_pupil that only
works on Eyeball objects. That makes sense because Circle objects don’t
have pupils. We use the move_pupil method in the next steps so that
we can make the pupils follow the mouse around the screen.
move_eyes
The move_eyes function takes a list of eyes and a single point on the screen as parameters and moves the pupil of each eye to move so that it is "looking at" that
point. This function mutates each Eyeball in the list, so there is no return value.
def move_eyes(eyes, point):
    """
    Move the pupil of each eye so that it looks at the point.
    There is no return value from this function.

    Args:
        eyes (list): a list of Eyeball objects
        point (Point): a point to have each pupil look at

    """
In main, we will make a call to move_eyes using the list of eyes returned
by create_circles and a point where the user clicks. You can get a mouse click from the user with the getMouse function in the graphics library. Assuming your graphics window is called window:
click = window.getMouse() # click will store the Point where the user clickedTo move a pupil, we use the move_pupil(dx, dy) method of the Eyeball class.
Given an Eyeball called eye, eye.move_pupil(15, -10) would move its pupil 15 pixels to the right and 10 pixels up.
If you have trouble seeing the pupils moving, you can make those values larger. (Notice that if you make the values
too large the pupils will come out of the eyeballs!)
Let’s ignore the point parameter right for now and try this out before continuing. Use the move_eyes method to move every pupil some dx and dy value of your choosing and test this by calling move_eyes in main.
Moving the pupil to look at the mouse click
Calculating where to move the pupil so it looks towards a particular point is
somewhat challenging, but we’ve provided a method in the Eyeball class that does
most of the hard work for you. Given an Eyeball called eye and a mouse click
stored in point, calling eye.new_location(point) will return a new Point which
is where the center of the pupil should be. You can use that new pupil center to
figure out the values of dx and dy that you need for move_pupil. The new_location
method will never move the pupil outside of the eyeball - it will always return
the location that is closest to point that is still inside the eyeball.
The eye.get_pupil_center() method returns the current center of the pupil. Use
that point, and the point you got back from the new_location method to figure out
where to move your pupil.
Test this out before proceeding!
putting it all together
Once all of the functions listed above are working, you can tie everything
together in your main function. are convinced this is working, add a
loop in main that allows the user to click 5 times. After each click, the
pupils should follow the mouse pointer. After the fifth click, the program
should display a message (such as "Click to exit") in the graphics window and
wait for one additional click before closing the window.
This video shows the final program in action:
Requirements
|
The code you submit for labs is expected to follow good style practices, and to meet one of the course standards, you’ll need to demonstrate good style on six or more of the lab assignments across the semester. To meet the good style expectations, you should:
|
Your program should meet the following requirements:
-
Your program should implement the
get_positive_integerfunction with the same number of parameters and behavior described above. -
Your program should implement the
create_circlesfunction with the same number of parameters and behavior described above. You should also replace the Circle objects with Eyeball objects in this function as described here. -
Your program should implement the
color_circlefunction with the same number of parameters and behavior described above. -
Your program should implement the
move_eyesfunction with the same number of parameters and behavior described above. -
Your final
mainfunction should:-
prompt the user for the number of circles and the diameter of the circles (validating the input)
-
open a graphics window with the appropriate size
-
create a grid of eyeballs with the given diameter
-
color each eyeball with a random color. (You can do this in the
create_circlesfunction or inmain.) -
allow the user to click 5 times in the graphics window
-
after each click, move the pupils of the eyeballs to follow the mouse pointer
-
Autograder
There is no autograder for Lab 6! The autograder doesn’t work well with graphics. You should be sure to test your functions as you go to make sure that they are working correctly and following the specifications provided.
(Optional) Extra challenges
If you’d like to make this more interesting, here are some fun
things to try. These are optional, but if you’re interested in trying
them, copy your eyes.py file to a new file named eyes_fun.py and
add some (or all) of these fun things to your eyes_fun.py file.
-
Instead of having the user click 5 times, let the user click as many times as they want. However, you’ll still want the user to tell your program that they are done clicking. Add a special location on the screen that the user can click in to make the program end. For example, you can make your graphics window a little taller and add a "Click to exit" message at the bottom of the window. When the user clicks on that message, the program should end. You’ll have to figure out how to detect when the user clicks on that message.
-
Instead of creating a grid of eyeballs, allow the user to click in the window to create a new eyeball at that location. Accumulate all the eyeballs in a list. Either create a fixed number of eyeballs (e.g. 8 eyes) or allow the user to click on a message to stop creating new eyeballs. After the user stops creating new eyeballs, allow the user to click to move the pupils of the eyeballs to follow the mouse pointer.
-
Instead of placing the eyeballs on a blank background, load an image as your background and place the eyeballs on top of that image. Read the documentation for the Image class to learn how to load an image and place it in your graphics window. You can use any image you’d like, but it must be saved in
.gifformat. The image used in the video below is located on the CS lab machines here:/data/cs21/Ernest_Kilbourne_and_Family.gif(source).
Answer the Questionnaire
After each lab, please complete the short Google Forms questionnaire. Please select the right lab number (Lab 06) from the dropdown menu on the first question.
Once you’re done with that, you should run handin21 again.
Submitting lab assignments
Remember to run handin21 to turn in your lab files! You may run handin21
as many times as you want. Each time it will turn in any new work. We
recommend running handin21 after you complete each program or after you
complete significant work on any one program.
Logging out
When you’re done working in the lab, you should log out of the computer you’re using.
First quit any applications you are running, including your vscode editor, the browser and the
terminal. Then click on the logout icon ( or
or
 ) and choose "log out".
If you plan to leave the lab for just a few minutes, you do not need to log
out. It is, however, a good idea to lock your machine while you are gone. You
can lock your screen by clicking on the lock  icon.
PLEASE do not leave a session locked for a long period of time. Power may go
out, someone might reboot the machine, etc. You don’t want to lose any work!